Tuesday, April 30, 2019
Monday, April 29, 2019
Sunday, April 28, 2019
Saturday, April 27, 2019
Friday, April 26, 2019
Thursday, April 25, 2019
Wednesday, April 24, 2019
15 Ready-Made Ionic 3 App Templates
With Ionic, creating a high-performance, cross-platform mobile app is as easy as creating a website. Seasoned web developers, or anyone with an intimate knowledge of JavaScript can easily get up and running with Ionic. Its ability to create native apps on Android, iOS, and more with a JS framework and a single codebase make it a breeze to pick up. I assure you, you'll take to it like a fish to water.
Building a feature-rich Ionic app with an elegant user interface, however, can be challenging—even more so if it is to look native on multiple platforms. Fortunately, by using a ready-made Ionic template, you can save substantial amounts of time and effort.
CodeCanyon is one of the largest online marketplaces for Ionic templates. No matter what your app's requirements are, there's a good chance that CodeCanyon has a template for it. In this article, I'm going to list 15 outstanding Ionic app templates you should consider using this year.
What Is An Ionic App Template?
Ionic templates work similar to front-end development themes and templates that you might have ran into using other platforms, such as WordPress themes. They consist of a series of files and assets that help to bridge the gap between the framework itself and the finished product that you are seeking.
There are a ton of benefits to using an Ionic App Template, namely:
- starting with a large portion of your project already completed
- documented, professional code
- reduced project cost
- an existing structure to build the remainder of your project on
Pairing these benefits with the already powerful framework provided by Ionic gives developers a huge leg up when it comes to app development. Small development teams and those with limited resources will find them especially helpful.
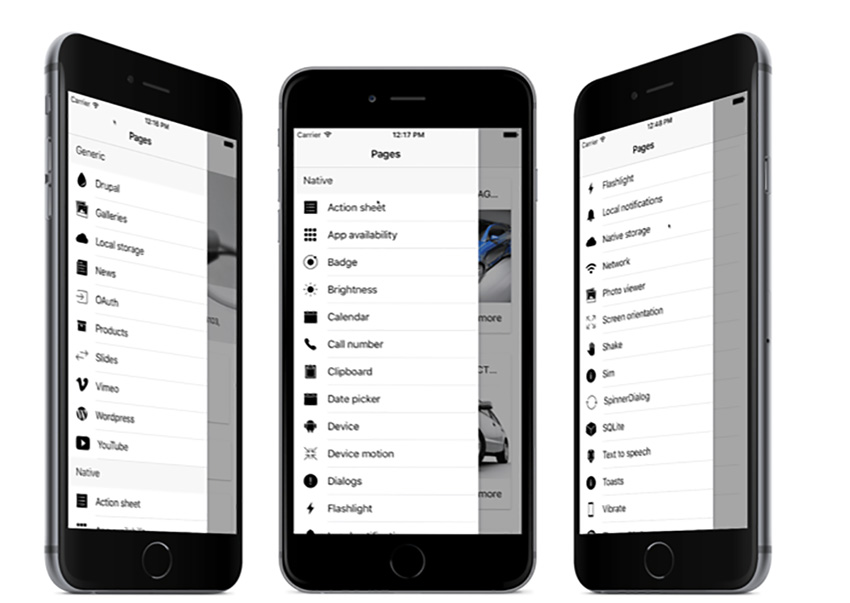
1. Ionic 3 UI Theme

This template, developed by elite author CreativeForm, is ideal for Ionic developers who want to create beautiful apps but spend less time designing them. It offers just one theme that includes over 70 commonly used screens and more than 45 finished layouts ready to use. It also has a well-organized Sass file containing dozens of variables you can change to further customize your app's looks.
2. IonFullApp
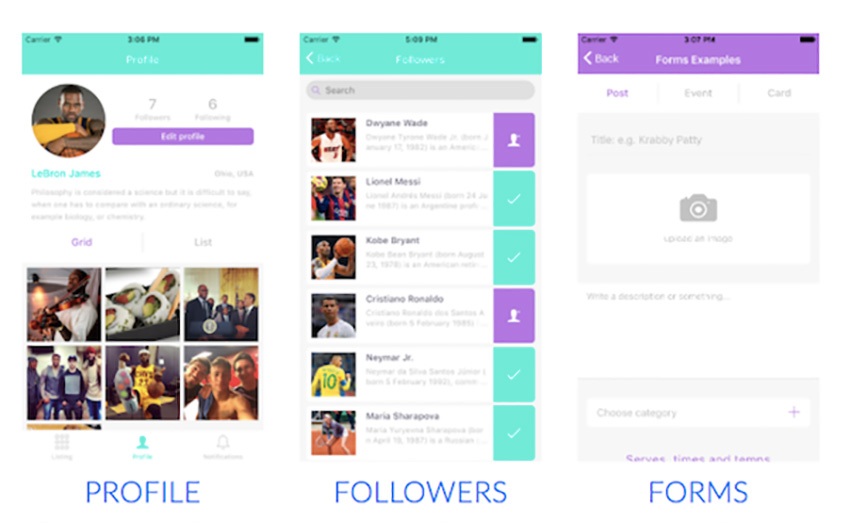
IonFullApp, developed by elite author IonicThemes, is a multipurpose app template which comes in three different versions: basic, pro, and elite. These three versions offer from 30 to 38 screens and different combinations of components to suit a variety of needs. Some of the best features offered are Google Maps integration, social login, geolocation, a video player, and an image slider.
3. Ionic 3 App for WooCommerce
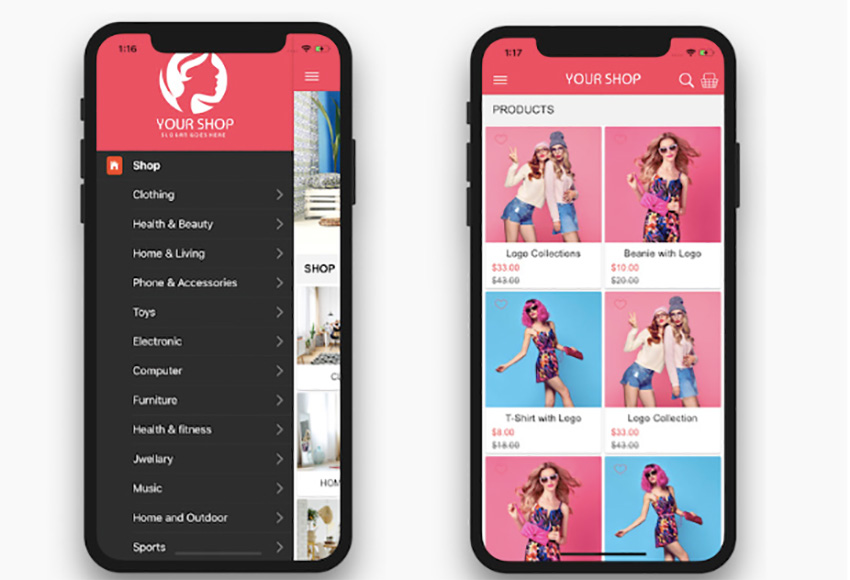
Ionic 3 App for WooCommerce, developed by hakeemnala, is a template you should definitely consider using if you are creating an e-commerce app. It allows you to quickly create a beautiful app that can connect to your WooCommerce website.
This integration allows you to pull in settings, product, and more. This cohesiveness across platforms provides a seamless experience, and makes it a breeze for your customers to shop your brand anywhere, without feeling out of place.
This app template supports all major payment methods, has auto-updating shipping information, and a global search that make it as versatile as it is stunning.
4. Ionic 3 Restaurant App

If you’re looking for an intuitive, easy to set up restaurant app then check out this Ionic 3 Restaurant App template, developed by Lrandom. The app is well structured and offers useful features that will enhance any restaurant’s presence.
Food categories, fully fleshed-out product listings, adjustable pricing, current promotions, a powerful search, and an easily navigable cart will help your app to stand out. In addition, the source code for the app comes with an admin panel CMS that will help you build your app faster.
5. IonChat v3
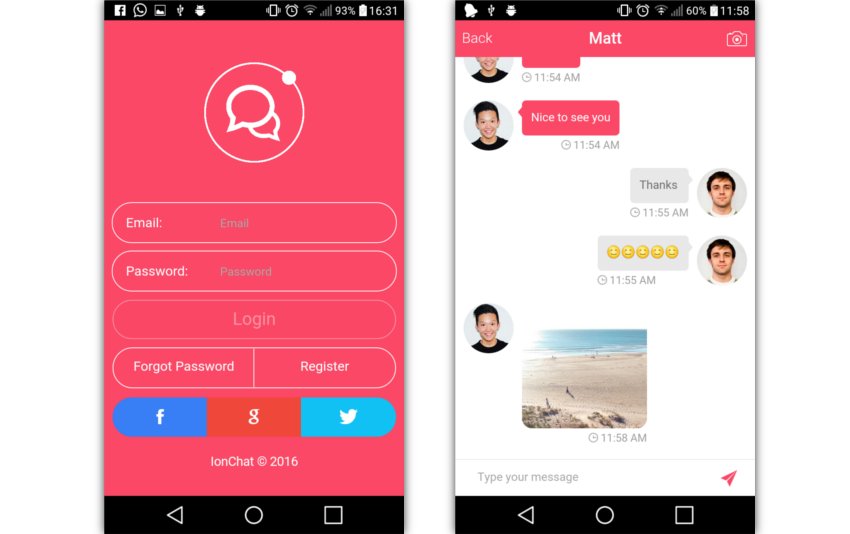
IonChat v3, as its name suggests, is a template that lets you build cross-platform instant messaging apps. Developed by IonCoder, this is a large template offering dozens of powerful features, such as support for group conversations, social login, and friend management.
Not only is this template easily customizable, the apps you create with it will be powered by Firebase, a cloud-based platform that's owned by Google. That means you can use the Firebase console to manage your app data.
6. Ionic Framework App

If you are looking for a modern template with dozens of beautiful pages and a wide variety of useful features, this template, created by gtsopour, is for you. Built with Ionic 3, it is very modular and extremely easy to extend. In fact, it has over 20 modules and over 35 components!
The apps you create with this template will be able to communicate with your WordPress blog using its REST API. They'll also be able to display charts, YouTube videos, Google maps, and RSS feeds. Another impressive fact about the template is that it offers a barcode scanner module, which you can use to scan several types of barcodes.
7. Restaurant Ionic 3

Restaurant Ionic 3, developed by appseed, is a template that's bound to entice any restaurant owner. Apps created with it are feature-packed, and they have intuitive user interfaces that let customers view menus, place customized orders, read about special offers, and choose delivery methods. They'll also allow you to communicate with your customers using push notifications.
Setting this template up is a breeze. So is customizing it, because you can dramatically change the looks of your app by simply selecting one of the several beautiful Material Design-inspired color themes it offers.
8. Ionium 2
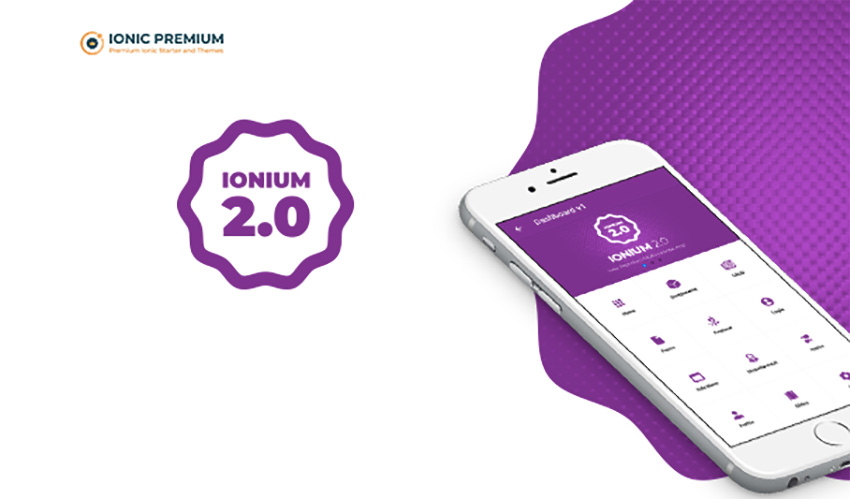
Ionium 2 is an update of the popular multipurpose app template Ionium, created by ionicpremium. Built with Ionic 3, this multipurpose app template is a great choice for almost any type of app. e-Commerce, hotel booking, news readers, and social media apps will all find useful features to speed along development. The template allows you to quickly create CRUD-oriented apps, which support both local and remote storage.
Using Sass and Material Design components, animations, and gestures, you can be sure that the apps you create with Ionium 2 will look very modern and polished.
9. Ionic 3 Toolkit
The Ionic 3 Toolkit app template developed by appseed certainly lives up to its promise of being a toolkit. This template offers a wide range of features paired with a modular structure. With these two selling points in tandem, you can easily and quickly build a variety of different apps, all from the same template.
It also allows you to collect data from your WordPress, Drupal, YouTube, Vimeo, Instagram and other social media accounts and add them to the content of your app as needed. Furthermore, the template makes it easy to customise the template’s default styles by changing the predefined colours or the default value of the Sass.
10. Firetask

Apps with social features tend to be more successful on both Google Play and Apple's App Store. If you’re looking for an Ionic 3 app template to build a social media app for yourself or a client, look no further than Firetask by developer Stewan_io. Firetask is a social media app template that has everything you need to get started. It offers screens that allow users to sign up, sign in, create posts, write comments, browse through trending topics, and much more.
11. WooCommerce Mobile App
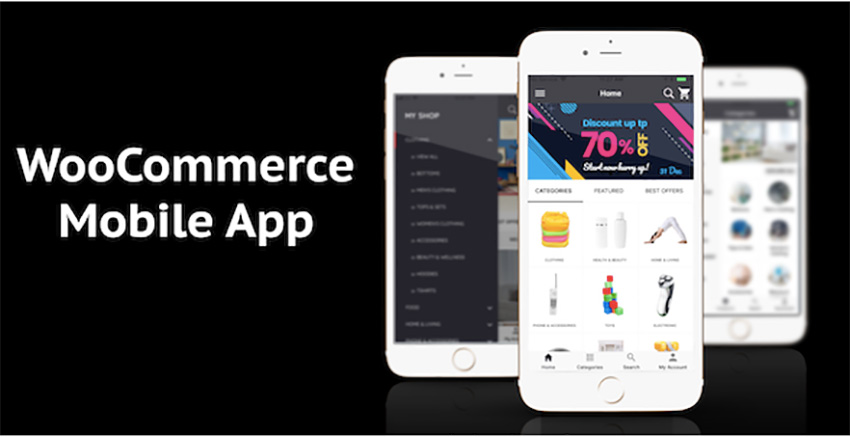
WooCommerce Mobile App template, by hakeemnala, is a best selling template and is one of the best-rated in its category.
The app allows clients to connect to their WooCommerce store and sync categories and products in real time. Once customers register and log in, they can shop, pay for items, view order status and order history, and manage their account. Useful features include a featured products page, categories, a powerful search and filter, list and grid views, as well as ratings and reviews.
Being able to tie into an existing CMS reduces the overall work that needs to be completed, both by developers and by the eventual end user.
12. Hotel Room Reservation

For those looking to build a portal for an existing hotel, or to recreate something similar to Airbnb, FunnyIonic’s Hotel Room Reservation can get you started. The template helps developers to create an app that will allow end users to search, view and book hotels in their targeted location. The app is integrated with Google Maps and PayPal for user convenience.
13. Conference Ionic 3
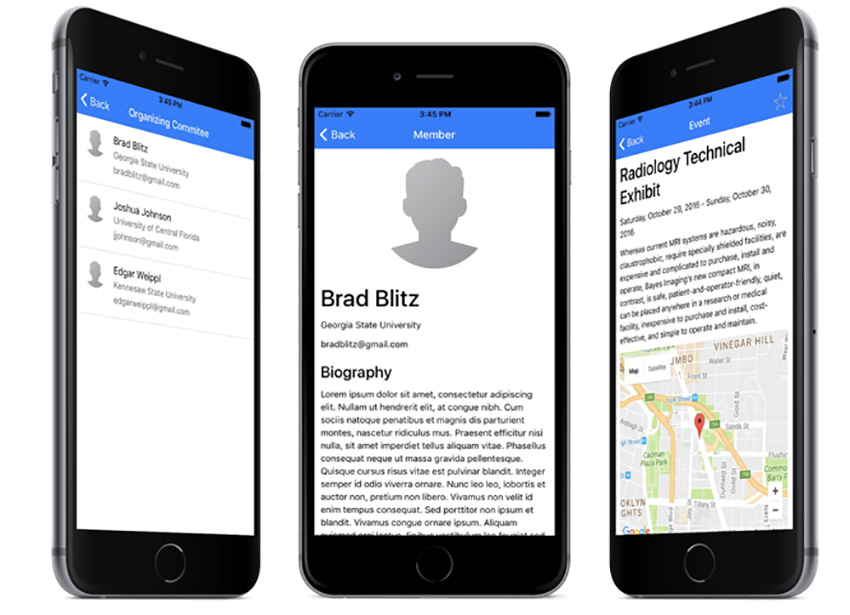
Another app template by the prolific developer appseed, Conference Ionic 3 app template offers something unique in the app template arena. The app is aimed at conference organisers who want to create an app for attendees that provides all the information related to a conference in one handy app.
It allows attendees to view conference information such as location, exhibition halls, speakers, schedules, sponsors, committees, and much more. Users can access speaker profiles, as well as create their own personal schedules, which is helpful for anyone that’s trying to make sense of a multi-track conference.
14. Ionic e-Commerce

While we’ve covered a few specific e-commerce templates so far, Ionic e-Commerce by vectorcoder is a different beast. Its focus on widely useable features have made it an extremely popular starting point for those looking to sell online. While it operates well as a template, its real power is in its toolkit approach, providing everything you might need for many types of e-commerce apps.
Ionic e-Commerce offers a variety of ready-made e-commerce pages to create your mobile app and provides a comprehensive CMS to manage your store. Some key features include interactive themes, social share, product filters, sorting and search, inventory management, and much more. The developer provides full support and will customise and install the app for you for a fee.
15. Nearme

Nearme is a location-based app template by developer quanlabs. The Ionic 3 template helps developers build an app that will identify supermarkets, restaurants, places of interest, gas stations, etc. that are near the user. The template comes with an admin panel that allows developers to send push notifications to users and manage categories, places, deals, slider images, users, reviews, etc.
Conclusion
These 15 premium Ionic 3 templates will give you a huge leg up in your app development process. But don’t limit yourself to just the ones on this list!
These are just a small selection of the hundreds of Ionic 3 app templates we have available at CodeCanyon. With so many app templates in existence, you’re sure to find one that’s helpful, no matter how niche your project.
And if you want to improve your skills in building Ionic apps and templates, then check out some of the ever-so-useful Ionic tutorials we have on offer!
 Ionic10 Best Ionic 3 App Templates
 IonicBest Ionic App Templates of 2019
 IonicIonic From Scratch: Getting Started With Ionic
 IonicIonic From Scratch: What Is Ionic?

Tuesday, April 23, 2019
Monday, April 22, 2019
Sunday, April 21, 2019
Saturday, April 20, 2019
Friday, April 19, 2019
Thursday, April 18, 2019
Form Input Validation Using Only HTML5 and Regex
Validation of form input is something that should be taken seriously. With luck, nothing worse than garbage data will be submitted to a site which uses data from forms without proper validation. However, there also a chance that hackers will be able to compromise the private data of users who trusted you with their information.
Since validation is so important, it makes sense that there are tools and libraries to validate and sanitize data on both the front-end and the back-end.
In this tutorial, our focus will be on using the built-in features of HTML5 to validate different kinds of input without relying on any external libraries. Obviously, you should not stop at just HTML5-based validation, but this would be a good start to make forms on website more secure.
The Form Input Element
Whenever you want to get some kind of input from your users, you will most likely use the HTML input element. It doesn't matter if you want to know their first name, last name, email address, the city they currently live in, their phone number or their favorite sports team. The input element is a very user-friendly way of getting information from our visitors.
However, some malicious users would like to take advantage of the fact that they can enter almost any kind of string into an input element and submit a form. Similarly, there might be some users who just didn't know that they are entering the data in wrong format.
Both these problems can be solved very easily by using some HTML5 attributes with your form elements.
The Type Attribute
The type attribute will determine what kind of input in considered valid for a given element. When no value is specified for the type attribute, the type is set to text by default. This basically means that all kinds of text inputs will be considered valid for that particular element. This is fine when you want users to input their names. However, when you want them to enter their email address or numbers like their age and weight, it is much better to set the value of type attribute to something appropriate.
Here are a couple of values that you can choose from:
email: This will ask users to enter their email address in a valid format. For instance, they can't just write myemail.com or something@ or @something.com. They will have to enter a value similar to myemail@domain.tld. Of course, they can still enter non-existent, emails but that is a different issue!number: This will make sure that only numbers are considered valid input. For example, when you ask someone their age in a form, they won't be able to submit potato or thirty six as input. They will have to write an actual number like 36 or 15.url: You can set the type attribute tourlif you want users to enter a valid URL into the input element. This will prevent them from entering something like tutsplus. However, tutsplus.com will also be considered invalid—users will have to enter a full URL like https://tutsplus.com.tel: Using this value is not as helpful as others because the format for a telephone numbers varies all over the world. There is just no standard pattern that browsers can match against the input to determine if the number is valid. However, setting the type totelcan be helpful at a later stage when you do your own custom validation.
There are many other values for the type attribute which can be used to specify the type of input that is valid for a particular element. You can read about all these values on the Input element reference page on MDN.
The following CodePen demo shows how we can use the type attribute to control what is permitted in different input fields.
The Minimum and Maximum Length Attributes
One more way to restrict what passes as valid input for an element is to use the minlength and maxlength attributes. These set the minimum and maximum number of characters that need to be entered in an input element to make it valid.
The right values for both these attributes will vary on a case-by-case basis. For instance, some websites might want a username to be between 4 to 15 characters long while others might limit the maximum length to 12. Similarly, people in some countries will have unusually short or long names compared to others.
Using Regex for Form Validation
Setting a type attribute value certainly helps us in limiting what passes as valid input. However, you can go even further and specify a pattern that a username or email address has to follow in order to be considered valid.
Lets say you want to make sure that usernames are only alphanumeric, this can be done easily with the help of pattern attribute. You just have to set its value to a regex expression which will act as a guideline to determine which input is valid and which is not.
Here are some examples of using regex with the pattern attribute.
<input type="text" id="uname" name="uname" pattern="[a-zA-Z0-9]+" minlength="4" maxlength="10">
The pattern above will keep checking that all the usernames only contain characters from a-z, A-Z or 0-9. For example, monty42, 42monty, MON42ty and mon42ty are all valid usernames in this case but monty_42 is invalid.
The minlength and maxlength attributes will make sure that the username is not too small or too big.
If you want the usernames to begin with a particular character like an underscore, you can simply add it to the front of the pattern.
<input type="text" id="uname" name="uname" pattern="_[a-zA-Z0-9]+" minlength="4" maxlength="10">
Now, every username which does not begin with _ and contains any characters besides a-z, A-Z or 0-9 after that will be considered invalid.
I hope this helps in clarifying how we can use the pattern attribute and some Regex to limit what is considered valid input even when the type attribute is set to text.
Advanced Validation With Regex Patterns
You can also use the pattern attribute along with other types of input elements like email and url to restrict what is considered valid. For example, lets say you only want users to enter a URL which is subdomain of tutsplus.com. You can simply set the value of pattern attribute to https://.*\.tutsplus.com. Now, any input like https://google.com or https://envato.com will be considered invalid. Even, https://code.tutsplus.com would be invalid because the valid URL is supposed to start with https://.
The same thing can be done with emails, if you want the emails to end with something specific, you can simply use the pattern attribute for that. Here is an example:
<input type="email" id="email" pattern=".+@tutsplus.com|.+@envato.com">
If the above input element was used in a form, users will only be able to enter email address which end with tutsplus.com or envato.com. This means that hi@gmail.com or howdy@something.com would be invalid.
Check out our JavaScript Regex Cheatsheet for more examples of regular expressions and tips on how to use them.
 Regular ExpressionsJavaScript Regex Cheat Sheet
Required Fields and Placeholder Text
While the required and placeholder attributes are not necessarily related to validation, they can be used to improve the user experience when someone is filling out a form.
Not everyone is willing to share their information with a website. If a form contains ten different input elements but only 5 or 6 of them are required for what you are want to do and the rest are to get extra information, it is a good idea to let the users know.
You can mark certain input fields as required using the required attribute while leaving the optional fields untouched. This will let users know the absolute minimum information they have to provide when filling out a form. It might also increase the number of people who fill out a form because they will know beforehand that filling out all the fields is not absolutely necessary.
The placeholder attribute also goes a long way when it comes to making a form more user friendly. For example, if you don't let users know that they have to enter URLs which begin with https:// and are subdomains of tutsplus.com, they might just give up after unsuccessfully filing up the URL field with something.com or code.tutsplus.com.
In the following example, we have used the pattern, required and placeholder attributes for more granular control over validation and better user experience.
<form>
  <label for="name">Name: *</label>
  <input type="text" id="name" name="name" pattern="[a-zA-Z]+" placeholder="Monty" required>
  <br>
  <label for="name">Company Email Address: *</label>
  <input type="email" id="email" name="email" placeholder="joe@company.com" pattern=".+@company.com" required>
  <br>
  <label for="name">Age: </label>
  <input type="number" id="age" name="age" min="10" max="80" placeholder="30">
  <br>
  <label for="name">Favorite Tuts+ Website: *</label>
  <input type="url" id="website" name="website" pattern="https://.*\.tutsplus.com" placeholder="https://code.tutsplus.com" required>
</form>
Final Thoughts
In this tutorial, we learned how to add basic validation to our forms by simply using HTML and Regex. Using the right value for type attribute will force users to enter information in an input field in a certain format. Use of regular expressions with the pattern attribute can help us keep the valid input more constrained.
Finally, we learned how to use the placeholder attribute to make sure that the forms we create are user friendly and people filling out information don't get frustrated because they don't know the input format which we consider valid.
Form validation certainly does not end here. In our next tutorial, you will learn about different form events in jQuery and how to validate forms using a jQuery plugin.
 JavaScriptBest JavaScript Forms of 2019

Wednesday, April 17, 2019
Tuesday, April 16, 2019
Monday, April 15, 2019
Quick Tip: Create a Very Simple Parallax Effect With CSS & JavaScript
In this quick tip tutorial we’ll learn to add a simple yet useful parallax scrolling effect to a hero image. To achieve it we’ll use a bit of JavaScript code, but keep in mind that you can create pure CSS parallax websites by combining 3D transforms.
Here’s the page that we're going to build. Scroll down!
Let’s build it in three fundamental steps: beginning with the markup, then the styling, then the behavioral JavaScript.
1. Begin With the HTML Markup
The page markup consists of two sections. The first section holds the hero image and its child elements, while the second section contains the page’s main content:
<section class="banner" data-direction="down" data-speed="0.6">
  <h1 class="banner-title" data-direction="up" data-speed="0.25">...</h1>
  <p class="banner-subtitle" data-direction="up" data-speed="0.35">...</p>
  <img class="skiing" src="IMG_SRC" alt="" data-direction="up" data-speed="0.85">
</section>

<section class="content">
  <div class="container">...</div>
</section>
Notice the data-direction and data-speed custom attributes assigned to the elements of the first section. These elements are parallax elements and the values of their attributes will determine their behavior during the parallax scrolling. More on that in a minute!
2. Add the CSS
Next we’ll specify a few CSS rules for our page. Nothing really important, just some basic stuff that will enhance the page layout:
body {
  font: 20px/1.6 sans-serif;
}

.banner {
  position: relative;
  height: 100vh;
  background: #ededed url(IMG_SRC) no-repeat center/cover;
  display: flex;
  flex-direction: column;
  justify-content: center;
  align-items: center;
}

.banner > *:not(.skiing) {
  font-weight: 900;
  letter-spacing: -0.05em;
  padding: 5px 15px;
  background: #ffc844;
}

.banner-title {
  font-size: 3em;
  margin-bottom: -0.5em;
  transform: rotate(-6deg);
}

.banner-subtitle {
  font-size: 1.5em;
  box-shadow: -15px -15px 15px rgba(0, 0, 0, 0.07);
  transform: rotate(-3deg);
}

.skiing {
  position: absolute;
  right: 40px;
  bottom: 20px;
  max-width: 150px;
}

.content {
  position: relative;
  padding: 20px 0;
  background: white;
}

.container {
  max-width: 1100px;
  padding: 0 15px;
  margin: 0 auto;
}

.content p + p {
  margin-top: 25px;
}

@media screen and (max-width: 500px) {
  body {
    font-size: 14px;
  }

  .skiing {
    right: 20px;
    max-width: 100px;
  }
}
3. Apply the JavaScript
To create the parallax effect, we’ll listen to the scroll event.
Each time the page is scrolled, we loop through the parallax elements and do the following things:
- We retrieve the value of their
data-speedattribute and multiply it by the number of pixels that the document is scrolled vertically. That gives us the speed at which each of the parallax elements runs. So for example,data-speed = 1means that an element will move as quickly as the page content. On the other hand, an element withdata-speed = 0.5will move 50% slower than the page scrolling. - We retrieve the value of their
data-directionattribute. This attribute specifies where the parallax elements will move as the page gets scrolled. Possible values areupanddown. So for example,data-direction = "up"means that an element will move upwards. In our case, everything but the image will move in an upward direction. - Based on their attribute values, we use the
translate3d()function to move the elements either upwards or downwards.
Here’s the corresponding JavaScript code:
const parallaxEls = document.querySelectorAll("[data-speed]");

window.addEventListener("scroll", scrollHandler);

function scrollHandler() {
  for (const parallaxEl of parallaxEls) {
    const direction = parallaxEl.dataset.direction == "up" ? "-" : "";
    const transformY = this.pageYOffset * parallaxEl.dataset.speed;
    if (parallaxEl.classList.contains("banner-title")) {
      parallaxEl.style.transform = `translate3d(0,${direction}${transformY}px,0) rotate(-6deg)`;
    } else if (parallaxEl.classList.contains("banner-subtitle")) {
      parallaxEl.style.transform = `translate3d(0,${direction}${transformY}px,0) rotate(-3deg)`;
    } else {
      parallaxEl.style.transform = `translate3d(0,${direction}${transformY}px,0)`;
    }
  }
}
Conclusion
That’s it! In this quick tip, we managed to create a really simple parallax scrolling effect with just a few lines of JavaScript. Again, as already discussed, this is a basic demo and might not be suitable for all parallax cases.
Parallax effects can certainly add character to your website, but the browser may have to perform “expensive” tasks to build them, using up resources and impeding performance. Be sure to take performance into account during your parallax implementations.
However, if you want to create a more advanced parallax experience, you can have a look at some JavaScript libraries which exist out there like parallax.js.
As always, thanks for reading!
More Parallax Goodness on Tuts+
 Web DesignWhat Is Parallax Scrolling?
 WordPressHow to Make a Simple One Page Website: From a Parallax WordPress Theme
 InspirationWeb Design Inspiration: Scrollin’, Scrollin’, Scrollin’
