Did you know your camera has built-in, adjustable profiles? In this article we'll take a look at how you can find and use profiles on your camera, plus how to take a photograph in more than one format to give yourself extra options. You'll learn how to set a custom creative colour profile in your camera, and why this often-overlooked feature is actually very useful.
In the next tutorial, we'll look at how you can use the profile-adjusted JPEG from this method to replicate the look of the in-camera profile, and then how to create your own version of that so that you can quickly apply it to RAW your photographs too.
How to Use Picture Styles in Your Camera to Create a Look
Your camera has several built-in colour profiles. These profiles to help you see how your image will look later when processed on a computer and to let you process your images right in the camera itself.
RAW or JPEG?
Recording your images in raw image format saves you all the available infomation, and the files have lot of flexibility in post-production. The problem is that RAW photos look very flat by nature, and it can be hard to imagine just by looking at one how it might turn out once edited. They need to have a colour profile applied to make them look realistic.
JPEGs don't have this problem; they have a human-perceivable look "baked in" from the start, and you can view them on any computer without needing special software. The downside of this format is that the images have less information and are less flexible in post-production.
Recording Both RAW and JPEG
However, if you record both RAW and JPEG in your camera you can get the best out of both! Setting your camera to RAW+JPEG mode will save a RAW (untouched) version of your photograph, great for editing, and it will also save a JPEG with your chosen look applied.
Even though you see the profile effect on your picture on the back of the camera, it won’t ‘bake in’ the look into your RAW file so, if you choose, on the computer your RAW will still look as it would without the profile. Your JPEG, on the other hand, will have the look applied, which is great for sharing.
Pre-visualization
Being able to see the way a setting changes your image on the back of your camera is very useful, but getting to know the relationship between what you see on the camera screen and what you see on the computer screen will help you better understand of the limits of your particular camera equipment and how to get the most from it.
Activating Profiles or In-Camera LUTs on Your Camera
The different camera manufacturers call their colour presets different things. On Nikon, it's Picture Control. On Fuji it's called Film Simulation. Canon calls them Picture Styles. Pentax, Panasonic and Olympus each have their own versions.


Let's take Nikon as an example. In most Nikon cameras you’ll find the profile options in your Shooting Menu > Select Picture Control. You’ll have the choice of:
- Standard: A balanced image, good for photographing most subjects including regular quick snapshots.
- Neutral: Closest to how your scene looks as you see it, reproducing the colours as accurately as possible without enhancing them. Nikon calls this a ‘more soothing’ version of Standard.
- Vivid: Emphasis on colour, contrast and sharpening for a ‘more glamorous overall impression.’ This profile works well for street photography or subjects with bright colours like flowers.
- Monochrome: Monochrome images like black and white, sepia or cyanotype. You have the extra option of adding a filter effect to monochrome, like yellow, orange, red or green (Y/O/R/G), plus you can modify colour tones with a choice of 10.
- Portrait: Portrait uses the same settings as Neutral but gives skin a more natural appearance so that people don’t look washed out.
- Landscape: If you have a newer camera than I do, you might also see Flat – which Nikon suggest using primarily for filming – and a variety of Optional Picture Controls which vary from model to model.
Extra Adjustments
You can adjust each of these presets to your own liking. The picture style setting from all manufacturers all work in basically the same way, too. You'll find options for adjusting colour (or hue), contrast, and saturation. Some cameras also have simulated film grain, and some even have parametric curves.


On Nikon, You can make extra adjustments to all of the profiles by going to Manage Picture Control (under Set Picture Control). Then just use the navigation pad to alter the sliders.


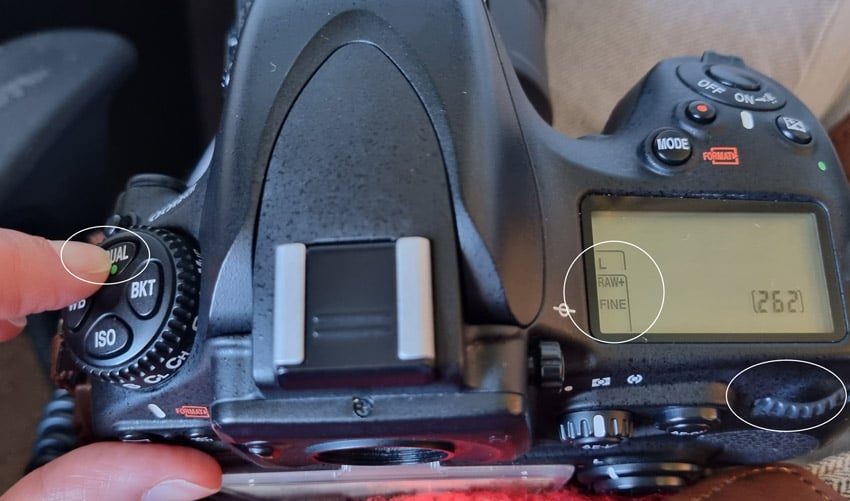
Setting Your Camera to RAW + JPEG
On the D800 this is a quick-change option, so I don’t need to go into the settings. Instead, press the Qual button and scroll the back wheel through the options. There are quite a few but RAW + FINE will take a RAW image plus a good quality JPEG. You can choose to downgrade the quality of the JPEG from FINE (if space is an issue). There's the option of a TIFF too, but we can ignore that one.
Using RAW + JPEG with a profile will give me a regular RAW image in case I want to process it later, but also a JPEG with the selected profile applied.


Making Your Photographs
Once you're set up you can photograph as you usually would. If you look through the camera's prism, everything will of course look normal, but if you use Live View you'll see it presented with your profile on. Likewise, if you take the photograph and then look at your thumbnails in-camera, you'll see them with the profile applied. In the case of shooting RAW plus JPEG, you'll only see one image (with the profile applied) but the information will say RAW + FINE so you know there's a RAW version of the photo there too.


So now I have a JPEG version of my image that looks like this:


I can either leave this as is, or if I feel like it needs a few tweaks I can use the Open as feature in Photoshop, to open the image in Adobe Camera RAW and make raster edits using my preferred software. You can also just do this right in PS or whatever you use.


Above, I've given the JPEG a very quick edit: added some contrast, a matte look to the shadows, and a new crop. For quickly sharing or publishing online that's probably enough.
While this was much quicker than starting from scratch if you're pushed for time, you'll still have a RAW copy, as below, in case you decide to go back and work on your image in a different way, or you want the colour version as a backup.


Summary
Profiles in-camera can be a great way to save time with editing, to increase your options going forwards, or even just to give you a better idea of how a 'flat' RAW image has the potential to look. If space isn't an issue then it's really useful to be able to take both a RAW image plus a JPEG with the profile applied, that way you can easily use the JPEG if it looks how you want it, or can replicate the look to your RAW image, and to future ones by turning it into a useable LUT or Preset. We'll take a look at how you can do that in the next tutorial.
More Great Photography Resources
-

Achieve Beautiful Landscape Photos with a Neutral Density Filter
-


Landscape Photography in Challenging Weather and Light: Quick Help Guide
-


How to Make Basic Adjustments to Photos With Adobe Camera Raw (for Free)
-

Shooting an Incredible Lit Landscape From Start to Finish
About This Page
About the Authors
Marie Gardiner is a writer and photographer from the North East of England. After gaining her degree in Film and Media, Marie worked in the media industry, before leaving to set up the business she runs with her partner: Lonely Tower Film & Media. As well as writing about visual practices like photography and video, Marie is also the author of Sunderland Industrial Giant (The History Press, 2017) and Secret Sunderland (Amberley Publishing 2019). Her photographic work focuses on landscapes and industrial ruins, particularly those of the North Pennines as she continues to work on her long-form documentary project Changing Landscapes.

No comments:
Post a Comment