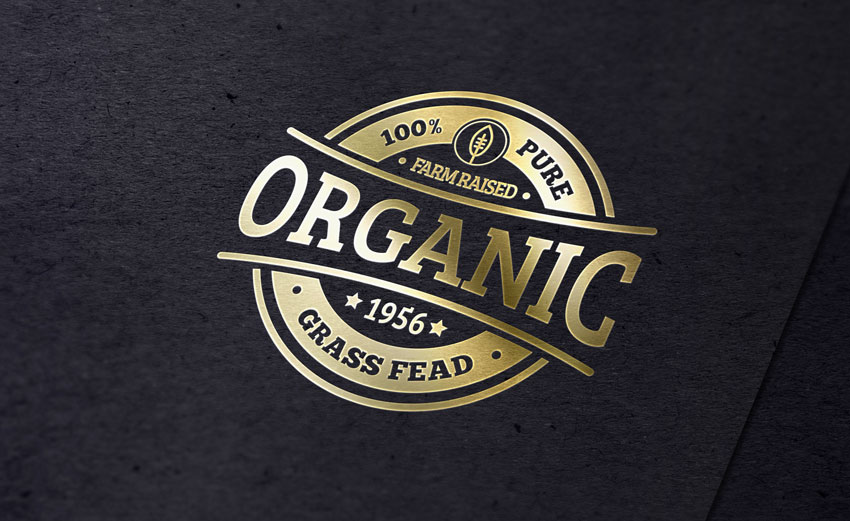
Learn the process to build a photorealistic logo presentation mockup, from the right perspective to multiple layer styles. And you'll get a final bonus tip about how to get a trendy rose gold logo! In this tutorial, I will guide you through the steps to create a photorealistic gold foil mockup with Adobe Photoshop.
We'll use a vector badge for the purpose, so you also need to have Adobe Illustrator installed on your computer.
But first, do you need to design a logo texture in Photoshop? Check out this simple, easy-to-use online logo maker. Hundreds of SMART logo templates to design your custom logo all in one place, Placeit.
If you're looking for a professional logo mockup PSD, why not try this photorealistic logo type mockup, available on Envato Elements.

Tutorial Assets
The following assets were used during the production of this tutorial to create gold foil text in Photoshop:
If you're looking for some alternative fonts to use, check out this list of fonts that are best suited for logo design:
1. How to Prepare the Paper Texture
Step 1
Download the paper texture and open it with Photoshop.
In the top menu, choose Layer > New > Layer From Background. Type the name "Paper Texture" and press OK.

Step 2
Open the Layer Style panel for the "Paper Texture" layer you just created and add a new Gradient Overlay effect. Set the options as shown in the image below:

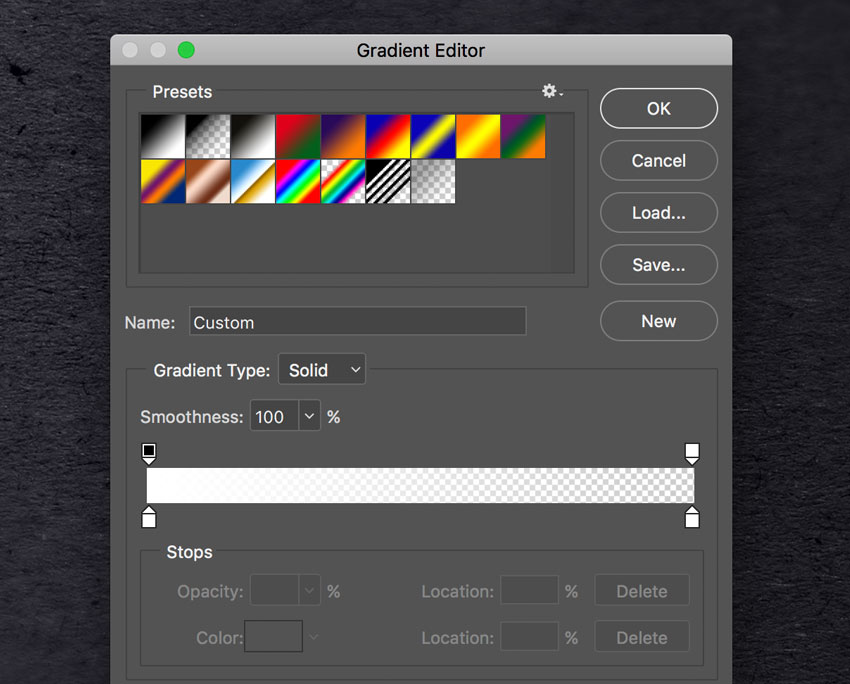
Click on the small gradient window to edit the gradient. Set the color for the two color stops to white, and set the left opacity stop to 100% and the right to 0%.

2. How to Prepare the Smart Object
Step 1
Download the Perspective Image and open it with Photoshop.

Choose, in the top menu, Select > All, and then choose Edit > Copy to copy the selection to the clipboard.
Go back to the paper texture document and choose, in the top menu, Edit > Paste to paste the perspective image over the paper texture.
Rename the layer by double-clicking directly on the layer's name in the Layers panel and changing it to "Perspective".
Step 2
Set the foreground color to blue (any color different from black is good).
Then choose the Rectangle Tool, move the cursor over the canvas, and click. You’ll open a small dialog box that allows you to enter precise dimensions for your new shape. Type 1099 x 791 px and click OK.
Rename the layer by double-clicking directly on the layer's name in the Layers panel and changing it to "Smart Object".
With the layer "Smart Object" selected, choose, in the top menu, Layer > Smart Object > Convert to Smart Object.
Now you should have a rectangle (no matter the color) over the perspective image:

What we're going to do now is distort the blue rectangle to fit the same shape of the black perspective rectangle.
Step 3
Choose Edit > Transform > Scale.
In this step it's extremely important that we transform the blue rectangle using only the handles at the corners of the bounding box.
Move the mouse cursor over the handle on the top right corner, press and hold the Command button on your keyboard (the cursor will change to a small white arrow), and then click and drag the handle until you touch the top-right corner of the black perspective square with your mouse cursor:

Keep dragging the handles to cover the whole black area with the blue rectangle:

Now you can remove the "Perspective" layer by selecting it in the Layers panel and choosing Layer > Delete > Layer.
3. How to Arrange the Badge With Illustrator
We need a logo or badge to complete the scene. This badge will be a prominent element that later will be stamped on the paper texture.
Fortunately, Envato Elements offers a wide range of high-quality badges and vector elements ready for use. Subscribe to unlock unlimited, high-quality badges, templates, photos and more for one monthly fee!
In this tutorial, we'll use a badge that comes from a great collection of 30 Vintage Style Badges and Logos:

Step 1
Open the vector .ai file with Adobe Illustrator. While you open the file, a window may pop up alerting you that the document uses fonts that are currently not available on your computer. No worries about that—all the fonts are free for use, and you can find a text file inside the folder with all the references and links to download each font.

For the purpose of this tutorial, I replaced the commercial fonts used in this badge with two free fonts:
Step 2
Once you're done with fonts, choose the Selection Tool (V).

Now select the "Organic" badge (or whatever badge you like). Copy the badge by going to Edit > Copy or pressing Command-C.
Create a new 350 x 350 px document in Adobe Illustrator. Now paste the badge you just copied by choosing Edit > Paste or pressing Command-V.
Step 3
With the Selection Tool (V), move the badge over the grey area, out of the white canvas.

If the badge is not selected, select it by clicking on it using the Selection Tool (V).
In the top menu, choose Object > Expand Appearance. Again, choose Object > Expand. A dialog window will appear; select Object and Fill and press OK:

Step 4
Locate the Pathfinder panel. If you can't see the panel, open it by choosing Window > Pathfinder. Click on the Trim button.

Step 5
To remove the white areas, choose the Magic Wand Tool:

Move the cursor over a white area and click to select all the white areas of the badge:

If you need to, magnify the canvas using the Zoom Tool (Z).
Now that all the white areas of the badge are selected, remove them by choosing, in the top menu, Edit > Cut.
Now the badge is ready to be imported into the Photoshop scene!
4. How to Include the Badge in the Scene
Step 1
We're still in the Adobe Illustrator workspace. Copy the badge by going to Edit > Copy or pressing Command-C.

Step 2
Go back to Photoshop, select the Smart Object from the Layers panel, and Double-click on the Smart Objects thumbnail.
When you edit a Smart Object, the source content is opened in a new window of Photoshop. Here you can make any changes you like and, once you're satisfied, all you need to do is save the file and the Photoshop Smart Object will be updated when you return to it.
In the Layers panel, deactivate the visibility for the blue rectangle layer, and paste the badge you just copied by choosing Edit > Paste or pressing Command-V.
From the dialog box, choose Smart Object and press OK.

Locate the top options bar and set the badge's position to 744 x 536 px and its dimension to 771% for both the Width and Height fields. When you're done, press Enter on your keyboard:

Step 3
Save the document by choosing File > Save or using the keyboard shortcut Command-S.
Go back to the main document, and you'll notice that the smart object is now updated with the last changes. The badge, in fact, has taken the perspective of the smart object.

5. How to Add the Gold Foil Effect
It's time to add some significant effects to the badge to give it a 3D logo mockup feel consistent with the scene.
Step 1
Select the "Smart Object" layer and set the Fill to 0%. Duplicate the "Smart Object" three times by going to Layer > New > Layer Via Copy.
Now look at the Layers panel, and you should be in a situation like this:

Rename the layers as shown in the image below, and then group the three effect layers:

From now on, when you need to replace the badge in your smart object, you can use this layer, by clicking on it and editing the content.
Step 2
Let's start adding some layer styles to the "Effect 1" layer in your gold logo mockup. Open the Layer Style panel and add a new Inner Shadow effect and set it as shown in the image below:

The color for the Blend Mode Color is White #ffffff.
Step 3
Add a new Color Overlay effect to your gold foil mockup and set it as shown in the image below:

The color for the Blend Mode Color is #967a2f.
Step 4
Add a new Gradient Overlay effect in the gold logo PSD and set it as shown in the image below:

Click on the small gradient window to edit the gradient. You're halfway there in your gold foil text in Photoshop.
Set the first color stop to Location 0% and Color to #343434, and then set the second color stop to Location 45% and Color to #343434.
Set the first opacity stop to Opacity 75% and Location 0%, and then set the second opacity stop to Opacity 0% and Location 45%.

Press OK to confirm and close the Layer Style panel for your gold foil in Photoshop.
Step 5
Now let's add some layer styles to the "Effect 2" layer. This will help you create a gold letter mockup. Open the Layer Style panel and add a new Gradient Overlay effect and set it as shown in the image below:

Click on the small gradient window to edit the gradient. Here you need to set up seven color stops as follows:
- 1# color stop: Color
#bdbbb6, Location 0% - 2# color stop: Color
#ffffff, Location 18% - 3# color stop: Color
#85816f, Location 33% - 4# color stop: Color
#ffffff, Location 46% - 5# color stop: Color
#716d54, Location 54% - 6# color stop: Color
#ffffff, Location 66% - 7# color stop: Color
#65625a, Location 82%

Step 6
Add a new Drop Shadow effect and set it as shown in the image below:

The color for the Blend Mode Color is White #ffffff.
Press OK to confirm and close the Layer Style panel.
Step 7
Finally add some layer style to the "Effect 3" layer in your logo texture in Photoshop. Open the Layer Style panel and add a new Gradient Overlay effect and set it as shown in the image below:

Click on the small gradient window to edit the gradient. Here you need to set up seven color stops as follows:

Click on the small gradient window to edit the gradient. Here you need to set up seven color stops as follows:
- 1# color stop: Color
#e9e7d9, Location 0% - 2# color stop: Color
#fffdf0, Location 20% - 3# color stop: Color
#8e8366, Location 61% - 4# color stop: Color
#9e9475, Location 67% - 5# color stop: Color
#cec7b2, Location 78% - 6# color stop: Color
#69604c, Location 95%
Step 8
Add a new Drop Shadow effect in the 3D logo mockup and set it as shown in the image below:

The color for the Blend Mode Color is Black #000000.
Press OK to confirm and close the Layer Style panel.
Your gold letter mockup is done!

6. Bonus Tip: How to Get the Rose Gold Tint
In case you haven’t noticed, rose gold is everywhere right now. From holiday decorations to engagement rings to the new iPhone, this pretty metallic is kicking traditional gold to the curb.
You don't need a rose gold logo template. If you'd like to apply this trendy tint to your new Gold Foil Logo Mockup and create a rose gold logo, just do the following:
Step 1
Select the "Effect" folder in the Layers panel, and then click on the small icon at the bottom of the panel and select Solid Color. See the image below for reference:

In the Color Picker dialog, set the HEX color to #eeb5ef and press OK to confirm.

Step 2
Right click on the Color Fill layer you just created and choose Create Clipping Mask.
Change the Blend Mode to Multiply and the Opacity to 90%.

Your Rose Gold Logo Mockup is ready!

Congratulations, Your Gold Logo PSD Is Done!
In this tutorial we learned how to create a realistic gold foil logo mockup with Adobe Photoshop!
I hope that you've enjoyed my tutorial about creating a gold letter mockup and learned something new. Please feel free to leave your comments, suggestions, and outcomes below.

Top 5 Logo Mockup PSD Templates From Envato Elements
Now that you've learned how to make your own gold foil Photoshop logo from scratch, let me tell you about the all-inclusive offer Envato Elements has for you:
You can save hours of work by signing up for Envato Elements. Get access to thousands of creative graphics and templates with unlimited use. From professional logo mockup PSD templates and 3D logo mockups to royalty-free audio tracks, images, videos, and more—all for one low monthly price.

To show you what I'm talking about, below you'll find some of our best logo type mockups and foil stamp mockups for Photoshop, so you can keep creating realistic logo textures in Photoshop in a fraction of the time.
1. Metallic Logo Mockups (PSD)

This metallic logo mockup PSD will showcase your designs on seven realistic metallic surfaces. All the mockups included in this pack have smart object layers that allow you to add your designs to your logo presentation mockup with a single click.
2. Gold Foil Mockup (PSD)

Ever wanted to quickly create realistic gold foil text in Photoshop? This gold foil Photoshop mockup is for you. To obtain a realistic logo presentation mockup, just place your design inside the smart layer and save the changes.
3. Silver Foil Logo Mockup (PSD)

On the other hand, if you prefer silver over gold, we can also help you with a foil stamp mockup. This silver foil logo mockup creates a polished and professional effect with any logo or badge. Just a few clicks and you'll get a fantastic logo presentation mockup!
4. Gold Logo Mockup (PSD)

This gold logo PSD features smart object layers, so you can quickly do your own gold letter mockup. This gold logo mockup also includes real backgrounds and textures for a professional foil stamp mockup.
5. Rose Gold Logo Wall Mockups (PSD)

As we've seen, rose gold logos are everywhere this season. This rose gold logo template is included in a set of eight logo mockup PSD templates for your design.
Each template contains eight types of overlay shadows (windows, natural shadow, palm tree shadows) and five backgrounds with different wall textures.
Don't miss out on this rose gold logo template—check out all the elements included in this set!
Discover More Logo Mockup PSD Templates
Looking for more logo textures in Photoshop? Check out the following content to learn more about logo type mockups and more:
 Product MockupHow to Create a Leather Stamp Logo Mockup in Adobe Photoshop
 Product MockupHow to Create a Rubber Stamp Logo Mockup in Adobe Photoshop
 Product MockupHow to Create a Pressed Paper Logo Mockup in Adobe Photoshop
 Branding25+ Logo and Branding Mockups
 Fonts40 Best Fonts for Making Monograms & Logo Designs in 2020
 Product Mockup20 T-Shirt Mockup PSD Templates (With Photorealistic Results)
Conclusion
We hope you've enjoyed our tutorial on how to create a gold foil Photoshop logo and our selection of logo type mockups. If you want more 3D logo mockups and foil stamp mockups, you can always browse our awesome library at Envato Elements!
No comments:
Post a Comment