In the first part of this tutorial we explored how to create and rig our custom character using Adobe Photoshop and Cartoon Animator. We also exported the project to After Effects, automatically reconstructing the scene structure and animation identically.
Now you will learn how to animate your own 2D characters with the help of Cartoon Animator, Adobe Photoshop and Adobe After Effects, using the strengths of each program.
What You'll Learn in This Character Animation Tutorial
- How to animate your custom character using pre-made animations in Cartoon Animator
- How to combine different animations together using the timeline
- How to import your project from Cartoon Animator to Adobe After Effects using the Cartoon Animator—AE Script
- How to improve your animation in Adobe After Effects using background layers, foreground objects, and smoother motions
What You'll Need
To follow along with this tutorial you will need a PSD editor. If you don't have Photoshop, try Affinity Photo, Krita, or Photopea. You'll also need your own version of Adobe After Effects and Cartoon Animator. You can download a free trial version for Cartoon Animator on the Reallusion Website.
You'll need a character to animate. If you don't have a character design already, Cartoon Animator has a content library with a good selection of stock characters you can alter. Character kits are also available for sale on Envato Market and with the Envato Elements subscription.
You will need a scene. We used the following graphic pack from Envato Elements, click on the link to download:
![night city](https://cms-assets.tutsplus.com/cdn-cgi/image/width=850/uploads/users/403/posts/36874/image-upload/animate_character_01.jpg)
![night city](https://cms-assets.tutsplus.com/cdn-cgi/image/width=630/uploads/users/403/posts/36874/image-upload/animate_character_01.jpg)
![night city](https://cms-assets.tutsplus.com/cdn-cgi/image/width=360/uploads/users/403/posts/36874/image-upload/animate_character_01.jpg)
1. How to Add Animations to Your Custom Character
Now that we have our custom character fully rigged and prepared, it's time to add some ready-made animations to it.
We'll start in Cartoon Animator. Make sure that the program is in Stage Mode. This is usually indicated on the bottom left of the screen. If you are not in Stage Mode just click on the Back Stage button located on the left tool bar.
![back stage button](https://cms-assets.tutsplus.com/cdn-cgi/image/width=850/uploads/users/403/posts/36874/image-upload/rig_character_36.jpg)
![back stage button](https://cms-assets.tutsplus.com/cdn-cgi/image/width=630/uploads/users/403/posts/36874/image-upload/rig_character_36.jpg)
![back stage button](https://cms-assets.tutsplus.com/cdn-cgi/image/width=360/uploads/users/403/posts/36874/image-upload/rig_character_36.jpg)
To add a ready-made animation to your fully rigged character, simply go to the Content Manager and then select the Animation tab to browse through the library of different animations you can use.
![content manager](https://cms-assets.tutsplus.com/cdn-cgi/image/width=850/uploads/users/403/posts/36874/image-upload/animate_character_02.jpg)
![content manager](https://cms-assets.tutsplus.com/cdn-cgi/image/width=630/uploads/users/403/posts/36874/image-upload/animate_character_02.jpg)
![content manager](https://cms-assets.tutsplus.com/cdn-cgi/image/width=360/uploads/users/403/posts/36874/image-upload/animate_character_02.jpg)
Next we need to navigate to the selection of animations that we are going to use for our character. The animations we're using in this example are found here: Animation Template > Motion > 1_G3 Human > _Turners_Female > Side
![side animations](https://cms-assets.tutsplus.com/cdn-cgi/image/width=850/uploads/users/403/posts/36874/image-upload/animate_character_03.jpg)
![side animations](https://cms-assets.tutsplus.com/cdn-cgi/image/width=630/uploads/users/403/posts/36874/image-upload/animate_character_03.jpg)
![side animations](https://cms-assets.tutsplus.com/cdn-cgi/image/width=360/uploads/users/403/posts/36874/image-upload/animate_character_03.jpg)
To add an animation to your character, simply use the mouse to click and drag the animation onto your rigged character. This will automatically start the animation on your character. Otherwise you can simply click on the play button at the bottom of the screen.
![animate character](https://cms-assets.tutsplus.com/cdn-cgi/image/width=850/uploads/users/403/posts/36874/image-upload/animate_character_04.jpg)
![animate character](https://cms-assets.tutsplus.com/cdn-cgi/image/width=630/uploads/users/403/posts/36874/image-upload/animate_character_04.jpg)
![animate character](https://cms-assets.tutsplus.com/cdn-cgi/image/width=360/uploads/users/403/posts/36874/image-upload/animate_character_04.jpg)
2. How to Use the Timeline
Now that we are familiar with the content manager and how to add animations to our custom character, let's combine multiple movements to create a complete animation. To do this we need to familiarise ourselves with the Timeline.
First we need to open up the timeline. To do this go to Window > Timeline (F3) which will open up the timeline editor. This is where we can edit the animation keys and animation clips for the character.
![timeline](https://cms-assets.tutsplus.com/cdn-cgi/image/width=850/uploads/users/403/posts/36874/image-upload/animate_character_05.jpg)
![timeline](https://cms-assets.tutsplus.com/cdn-cgi/image/width=630/uploads/users/403/posts/36874/image-upload/animate_character_05.jpg)
![timeline](https://cms-assets.tutsplus.com/cdn-cgi/image/width=360/uploads/users/403/posts/36874/image-upload/animate_character_05.jpg)
Located on the top left of the timeline is the Track Selector. Clicking on this button opens up a dropdown menu that allows you to show/hide any object that is in the scene.
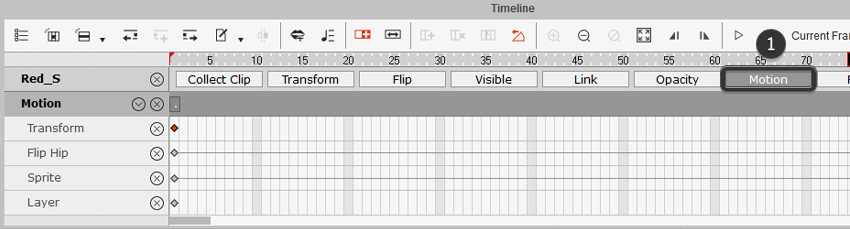
In the example below we have our custom character, named Red_S, and the original dummy we used in Part 1 of this tutorial, named Dummy_2 Font Side.
![track selector](https://cms-assets.tutsplus.com/cdn-cgi/image/width=850/uploads/users/403/posts/36874/image-upload/animate_character_06.jpg)
![track selector](https://cms-assets.tutsplus.com/cdn-cgi/image/width=630/uploads/users/403/posts/36874/image-upload/animate_character_06.jpg)
![track selector](https://cms-assets.tutsplus.com/cdn-cgi/image/width=360/uploads/users/403/posts/36874/image-upload/animate_character_06.jpg)
Upon selecting your character you will notice that there are some Track Buttons located to the right of the character name. These include:
- Collect Clip
- Transform
- Flip
- Visible
- Link
- Opacity
- Motion
- Face
Clicking on these will display the names of the names of the main tracks and sub-tracks including any keyframes associated with them.
In this tutorial we are going to add some motion to our character so click on the Motion track button to display the keyframes.
![motion](https://cms-assets.tutsplus.com/cdn-cgi/image/width=850/uploads/users/403/posts/36874/image-upload/animate_character_07.jpg)
![motion](https://cms-assets.tutsplus.com/cdn-cgi/image/width=630/uploads/users/403/posts/36874/image-upload/animate_character_07.jpg)
![motion](https://cms-assets.tutsplus.com/cdn-cgi/image/width=360/uploads/users/403/posts/36874/image-upload/animate_character_07.jpg)
At the very top of the timeline is the Toolbar. This contains lots of different options associated with the using the timeline. For this tutorial we will only be focusing on these areas:
- Project Star and End Frame Markers—these allow you to set a start and end frame for your animation.
- Play and Stop Buttons—these will allow you to play and pause the animation. You can also use the Space Bar on the keyboard to do this.
- Current Frame—This field will show you the current frame number on the timeline. You can also type in a number to jump to the target frame that you want, allowing you to go to a precise target location.
![timeline toolbar](https://cms-assets.tutsplus.com/cdn-cgi/image/width=850/uploads/users/403/posts/36874/image-upload/animate_character_08.jpg)
![timeline toolbar](https://cms-assets.tutsplus.com/cdn-cgi/image/width=630/uploads/users/403/posts/36874/image-upload/animate_character_08.jpg)
![timeline toolbar](https://cms-assets.tutsplus.com/cdn-cgi/image/width=360/uploads/users/403/posts/36874/image-upload/animate_character_08.jpg)
Time Scrubbing
Next we have the Time Scrub. This allows you to "scrub" or move your animation back and forth in time without having to play it. The Time Scrub consists of the following:
- Time Unit Bar—Use the mouse to drag the bar left and right to display the desired time frame within the timeline. You can also drag the right edge to change the size of the displayable range.
- Play Back and Export Range —Drag the two flags to decide the range for playing back your animation or exporting.
- Play Head—Use the mouse to drag and move to the desired time frame of the animation.
![time scrub](https://cms-assets.tutsplus.com/cdn-cgi/image/width=850/uploads/users/403/posts/36874/image-upload/animate_character_09.jpg)
![time scrub](https://cms-assets.tutsplus.com/cdn-cgi/image/width=630/uploads/users/403/posts/36874/image-upload/animate_character_09.jpg)
![time scrub](https://cms-assets.tutsplus.com/cdn-cgi/image/width=360/uploads/users/403/posts/36874/image-upload/animate_character_09.jpg)
3. How to Combine Multiple Animations with a Custom Character
In this section we will learn how to add multiple animations to the custom character. Select the Idle_Stand animation and then click and drag it into your custom character.
![click and drag idle](https://cms-assets.tutsplus.com/cdn-cgi/image/width=850/uploads/users/403/posts/36874/image-upload/animate_character_10.jpg)
![click and drag idle](https://cms-assets.tutsplus.com/cdn-cgi/image/width=630/uploads/users/403/posts/36874/image-upload/animate_character_10.jpg)
![click and drag idle](https://cms-assets.tutsplus.com/cdn-cgi/image/width=360/uploads/users/403/posts/36874/image-upload/animate_character_10.jpg)
You will then see the animation added automatically to your character. This will also be reflected in the timeline, where you can adjust it. Select it and drag it to the very start of the timeline so that the animation begins at the very start.
![idle in timeline](https://cms-assets.tutsplus.com/cdn-cgi/image/width=850/uploads/users/403/posts/36874/image-upload/animate_character_11.jpg)
![idle in timeline](https://cms-assets.tutsplus.com/cdn-cgi/image/width=630/uploads/users/403/posts/36874/image-upload/animate_character_11.jpg)
![idle in timeline](https://cms-assets.tutsplus.com/cdn-cgi/image/width=360/uploads/users/403/posts/36874/image-upload/animate_character_11.jpg)
Adjust Time Range
Expand the Time Unit Bar using the mouse to click and drag the right edge. This will display a greater range of the timeline which will allow you to see more animations as we add them to the character.
![expand timeline](https://cms-assets.tutsplus.com/cdn-cgi/image/width=850/uploads/users/403/posts/36874/image-upload/animate_character_12.jpg)
![expand timeline](https://cms-assets.tutsplus.com/cdn-cgi/image/width=630/uploads/users/403/posts/36874/image-upload/animate_character_12.jpg)
![expand timeline](https://cms-assets.tutsplus.com/cdn-cgi/image/width=360/uploads/users/403/posts/36874/image-upload/animate_character_12.jpg)
Add More Motions
Click and drag the Run(1S) animation to the custom character to add the second animation.
![apply run animation](https://cms-assets.tutsplus.com/cdn-cgi/image/width=850/uploads/users/403/posts/36874/image-upload/animate_character_13.jpg)
![apply run animation](https://cms-assets.tutsplus.com/cdn-cgi/image/width=630/uploads/users/403/posts/36874/image-upload/animate_character_13.jpg)
![apply run animation](https://cms-assets.tutsplus.com/cdn-cgi/image/width=360/uploads/users/403/posts/36874/image-upload/animate_character_13.jpg)
Make sure to move the Run(1S) animation close to the end of the previous animation (in this example the Idle_Stand animation). This will blend to two animations seamlessly together so that when the first animation finishes, the second one will start.
![connect the animations](https://cms-assets.tutsplus.com/cdn-cgi/image/width=850/uploads/users/403/posts/36874/image-upload/animate_character_14.jpg)
![connect the animations](https://cms-assets.tutsplus.com/cdn-cgi/image/width=630/uploads/users/403/posts/36874/image-upload/animate_character_14.jpg)
![connect the animations](https://cms-assets.tutsplus.com/cdn-cgi/image/width=360/uploads/users/403/posts/36874/image-upload/animate_character_14.jpg)
Now let's repeat the steps again by clicking and dragging a third animation to the custom character. For this tutorial, we are going to use the Run Fast(2L) animation.
![apply run fast animation](https://cms-assets.tutsplus.com/cdn-cgi/image/width=850/uploads/users/403/posts/36874/image-upload/animate_character_15.jpg)
![apply run fast animation](https://cms-assets.tutsplus.com/cdn-cgi/image/width=630/uploads/users/403/posts/36874/image-upload/animate_character_15.jpg)
![apply run fast animation](https://cms-assets.tutsplus.com/cdn-cgi/image/width=360/uploads/users/403/posts/36874/image-upload/animate_character_15.jpg)
Make sure that the new animation is next to the previous animation by clicking and dragging it into place.
For the Run Fast(2L) animation, we can also extend the duration by clicking and dragging the right edge and moving it to the right. This will make the character run animation last a little bit longer.
![adjust the run timeline](https://cms-assets.tutsplus.com/cdn-cgi/image/width=850/uploads/users/403/posts/36874/image-upload/animate_character_16.jpg)
![adjust the run timeline](https://cms-assets.tutsplus.com/cdn-cgi/image/width=630/uploads/users/403/posts/36874/image-upload/animate_character_16.jpg)
![adjust the run timeline](https://cms-assets.tutsplus.com/cdn-cgi/image/width=360/uploads/users/403/posts/36874/image-upload/animate_character_16.jpg)
For the next animation in the sequence, we will use the Run Fast & Roll animation. Click and drag it on to the character to apply it.
![apply roll animaiton](https://cms-assets.tutsplus.com/cdn-cgi/image/width=850/uploads/users/403/posts/36874/image-upload/animate_character_17.jpg)
![apply roll animaiton](https://cms-assets.tutsplus.com/cdn-cgi/image/width=630/uploads/users/403/posts/36874/image-upload/animate_character_17.jpg)
![apply roll animaiton](https://cms-assets.tutsplus.com/cdn-cgi/image/width=360/uploads/users/403/posts/36874/image-upload/animate_character_17.jpg)
Move the new animation so that it is connected to the previous animation.
![join animation](https://cms-assets.tutsplus.com/cdn-cgi/image/width=850/uploads/users/403/posts/36874/image-upload/animate_character_18.jpg)
![join animation](https://cms-assets.tutsplus.com/cdn-cgi/image/width=630/uploads/users/403/posts/36874/image-upload/animate_character_18.jpg)
![join animation](https://cms-assets.tutsplus.com/cdn-cgi/image/width=360/uploads/users/403/posts/36874/image-upload/animate_character_18.jpg)
The final animation we are going to use for this sequence is the Run Fast(3E) animation. This will show the custom character skidding to a halt after she dives and rolls.
![apply animation](https://cms-assets.tutsplus.com/cdn-cgi/image/width=850/uploads/users/403/posts/36874/image-upload/animate_character_19.jpg)
![apply animation](https://cms-assets.tutsplus.com/cdn-cgi/image/width=630/uploads/users/403/posts/36874/image-upload/animate_character_19.jpg)
![apply animation](https://cms-assets.tutsplus.com/cdn-cgi/image/width=360/uploads/users/403/posts/36874/image-upload/animate_character_19.jpg)
Move the animation close to the last animation to finish the sequence.
![join animations](https://cms-assets.tutsplus.com/cdn-cgi/image/width=850/uploads/users/403/posts/36874/image-upload/animate_character_20.jpg)
![join animations](https://cms-assets.tutsplus.com/cdn-cgi/image/width=630/uploads/users/403/posts/36874/image-upload/animate_character_20.jpg)
![join animations](https://cms-assets.tutsplus.com/cdn-cgi/image/width=360/uploads/users/403/posts/36874/image-upload/animate_character_20.jpg)
Add End Frame
Move to the end of the animation and use the End Frame Marker button to end the animation.
![set end](https://cms-assets.tutsplus.com/cdn-cgi/image/width=850/uploads/users/403/posts/36874/image-upload/animate_character_21.jpg)
![set end](https://cms-assets.tutsplus.com/cdn-cgi/image/width=630/uploads/users/403/posts/36874/image-upload/animate_character_21.jpg)
![set end](https://cms-assets.tutsplus.com/cdn-cgi/image/width=360/uploads/users/403/posts/36874/image-upload/animate_character_21.jpg)
Preview Animation
Once you are happy with the animation sequence and how it is laid out on the timeline, click on the Play Preview button to see what it looks like!
![play animation](https://cms-assets.tutsplus.com/cdn-cgi/image/width=850/uploads/users/403/posts/36874/image-upload/animate_character_22.jpg)
![play animation](https://cms-assets.tutsplus.com/cdn-cgi/image/width=630/uploads/users/403/posts/36874/image-upload/animate_character_22.jpg)
![play animation](https://cms-assets.tutsplus.com/cdn-cgi/image/width=360/uploads/users/403/posts/36874/image-upload/animate_character_22.jpg)
Break Time
When you are learning a new skill, it helps your memory to take lots of small breaks as you go. Relaxing, even as short as 15 seconds, helps with learning. So take a small break, and then we will continue.
Adjust Your Animation
Sometimes you may need to make some adjustments to the animation. Move the animations around if you need to using the steps outlined above. Once you are happy with the animation sequence you can import the project to Adobe After Effects.
![make adjustments if needed](https://cms-assets.tutsplus.com/cdn-cgi/image/width=850/uploads/users/403/posts/36874/image-upload/animate_character_23.jpg)
![make adjustments if needed](https://cms-assets.tutsplus.com/cdn-cgi/image/width=630/uploads/users/403/posts/36874/image-upload/animate_character_23.jpg)
![make adjustments if needed](https://cms-assets.tutsplus.com/cdn-cgi/image/width=360/uploads/users/403/posts/36874/image-upload/animate_character_23.jpg)
4. Import Your Project into Adobe After Effects
To import your animation into Adobe After Effects you need to go to Windows > Cartoon Animator—AE Script.jsx which will open up a new panel.
This script (now officially out of beta testing) takes our animation from Cartoon Animator into After Effects. It's a very useful update, with transparent background video exports and methods for taking objects from Cartoon Animator into After Effects—without overwriting the project.
![import to Adobe After Effects](https://cms-assets.tutsplus.com/cdn-cgi/image/width=850/uploads/users/403/posts/36874/image-upload/animate_character_24.jpg)
![import to Adobe After Effects](https://cms-assets.tutsplus.com/cdn-cgi/image/width=630/uploads/users/403/posts/36874/image-upload/animate_character_24.jpg)
![import to Adobe After Effects](https://cms-assets.tutsplus.com/cdn-cgi/image/width=360/uploads/users/403/posts/36874/image-upload/animate_character_24.jpg)
Click on the Import Project (JSON) button and locate the project location. Select the JSON file you exported from Cartoon Animator.
![locate project file](https://cms-assets.tutsplus.com/cdn-cgi/image/width=850/uploads/users/403/posts/36874/image-upload/animate_character_25.jpg)
![locate project file](https://cms-assets.tutsplus.com/cdn-cgi/image/width=630/uploads/users/403/posts/36874/image-upload/animate_character_25.jpg)
![locate project file](https://cms-assets.tutsplus.com/cdn-cgi/image/width=360/uploads/users/403/posts/36874/image-upload/animate_character_25.jpg)
This will open up the character running animation that we created in Cartoon Animator! Now we can treat this animation as if it were any other After Effects project. For example, let's add a new background into the project.
![imported project](https://cms-assets.tutsplus.com/cdn-cgi/image/width=850/uploads/users/403/posts/36874/image-upload/animate_character_26.jpg)
![imported project](https://cms-assets.tutsplus.com/cdn-cgi/image/width=630/uploads/users/403/posts/36874/image-upload/animate_character_26.jpg)
![imported project](https://cms-assets.tutsplus.com/cdn-cgi/image/width=360/uploads/users/403/posts/36874/image-upload/animate_character_26.jpg)
5. Create a Background for the Animation in Photoshop
Open the background into Adobe Photoshop. You can open the file directly or import the assets straight from Adobe Illustrator.
![open background in Photoshop](https://cms-assets.tutsplus.com/cdn-cgi/image/width=850/uploads/users/403/posts/36874/image-upload/animate_character_01.jpg)
![open background in Photoshop](https://cms-assets.tutsplus.com/cdn-cgi/image/width=630/uploads/users/403/posts/36874/image-upload/animate_character_01.jpg)
![open background in Photoshop](https://cms-assets.tutsplus.com/cdn-cgi/image/width=360/uploads/users/403/posts/36874/image-upload/animate_character_01.jpg)
For this tutorial the background will consist of three separate layers.
- Main Background
- Foreground Lamp
- Foreground Lamp Glow
In the image below we have added the foreground lamp on top of the background on a separate layer.
![add close lamp](https://cms-assets.tutsplus.com/cdn-cgi/image/width=850/uploads/users/403/posts/36874/image-upload/animate_character_27.jpg)
![add close lamp](https://cms-assets.tutsplus.com/cdn-cgi/image/width=630/uploads/users/403/posts/36874/image-upload/animate_character_27.jpg)
![add close lamp](https://cms-assets.tutsplus.com/cdn-cgi/image/width=360/uploads/users/403/posts/36874/image-upload/animate_character_27.jpg)
The third layer we have used a soft round bush to create the lamp glow using the following colour:
- R: 236
- G: 229
- B: 130
Save your file once you are happy with the composition we can import the background into Adobe After Effects to animate it.
![add glow](https://cms-assets.tutsplus.com/cdn-cgi/image/width=850/uploads/users/403/posts/36874/image-upload/animate_character_28.jpg)
![add glow](https://cms-assets.tutsplus.com/cdn-cgi/image/width=630/uploads/users/403/posts/36874/image-upload/animate_character_28.jpg)
![add glow](https://cms-assets.tutsplus.com/cdn-cgi/image/width=360/uploads/users/403/posts/36874/image-upload/animate_character_28.jpg)
6. Import the Background from Adobe Photoshop into After Effects
To import our background PSD file you need to go to File > Import > File.
![import file](https://cms-assets.tutsplus.com/cdn-cgi/image/width=850/uploads/users/403/posts/36874/image-upload/animate_character_29.jpg)
![import file](https://cms-assets.tutsplus.com/cdn-cgi/image/width=630/uploads/users/403/posts/36874/image-upload/animate_character_29.jpg)
![import file](https://cms-assets.tutsplus.com/cdn-cgi/image/width=360/uploads/users/403/posts/36874/image-upload/animate_character_29.jpg)
Locate the background PSD file that you saved and make sure to choose Composition—Retain Layer Sizes from the drop down box under Import As. This will allow us to import the PSD file as close as possible to how it looks like when we saved it in Adobe Photoshop.
![import as composition](https://cms-assets.tutsplus.com/cdn-cgi/image/width=850/uploads/users/403/posts/36874/image-upload/animate_character_30.jpg)
![import as composition](https://cms-assets.tutsplus.com/cdn-cgi/image/width=630/uploads/users/403/posts/36874/image-upload/animate_character_30.jpg)
![import as composition](https://cms-assets.tutsplus.com/cdn-cgi/image/width=360/uploads/users/403/posts/36874/image-upload/animate_character_30.jpg)
Once you click on the Import button, you'll be greeted with another window. Here you want to choose the following:
- Import Kind: Composition—Retain Layer Sizes
- Layer Options: Editable Layer Styles
![retain layer sizes](https://cms-assets.tutsplus.com/cdn-cgi/image/width=850/uploads/users/403/posts/36874/image-upload/animate_character_31.jpg)
![retain layer sizes](https://cms-assets.tutsplus.com/cdn-cgi/image/width=630/uploads/users/403/posts/36874/image-upload/animate_character_31.jpg)
![retain layer sizes](https://cms-assets.tutsplus.com/cdn-cgi/image/width=360/uploads/users/403/posts/36874/image-upload/animate_character_31.jpg)
Once you click on the OK button, Adobe After Effects will create a new composition containing all the layers from the background PSD file. We will use this as our main render composition.
![imported background](https://cms-assets.tutsplus.com/cdn-cgi/image/width=850/uploads/users/403/posts/36874/image-upload/animate_character_33.jpg)
![imported background](https://cms-assets.tutsplus.com/cdn-cgi/image/width=630/uploads/users/403/posts/36874/image-upload/animate_character_33.jpg)
![imported background](https://cms-assets.tutsplus.com/cdn-cgi/image/width=360/uploads/users/403/posts/36874/image-upload/animate_character_33.jpg)
7. Add the New Background to the Animation in After Effects
Open up the Scene Composition by double-clicking on it either in the Project Panel or in the currently open composition.
![scene comp](https://cms-assets.tutsplus.com/cdn-cgi/image/width=850/uploads/users/403/posts/36874/image-upload/animate_character_34.jpg)
![scene comp](https://cms-assets.tutsplus.com/cdn-cgi/image/width=630/uploads/users/403/posts/36874/image-upload/animate_character_34.jpg)
![scene comp](https://cms-assets.tutsplus.com/cdn-cgi/image/width=360/uploads/users/403/posts/36874/image-upload/animate_character_34.jpg)
Hide the current background by clicking on the Eye Icon next to the background layer.
![hide background](https://cms-assets.tutsplus.com/cdn-cgi/image/width=850/uploads/users/403/posts/36874/image-upload/animate_character_36.jpg)
![hide background](https://cms-assets.tutsplus.com/cdn-cgi/image/width=630/uploads/users/403/posts/36874/image-upload/animate_character_36.jpg)
![hide background](https://cms-assets.tutsplus.com/cdn-cgi/image/width=360/uploads/users/403/posts/36874/image-upload/animate_character_36.jpg)
Now that the background is removed from the Scene composition, we can apply our custom character animation which we created in Cartoon Animator into the new background.
Open the PSD background composition (in this example we have named it Night City Background) and then click and drag the Animation comp into it. Position the Animation comp above the Background layer and below the Lamp layer.
![drag into background comp](https://cms-assets.tutsplus.com/cdn-cgi/image/width=850/uploads/users/403/posts/36874/image-upload/animate_character_37.jpg)
![drag into background comp](https://cms-assets.tutsplus.com/cdn-cgi/image/width=630/uploads/users/403/posts/36874/image-upload/animate_character_37.jpg)
![drag into background comp](https://cms-assets.tutsplus.com/cdn-cgi/image/width=360/uploads/users/403/posts/36874/image-upload/animate_character_37.jpg)
Adjust Positions and Resize Elements
With the elements that make up the animation in one composition, we can start to resize and reposition everything until. Move things around until you are happy with the way that it looks.
![adjust composition](https://cms-assets.tutsplus.com/cdn-cgi/image/width=850/uploads/users/403/posts/36874/image-upload/animate_character_38.jpg)
![adjust composition](https://cms-assets.tutsplus.com/cdn-cgi/image/width=630/uploads/users/403/posts/36874/image-upload/animate_character_38.jpg)
![adjust composition](https://cms-assets.tutsplus.com/cdn-cgi/image/width=360/uploads/users/403/posts/36874/image-upload/animate_character_38.jpg)
8. Animate the Background
Create a Precomp of the background layer by right-clicking it and selecting Pre-Compose. Make sure to select Move all attributes to new composition.
![pre-compose](https://cms-assets.tutsplus.com/cdn-cgi/image/width=850/uploads/users/403/posts/36874/image-upload/animate_character_39.jpg)
![pre-compose](https://cms-assets.tutsplus.com/cdn-cgi/image/width=630/uploads/users/403/posts/36874/image-upload/animate_character_39.jpg)
![pre-compose](https://cms-assets.tutsplus.com/cdn-cgi/image/width=360/uploads/users/403/posts/36874/image-upload/animate_character_39.jpg)
Set Region of Interest
This will create and open a new composition for the background layer. Select the Region of Interest button located between the 'Full' and 'Active Camera' drop down menus at the bottom of the preview panel.
Then select the whole background by clicking and dragging the with mouse.
![region of interest](https://cms-assets.tutsplus.com/cdn-cgi/image/width=850/uploads/users/403/posts/36874/image-upload/animate_character_40.jpg)
![region of interest](https://cms-assets.tutsplus.com/cdn-cgi/image/width=630/uploads/users/403/posts/36874/image-upload/animate_character_40.jpg)
![region of interest](https://cms-assets.tutsplus.com/cdn-cgi/image/width=360/uploads/users/403/posts/36874/image-upload/animate_character_40.jpg)
Crop
Now go to Composition > Crop Comp to Region of Interest.
![crop comp](https://cms-assets.tutsplus.com/cdn-cgi/image/width=850/uploads/users/403/posts/36874/image-upload/animate_character_41.jpg)
![crop comp](https://cms-assets.tutsplus.com/cdn-cgi/image/width=630/uploads/users/403/posts/36874/image-upload/animate_character_41.jpg)
![crop comp](https://cms-assets.tutsplus.com/cdn-cgi/image/width=360/uploads/users/403/posts/36874/image-upload/animate_character_41.jpg)
Create a Moving Background
Go back to the Night City Background composition and select the Background pre-comp.
To create a moving background, add an Offset preset to the background pre-comp layer. To do this simply select the background layer and then go to Effect > Distort > Offset or type in Offset in the Effects and Presets panel.
![offset](https://cms-assets.tutsplus.com/cdn-cgi/image/width=850/uploads/users/403/posts/36874/image-upload/animate_character_42.jpg)
![offset](https://cms-assets.tutsplus.com/cdn-cgi/image/width=630/uploads/users/403/posts/36874/image-upload/animate_character_42.jpg)
![offset](https://cms-assets.tutsplus.com/cdn-cgi/image/width=360/uploads/users/403/posts/36874/image-upload/animate_character_42.jpg)
Make sure the timeline is set to the beginning of the animation and create a keyframe for Shift Center To.
![create keyframe](https://cms-assets.tutsplus.com/cdn-cgi/image/width=850/uploads/users/403/posts/36874/image-upload/animate_character_43.jpg)
![create keyframe](https://cms-assets.tutsplus.com/cdn-cgi/image/width=630/uploads/users/403/posts/36874/image-upload/animate_character_43.jpg)
![create keyframe](https://cms-assets.tutsplus.com/cdn-cgi/image/width=360/uploads/users/403/posts/36874/image-upload/animate_character_43.jpg)
Move forward a few frames in the timeline and using the mouse, keeping an eye on your character animation. Create a keyframe for Shift Center To just before she is about to move.
You may need to zoom in on the timeline to do this accurately.
![new keyframe](https://cms-assets.tutsplus.com/cdn-cgi/image/width=850/uploads/users/403/posts/36874/image-upload/animate_character_44.jpg)
![new keyframe](https://cms-assets.tutsplus.com/cdn-cgi/image/width=630/uploads/users/403/posts/36874/image-upload/animate_character_44.jpg)
![new keyframe](https://cms-assets.tutsplus.com/cdn-cgi/image/width=360/uploads/users/403/posts/36874/image-upload/animate_character_44.jpg)
Move forwards in the timeline until your character animation stops moving. Then change the Width Value to a high number to create a moving background.
Then scrub the timeline backwards and forwards (or click the play preview button) to see if you need to increase the speed of the background by having a higher number, or decrease the speed by having a lower number.
![width value](https://cms-assets.tutsplus.com/cdn-cgi/image/width=850/uploads/users/403/posts/36874/image-upload/animate_character_45.jpg)
![width value](https://cms-assets.tutsplus.com/cdn-cgi/image/width=630/uploads/users/403/posts/36874/image-upload/animate_character_45.jpg)
![width value](https://cms-assets.tutsplus.com/cdn-cgi/image/width=360/uploads/users/403/posts/36874/image-upload/animate_character_45.jpg)
Add Easing
Select the last two keyframes of the background layer by clicking and dragging the left mouse button. Right click the keyframe selection and then choose Keyframe Assistant > Easy Ease (F9).Click on the play preview button to see what the animation looks like and make any adjustments to the keyframes if needed.
![easy ease](https://cms-assets.tutsplus.com/cdn-cgi/image/width=850/uploads/users/403/posts/36874/image-upload/animate_character_46.jpg)
![easy ease](https://cms-assets.tutsplus.com/cdn-cgi/image/width=630/uploads/users/403/posts/36874/image-upload/animate_character_46.jpg)
![easy ease](https://cms-assets.tutsplus.com/cdn-cgi/image/width=360/uploads/users/403/posts/36874/image-upload/animate_character_46.jpg)
9. Animate the Foreground
Select the two foreground layers that make up the lamp:
- Glow
- Lamp
Then right-click and create a precomp using both of these layers.
![pre-comp](https://cms-assets.tutsplus.com/cdn-cgi/image/width=850/uploads/users/403/posts/36874/image-upload/animate_character_47.jpg)
![pre-comp](https://cms-assets.tutsplus.com/cdn-cgi/image/width=630/uploads/users/403/posts/36874/image-upload/animate_character_47.jpg)
![pre-comp](https://cms-assets.tutsplus.com/cdn-cgi/image/width=360/uploads/users/403/posts/36874/image-upload/animate_character_47.jpg)
Make sure to select Move all attributes into the new composition and then choose a name for it. For this example we will name the new composition Foreground.
![create foreground pre-comp](https://cms-assets.tutsplus.com/cdn-cgi/image/width=850/uploads/users/403/posts/36874/image-upload/animate_character_48.jpg)
![create foreground pre-comp](https://cms-assets.tutsplus.com/cdn-cgi/image/width=630/uploads/users/403/posts/36874/image-upload/animate_character_48.jpg)
![create foreground pre-comp](https://cms-assets.tutsplus.com/cdn-cgi/image/width=360/uploads/users/403/posts/36874/image-upload/animate_character_48.jpg)
Go back to the Night City Background composition and select the Foreground layer.
Using the Background keyframes as a guide and create keyframes for Shift Center To. Make sure to use the exact same timing so that the foreground moves at the same time as the background.
Use a lower number on the second keyframe than the one used for the Background layer so that it moves slightly slower, which will create a parallax effect.
![foreground animation](https://cms-assets.tutsplus.com/cdn-cgi/image/width=850/uploads/users/403/posts/36874/image-upload/animate_character_49.jpg)
![foreground animation](https://cms-assets.tutsplus.com/cdn-cgi/image/width=630/uploads/users/403/posts/36874/image-upload/animate_character_49.jpg)
![foreground animation](https://cms-assets.tutsplus.com/cdn-cgi/image/width=360/uploads/users/403/posts/36874/image-upload/animate_character_49.jpg)
Make sure that you have selected the Night City Background comp and go to Composition > Composition Settings (CTRL + K) to open up the options.
Here we can make some final adjustments to our animation such as the duration of the video. For this example our character animation lasts for 12:10 seconds. So make sure that the time duration in Composition Settings is the same as the time duration for your character animation.
![time duration](https://cms-assets.tutsplus.com/cdn-cgi/image/width=850/uploads/users/403/posts/36874/image-upload/animate_character_51.jpg)
![time duration](https://cms-assets.tutsplus.com/cdn-cgi/image/width=630/uploads/users/403/posts/36874/image-upload/animate_character_51.jpg)
![time duration](https://cms-assets.tutsplus.com/cdn-cgi/image/width=360/uploads/users/403/posts/36874/image-upload/animate_character_51.jpg)
Awesome! You're Finished!
Congratulations! And that's how you can animate a custom character using Cartoon Animator and Adobe After Effects!
Now that you are familiar with the techniques, why not experiment with different character designs or use another background image? Once you have imported your animation into After Effects you can check out even more tutorials below and apply them to the project.
Next in this animation this series we'll explore Cartoon Animator's transparent video features, which let you create intersting animation workflows in Premiere Pro, Resolve, Final Cut Pro X or any other video editing program.
![final animation](https://cms-assets.tutsplus.com/cdn-cgi/image/width=850/uploads/users/403/posts/36874/image-upload/pt_2_cover.jpg)
![final animation](https://cms-assets.tutsplus.com/cdn-cgi/image/width=630/uploads/users/403/posts/36874/image-upload/pt_2_cover.jpg)
![final animation](https://cms-assets.tutsplus.com/cdn-cgi/image/width=360/uploads/users/403/posts/36874/image-upload/pt_2_cover.jpg)
In the meantime, I hope you've found this tutorial useful and I'll see you next time, on Envato Tuts+!
- Video50 Top Video Project Templates for After Effects in 2021
- Video20 Best Adobe After Effects AE Templates to Make Amazing Videos in 2021
- Video15 Top Creative Marketing Video Templates for After Effects in 2021
- Video20 Flavours of After Effects: 56 Templates in Top Search Categories
- Video15 Top Particle Effects Templates for After Effects
- Video15 Top Logo Animation Video Templates for After Effects in 2021
No comments:
Post a Comment