
Always wondered what a Bevel and Emboss Photoshop layer style is, and most importantly how to use it?
From a comprehensive Bevel and Emboss definition, to how to bevel text in Photoshop, how to emboss text in Photoshop, or how to use Bevel and Emboss in Photoshop, or how to emboss an image in Photoshop, the following tutorial will do its best at providing all the necessary answers so that in the end you'll be able to master it.
The Bevel and Emboss layer style is one of Photoshop's most powerful tools when it comes to stylizing your artwork, since you can use it to emboss text, add an inner bevel or any other type of bevel effect, or even create an emboss Photoshop action, or create an embossed effect in Photoshop all in a matter of moments.
So, if you want to learn how to bevel in Photoshop, or how to create an emboss effect in Photoshop, or what a Photoshop bevel filter is, or maybe what's the difference between bevel and emboss, or even what Photoshop bevel edges are, then you should definitely give this tutorial a full read.
By doing so, I will walk you through all its ins and outs, and show you how to do simple things such as how to create an emboss effect in Photoshop, how to create a beveled text in Photoshop, or how to bevel in Photoshop, so that you can create Photoshop beveled text segments of your own.
Follow along with us over on our Envato Tuts+ YouTube channel:
The Uses For Bevel and Emboss
Bevel and Emboss is often considered the most powerful and adaptable tools within Photoshop Layer Styles.
The traditional use for Bevel and Emboss is to make something look more 3-dimensional by adding highlights and shadows to different parts of your layer, but it doesn't stop there.
With some special consideration and careful tweaks, you can create styles ranging from reflective chrome and refractive glass to chiseled stone and subtle letterpress graphics.

How to Bevel and Emboss in Photoshop
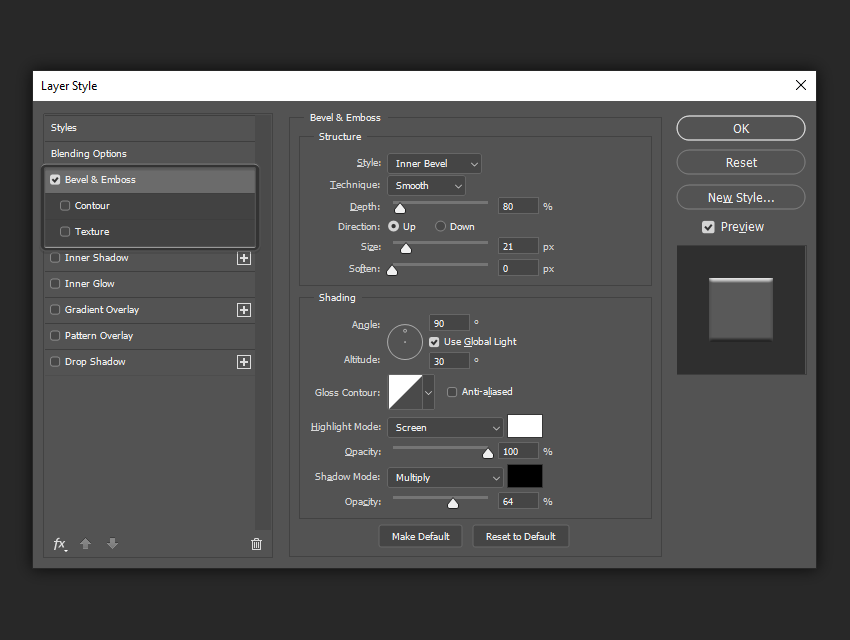
The Bevel and Emboss dialog boxes are shown below, giving us a slew of new options. These will allow to set things like bevel height, lighting direction, texture map, and more.
Style
The Style dropdown is where you set the style/location of your bevel and includes the following options:
- Outer Bevel: This applies the bevel to the outside of the shape you are applying it to
- Inner Bevel: This applies the bevel to the inside of the shape you are applying it to
- Emboss: This applies the bevel to both the outside, and the inside of the shape you are applying it to
- Pillow Emboss: This applies the bevel to both the outside and inside of the shape you are applying it to, but in opposite directions
- Stroke Emboss: This only works when you also have a stroke effect applied to your layer, and applies the bevel only to the stroke
It may seem confusing, but simply scrolling through the different Style settings with the Preview box checked will quickly show you how they each work.

In the following example, you can see that with Inner Bevel applied, it only affects the inside of the shape. With the Emboss style applied, the Bevel and Emboss affects both the inside and outside of the shape.

Technique
The Technique dropdown menu allows you to set the overall shape of the Bevel and Emboss and includes the following options:
- Smooth: This setting creates a smooth, rounded edge bevel
- Chisel Hard: This setting creates a hard, chiseled edge bevel
- Chisel Soft: This setting creates a rougher, chiseled edge bevel
Again, the best way to see the difference is to scroll through the settings with the Preview box checked.

In the following example, you can see that text on the left is more smooth while the text on the right looks like it has been chiseled out of stone.

Depth
The Depth slider increases or decreases the apparent depth of the Bevel and Emboss. A lower number creates a less visible 3D effect while a higher number makes it more dramatic.

In the following example, you can see how increasing the Depth makes the text look more 3-dimensional.

Direction
The Direction radio buttons simply let you choose whether you want your Bevel and Emboss to appear to be extruded towards you, or away from you.

In the following example, you can see how the "up" text appear to come out of the page, while the "down" text appears to sink into the page.

Size
The Size slider sets the overall size of the Bevel and Emboss. A lower number creates a smaller effect that stays closer to the edges of your shape, while a larger number increases the Bevel and Emboss coverage to a bigger area of your shape.

In the following example, the text on the left has a smaller bevel while the one on the right covers much more of the text.

Soften
The Soften slider allows you to soften any hard edges created by your Bevel and Emboss. It can be helpful in creating soft and squishy looking styles.

In the following example, you can see that increasing the Soften parameter helps us to create a much softer looking surface.

Angle and Altitude
The Angle and Altitude area is where you set the position of your light. The Angle sets the horizontal position of your light source, and the Altitude sets the vertical position, or apparent height of your light source. You can also drag the small crosshair around to edit your light source without having to use numeric values.
Checking the "Use Global Light" checkbox will sync these settings with any other lighting related settings in your document like Inner and Outer Shadow.

In the following example, you can see how changing the Angle and Altitude settings affects the perceived location of our light source.

Gloss Contour
Gloss Contour is the secret to creating great glass and metal effects.
The Gloss Contour sets the falloff of the shadows and highlights within our Bevel and Emboss. A linear contour creates a natural looking falloff, while choosing something like a "sine wave" style contour can create cool, reflective effects.
In addition, the Anti-aliased checkbox will smooth out any jagged edges within your gloss if it is desired.

In the following example, you can see how the text on the left looks nothing like metal, but by changing the Gloss Contour, it begins to look more realistic.

Highlight Mode and Opacity
There are two parts to lighting, highlights and shadows.
The Highlight Mode dropdown is where you set the blend mode for your highlights. Screen is the default setting, but you can also try Linear Dodge (Add), and Color Dodge for more dramatic effects.
This is also where you set your highlight color. Most of the time you will leave it at white, but if you want to simulate different color light sources, you can change the highlight to have a tint of color.
The Opacity slider adjusts the intensity of your highlight edges.

In the following example you can see how changing the Highlight Mode, Color, and Opacity gives our style a slightly different, warmer look.

Shadow Mode and Opacity
The Shadow Mode dropdown is where you set the blend mode for your shadows. Multiply is the default setting, but you can also try Linear Burn or Color Burn for more dramatic effects.
This is also where you set your shadow color. Most of the time you will leave it at black, but you can also achieve other subtle effects by using different tints of color.
The Opacity slider adjusts the intensity of your shadows.

In the following example you can see how changing the Shadow Color and Opacity gives our wood style a subtle "mossy" look.

Saving And Loading Default Settings
You can save and load default settings for each effect in the Layer Styles dialog box. By clicking "Make Default", Photoshop will store whatever settings are currently active as the new default settings for that effect.
By clicking "Reset to Default", Photoshop will then load whatever settings were last saved. This allows you to experiment and simply reload custom default settings if you want to start over.

Contour
The Contour sub-section under Bevel and Emboss allows you to set the overall shape of your bevel. Checking the Anti-aliased checkbox smooths out your Contour, and the Range slider allows you to set the overall coverage of your bevel that you want your chosen contour to apply to.
This is another setting that is easier seen than said.

In the following example you can see how changing the Contour to an inverted "U" shape gives our text an indented type of bevel.

Texture
The Texture sub-section under Bevel and Emboss allows you to add a bump map to your style. A bump map makes the surface of your layer to appear higher or lower, giving us the ability to create special effects.
The Pattern area allows us to choose a pattern from Photoshop's Patterns Palette to use as a bump map. Click the Snap to Origin button to align the Pattern to the origin of your document. You can also click the small "New" icon to create a new preset from your currently select Pattern.
The Scale slider lets you increase or decrease the size of your pattern, and the Depth slider changes the apparent depth of your bump map.
You can check the Invert checkbox to invert your pattern, make white areas black and black areas white.
Lastly, the Link with Layer checkbox locks the Pattern to your layer, so that if you move your layer around after closing the Layer Styles dialog box, the Pattern moves with it.
When the Layer Styles dialog box is open to the Contour sub-section, you can also drag the Pattern around on your canvas to position it manually.

In the following example you can see how adding a Pattern to our style can create a dramatically different looking effect. Since the Depth is set to 0 for the text on the left, the Pattern does not affect our style.

Expand Your Library
Want to build an extended Photoshop Layer Layer Styles Library, but don't know exactly where to start? Well, don't worry since Envato Elements has you covered, giving you a great selection of layer styles such as these ones.
Sloppy Press Layer Styles
Want to give your text that extra typographic feel? Well, if that's the case then this layer style pack should be exactly what you're looking for, since it comes with not one but 33 layer styles that you can use and abuse.

Ink Stamp Layer Styles
Let's be honest, giving your artwork that ink stamp look is and will always be an eye catcher, so why not add this creative layer styles pack to your library in case you'll ever need it in future projects.

Retro Etch Vintage Layer Styles
Looking to give your text that vintage look but not too keen on going through the actual process required to do so? Well, if that's the case this handcrafted layer style pack has you covered as it will do the job for you.

Grow Your Photoshop Skills
Just started out using Adobe Photoshop and feel like learning more of Photoshop? Well, today's your lucky day since I've put together a little list of tutorials that should get you up going for the following days!
-

The A to Z of Adobe Photoshop
-

How to Create a Stylized Chalk Text Effect in Adobe Photoshop
-

How to Make a Distressed Effect Photoshop Action
-

How to Create a Dripping Paint Photoshop Effect Action
-

How to Create a Sketch Effect Action in Adobe Photoshop
-

How to Make Gradients in Photoshop (and More!)
-

7 Spooky Photoshop Photo Effect Videos to Check Out!
-

How to Turn a Photo Into Art by Creating a Painting Photoshop Action
-
How to Create a Stylized Chalk Text Effect in Adobe Photoshop
-

How to Make a Photoshop Vignette Effect Action

No comments:
Post a Comment