
Photoshop is a great tool for graphic design, especially digital graphics that only are displayed on screen, in addition to its namesake tasks of tweaking photographs. But that's not all it's good for. With proper knowledge and thinking, you can use Photoshop to create stunning print designs as well.
This tutorial will take you through the basic steps of creating the eye-catching flyer seen above, which can be printed right away in print-shop-ready CMYK colors, directly from Photoshop. You can follow this tutorial to make this exact flyer, or tweak the steps with the content and colors you want to get the flyer style you'd like using the same methods.
Don't have access to Photoshop? Or maybe you are short on time? If so, I have a great option for you as well! Placeit offers hundreds of professionally made flyer templates that you can customize to fit your exact needs! No design skills required! Placeit is quick, easy, and requires no extra software. Create mockups, logos, videos & designs in seconds!

Otherwise, this tutorial will show you a professional workflow. Let's get started!
Follow along with us over on our Envato Tuts+ YouTube channel:
Tutorial Assets
This tutorial uses royalty-free images from Envato, along with some custom-made vector icons that I have created in Illustrator specifically for this project. You'll find each of them, along with a completed PSD file you can use to compare with your work, in the download on this tutorial's sidebar.
This tutorial also uses the Proxima Nova Font Family, which comes with an Adobe Creative Cloud subscription. You can sync that font to your computer and use it with this tutorial, or use another similar typeface of your own.
1. Hot to Set Up a Document With Guides
Step 1
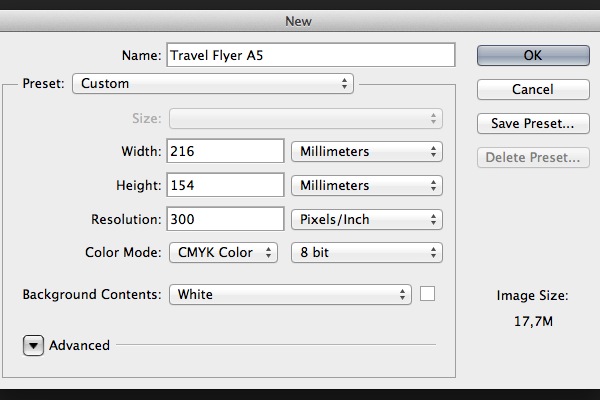
First, set up a document with the correct size and settings for print. Create a new document in Photoshop, and set its dimensions to 216 x 154 mm. These dimensions represent A5 paper size with a 3 mm bleed added to each edge. Since we are going to create artwork for print, set the Color Mode to CMYK and Resolution to 300 Pixels/Inch.
Step 2
Create new guides that will represent the bleed area. Illustrator and InDesign have this function built in, but in Photoshop, we have to create it ourselves. Use the Move Tool (V) and the Shift key to create a horizontal guide by dragging the cursor from the top ruler. Make sure that the guide is located 3 mm along on the Y-axis.

Step 3
Repeat the same process to create guides along each edge of the document. Make sure that each guide is inset 3 mm from its corresponding edge.

2. How to Create a Background
Step 1
Press Shift-Command-N to create a new Layer. Fill it with White as the Foreground Color (Alt-Backspace). Make sure that you have the CMYK Sliders turned on so you're using print colors.

Step 2
Create a new Gradient Overlay. In the Layer Style panel, edit the Gradient. Set the white slider Location to 30%. Change the color of the black slider to Pale Yellow (C=9 M=6 Y=14 K=0).


Step 3
Use the Rectangle Tool (U) to create a new rectangle. Set its size to 216 mm by 56 mm.

Step 4
Align the rectangle to the left top corner of the document. Fill it with Dark Brown (C=49 M=74 Y=80 K=70).

Step 5
Use the Pen Tool (P) to add a new anchor point at the lower edge of the rectangle.

Step 6
With the Direct Selection Tool (A), play around with the anchor handles to create a nice Bezier curve.

Step 7
Follow the same steps to adjust the rectangle into the shape shown below.

Step 8
Go to File > Place Embedded..., and then select the people-1.jpg image from the Resource Pack.

Step 9
Use the Move Tool (V) to move the photo around the document. Place it in the upper top corner as shown below.

Step 10
Create a new rectangle with the Rectangle Tool (U). Set its size to 216 mm by 100 mm.

Step 11
Use the Direct Selection Tool (A) to place the rectangle directly above the photo in the upper left corner.

Step 12
In the Rectangle Tool panel options, select Mask. This will create a vector mask applied to the layer with the photo.

Step 13
Add a new anchor point to the mask with the Pen Tool (P). Create a curvy Bezier curve with the Direct Selection Tool (A).

Step 14
Using the same tools, the Pen Tool and the Direct Selection Tool, try to adjust the mask into the shape shown below. Notice the position of the anchor points and the simplicity of the shape. The fewer anchor points you use, the smoother the final mask will appear.

Step 15
Go to Filter > Blur > Gaussian Blur. Set the Radius to 6.

Step 16
Select the Smart Filters mask. Use the Gradient Tool (G) to fade the mask from left to right.


Step 17
Create a new Layer Mask. Use the Brush Tool (B) to fade the stairs on the photo. Use some basic instinct and creativity.


Step 18
Create a new Brightness/Contrast Adjustment Layer by clicking the sun icon in the Adjustments panel. Set the Brightness to 40 and Contrast to 10.

Step 19
Right-click on the Adjustment Layer and select Create Clipping Mask. This will apply the new brightness settings only to the photo below.

Step 20
Create a new Solid Color. Set the Color Fill to Brown (C=30 M=80 Y=100 K=30).

Step 21
Click on the vector mask from the photo layer. Hold the Alt key and drag the mask over the brown Color Fill. This action will duplicate the selected mask.

Step 22
Use the Direct Selection Tool (A) and drag the top-right anchor point to the upper right corner.

Step 23
Use the Brush Tool (B) to reveal some areas of the photo beneath the brown fill. Set the Layer Opacity to 75%.

Step 24
Draw a new rectangle with the Rectangle Tool (U).

Step 25
Fill the rectangle with Light Brown Color (C=10 M=65 Y=100 K=0).

Step 26
Place the layer with the light brown rectangle beneath the dark brown rectangle.

Step 27
Use the Pen Tool (P) with the Direct Selection Tool (A) to adjust the rectangle into a curved shape, as shown below.

3. How to Add Text and a Logo
Step 1
Create a new Ellipse (U). Set its dimensions to 248 px by 248 px. Fill it with Brown Color (C=30 M=80 Y=100 K=30).
Step 2
Add a Drop Shadow effect. Set the Opacity to 14%, Distance to 5 px, and Size to 15 px.


Step 3
Create a new Ellipse (U). Set its dimensions to 400 px by 400 px. Fill it with Dark Blue Color (C=100 M=80 Y=45 K=50).

Step 4
Use the same Drop Shadow effect and apply it to the ellipse. You can either recreate create the shadow or right-click and select Copy Layer Style and then paste the layer style on the other ellipse. Put the layer with the dark blue ellipse beneath the one with the brown ellipse.

Step 5
Add text with the Type Tool (T). This tutorial uses the Proxima Nova family. The top title Size is 17 pt. Add the rest of the text, with each one on a separate layer. Use the Move Tool (V) to place each line accordingly, as outlined in the image shown below.

Step 6
Repeat the same process to add new text. Set the Size of the first line to 31 pt.

Step 7
Create a new title using the Type Tool (T). Set the Font to Proxima Nova Light and the Size to 18 pt.

Step 8
Add the subtitle, again, using the Type Tool (T). Set the Size to 36 pt. Adjust the Character Tracking to -10.

Step 9
Select both text layers. Hold down the Alt key and Drag the text to duplicate both lines below.

Step 10
Again, use the Type Tool (T) to rewrite the text according to the image shown below. Position the text with the Move Tool (V).

Step 11
Go to File > Place Embedded and place the vector logo acme-travel-logo.ai into the document.

Step 12
Scale down the vector logo and position it at the upper right corner.

Step 13
Add the Drop Shadow effect. In the Layer Style panel, set the Opacity to 11%, Distance to 3 px, and Size to 16 px.

4. How to Add the Bottom Photographs
Step 1
Create a new Rectangle (U). Set its Size to 60 px by 28 px.

Step 2
Select the rectangle shape with the Direct Selection Tool (A). In the Align panel, set Horizontal Centers.

Step 3
Go to File > Place Embedded and place the people-11.jpg photo from the Resource Pack.

Step 4
Scale down the image and place it directly in the rectangle.

Step 5
Activate the Rectangle Tool (U), and in the options panel, click Mask. This action will create a vector mask from the rectangle and apply it to the photo.

Step 6
With the photo layer still selected, hold Alt-Shift and drag the photo to duplicate it.

Step 7
Go to File > Place Embedded. Select the city-5.jpg photo from Resource Pack and add it to the document.

Step 8
Scale down the image and place it above the duplicated photo with the woman.

Step 9
Grab the mask from the duplicated photo with the woman and place it into the new image, and then delete the people-11-copy layer.

Step 10
Repeat Steps 7 to 9 to add the map screenshot into the document, this time placing the map picture.

Step 11
Select the map-screenshot layer and add a Stroke from the effects button in the Layers panel.

Step 12
Set the Stroke Size to 2 px. Adjust the Position to Inside and set the Color to Brown (C=30 M=80 Y=100 K=30).

5. How to Add the Bottom Text
Step 1
Use the Type Tool (T) to create a new instance of text. Set its size to 11 pt and its Color to Light Brown (C=10 M=65 Y=100 K=0).

Step 2
Add more lines. Set the Size to 9 pt, adjust the Leading to 13 pt, and change the Color to Gray (K=90).

Step 3
Follow the same process to create a new block of text. Place them beneath the photo with the woman and the map screenshot.

Step 4
Go to File > Place Embedded... Select icons.ai to import the icons into the document. A new contextual window will appear. Select the Calendar Icon and click OK.

Step 5
Scale down the icon and place it next to the first line with the time information.

Step 6
Repeat the same process to import the rest of the icons and place them accordingly next to each line.

Step 7
Use the Type Tool (T) to add new text. Place it over the map screenshot. Set the Size to 13 pt, adjust the Leading to 11 pt, and change the Color to Light Brown (C=10 M=65 Y=100 K=0).

Step 8
Follow the same process to add new lines of text for the address. Set the Size to 9 pt and change the Color to Gray (K=90).

Step 9
Go to File > Place Embedded..., select icons.ai again, and import the Globe Vector Icon into the document.

Step 10
Scale down the icon and place it next to the web address.

Step 11
Activate the Pen Tool (P) and create a vector shape that will represent a direction on the map.

Step 12
In the Options panel, set the Stroke to Dashed and Color to Light Brown (C=10 M=65 Y=100 K=0). Adjust the Stroke Width to 1.5 pt.

Step 13
Go to Stroke Options > More Options..., set Caps to Round, and adjust Dashed Line: Dash to 3 and Gap to 3.

Step 14
Create a new Ellipse (U). Set the Color to Brown (C=30 M=80 Y=100 K=30).

Step 15
Activate the Pen Tool (P). Hold the Alt key and click on the bottom anchor point. This will convert the anchor point from smooth to corner.

Step 16
With the Direct Selection Tool (A), move the converted anchor point down.

Step 17
Add the Drop Shadow effect to the pin. Use the settings shown below to make it subtle.

Step 18
Again, create a new Ellipse (U) with a Fill Color of White. Place the ellipse into the center of the pin. And that's the final touch to our flyer design.

Conclusion
Congratulations! If you've followed the tutorial up to this point, you should have a nice design of a promotional flyer completed.

Remember: every time you design images for digital print, you have to think in CMYK colors in order to achieve the best results. Don't forget to add a bleed to the canvas (at least 3 mm from each edge). If you are unsure about some advanced technical parameters, it is always good to consult directly with the printing company to avoid mistakes.
In the next tutorial in this series, we will take a look at how to impose this flyer into InDesign and prepare a print-quality PDF. In the meantime, if you have any questions about creating a print design in Photoshop, leave a comment below and we'd be glad to help you out.
Save Time With Placeit!
Save time, but still get a design that is completely unique to you by designing your flyer with one of the dozens of professionally made flyer templates on Placeit! They are the perfect jumping-off point for your business flyer or promotion. Here are a few of my personal favorite flyers you can check out on Placeit right now!
Cleaning Services Flyer Creator With a Simple Broom Icon
This flyer offers a clean and minimal design perfect for either an at-home startup or an established business! It includes a modern logo that fits the design perfectly, but can also be swapped out with your own quickly and easily!

Vegan BBQ Flyer Template
Let everyone know about your upcoming food festival with this vintage-inspired flyer template. The vector shapes bring color to the flyer, while still keeping the spotlight on all the crucial information. It could also be easily transformed into a restaurant flyer in just a few clicks!

Gym Flyer Design Template
Bring business to your gym with this high-contrast, ultra-modern flyer template. Placeit has dozens of different images with the same high-contrast neon colors to choose from, making it a great choice if you like to refresh your flyer design on a regular basis.

Flyer Maker to Create a Real Estate Agency Flyer
This real estate flyer design template is the perfect mix of professional and modern design, with clean lines and bold text. Swap in your own images to showcase a new house!

Flyer Template for a Pet Care Service With a Dog Illustration
Promote your pet care business with this ultra adorable pet care service flyer template! The bold colors and cute dog illustrations will grab the attention of all pet parents. You can choose other animals as well.

Need even more? Check out some of these other great resources below!
 Album CoverHow to Make a Rap Album Cover Art (Using an Album Cover Maker)
 PlaceitHow to Create an Animated Logo
 InstagramHow to Make Instagram Stories in Seconds Without Photoshop
 YouTubeHow to Make a Galaxy YouTube Banner (With a YouTube Banner Creator)
 PlaceitHow to Make a Church Event Flyer (Using a Flyer Maker)
 FlyersHow to Make a Business Flyer (Using a Flyer Generator)

No comments:
Post a Comment