


In this tutorial, we'll create a custom door hanger template, perfect if you're looking for a DIY door hanger template, a blank door hanger template, or a completed door hanger design. We'll also look at some door hanger ideas to help inspire your next project.


What You Will Need
We'll use the following assets in this door hanger template tutorial:
When it comes to your door hanger template, Word, Illustrator, and a host of other software options could work for you. In this tutorial, however, we'll develop a template for a door hanger sign using Adobe Photoshop. You could, however, develop door hanger templates of any size using this walkthrough, and then import them into the software of your choice.
Download Unlimited Door Hanger Template Designs on Envato Elements


Interested in downloading a door hanger template design? Check out the selection on Envato Elements for a host of door hanger ideas. The best part is, one low fee gets you unlimited access to the entire library of graphic templates. That means you can download as many door tag template designs as you want, because they're all included.


But Envato Elements includes more than door hanger templates. You also get graphics, stock photos, fonts, and much more. Everything is included. You even get mockup templates, like the template below. Easily place your design concept into Photoshop smart objects to get a photorealistic preview of what your door hanger would look like, printed and ready to use. Cool, right?


Now, let's begin creating our own door hanger template from scratch in Adobe Photoshop.
1. How to Make a Printable Door Hanger Template
Step 1
For this demo, we'll create an open house door hanger template. However, these techniques could work for any subject you'd like. If you're looking for door hanger dimensions for your templates, this is the perfect place to start.
We'll create a 4.5" by 11.5" inch document for our door hanger template. The intention here is to design a 4" x 11" door hanger, but we'll add an extra 0.25" on each side for our bleed.
Create a new document in Adobe Photoshop by going to File > New, using these dimensions. We'll set our resolution to 300 Pixels/Inch, so our project is appropriate for high-quality printing. Click Create to create your document.


Step 2
Next, let's create some Guides. Go to View > New Guide Layout.
Toggle the Margin on, and add 0.25" to each side of your document. This is going to act as our trim, or where the document will be cut. The 0.25" bleed here will help ensure that any full-page images extend to the edge of our project. Then click OK to proceed.


Step 3
Repeat this process by once again going to View > New Guide Layout.
Again, we want to turn to the Margin settings here. This time, add 0.50" to each side of your document. This will give us a 0.25" safety area for our design. We'll keep essentials like text within this space. Again, click OK to proceed.


Step 4
Next, turn to your Layers panel. You can open it up by going to Window > Layers.
Create a New Layer by clicking on the plus icon at the bottom of the Layers panel.
For optional, organizational purposes, we can name and label our layers. For example, double-click on the name of the layer to give it a new name. In this demo, we'll call it "Cut Area".
You can also right-click on PC or Control-click on Mac, on the layer itself, and choose a color identifier. This is cosmetic and for organizational purposes. However, since this is going to be an essential part of our blank door hanger template, it's a good idea to establish this early on.


Step 5
Now, let's turn to the Ellipse Tool in our Tools panel. We'll use it to define where on our door hanger template we'd like the hanger hole cut out.
Before drawing your ellipse, make sure you have the following settings ready in your Options panel:
- Set the Fill Color to white.
- Set the Stroke Color to black (or any other color of your choice).
- Set the Stroke Size to 5 pixels.
- Set the Stroke Options to a solid line.


Step 6
Then, with the Ellipse Tool active, click once on your document. We can define what size ellipse we'd like Photoshop to draw for us. In this example, we'll create an ellipse with a 1.25" diameter, which is a common door hanger template size.
Click OK to add the ellipse to your document.


Step 7
We'll want our ellipse aligned to the center of the door tag. Rather than eyeballing it and taking a guess, we can again turn to guides to help us position it. Go to View > New Guide.
Then, choose Vertical Orientation and input 50% as the value. Click OK to continue. This will create a guide right in the middle of our template.


Step 8
Let's create one more guide. Go to View > New Guide. This time, we want Horizontal Orientation, and input the value 0.875". This adds a guide that is 0.875" down the length of our door hanger template design. This gives us 5/8" of space from the top, after the 0.25" bleed. This is a common placement for the "hole" in our door hanger, but you could choose any alternative measurement you prefer.
Click OK to continue.
Then, use the Move tool to move our ellipse to align with these guides. We want it in the middle of the document, and aligned to that 5/8" guide from the top of the canvas, like this example, below.


Step 9
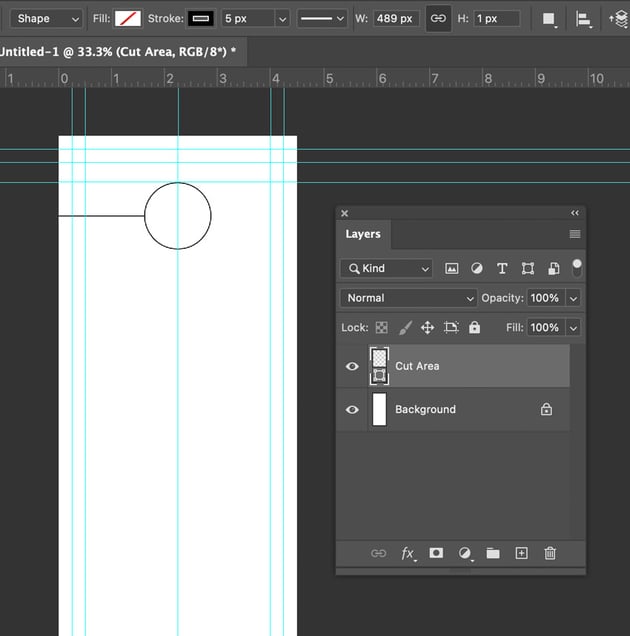
Finally, let's use the Line Tool to add a cut line that connects our door tag hole. If we don't have a cut here, we can't get the door tag on a door knob.
Select the Line Tool in your Tools panel. Make sure we have the same options from our ellipse still selected up in the Options panel. This was No Fill, a black Stroke, 5 px in Width, and a solid line.
Click and drag to draw a line from the ellipse to the edge of your document. Hold down the Shift key to create a perfectly straight line.
And now we have a basic, blank door hanger template. Keep in mind that you could create this in any dimensions you prefer. Make it longer, shorter, create a small door hanger template, or use a different shaped hole. It's up to you.


2. How to Design a Door Hanger Template
Step 1
Now, let's explore how to design a door hanger template. In this example, we'll design for an open house. Keep in mind that a door hanger template has somewhat limited space; the top is largely occupied by the door knob. In addition, we need to make sure that key information is quickly and clearly visible.
Let's start by adding an image, since that would be essential here. We'll use this stock photograph of a house as an example. Open your image in Photoshop by going to File > Open. Then, go to Select > All to select the entire image.
Go to Edit > Copy, and then return to your door hanger template. Go to Edit > Paste to paste the image into the document.


Step 2
We can then go to Edit > Free Transform to resize this image to fit our design, by clicking and dragging on the visible resize handles. Tap Return on your keyboard once you're happy with your resized image.
Use the Move Tool to reposition your image. Here's an example of what you could try.


Step 3
Another essential item here would be the company or business logo. We'll use this example logo design from Envato Elements in this design.
Follow the same process from Step 1. Open your image, copy it, and then paste it into your design. Use Free Transform and the Move Tool to position the logo.
Here's an example of where you might want to place the logo. I went with the bottom of the composition.


Step 4
Let's return to our Layers panel. You'll notice that our images were pasted onto new layers by default. It's a good idea to name these layers, for organizational purposes (as we did earlier in the tutorial).
Create a new layer by clicking on the plus sign at the bottom of the Layers panel. Position this layer right on top of the Background layer (and below all the others).
Now, let's use the Rectangle Tool to draw some rectangular shapes behind our photo layer. Try this with a blue Fill color and no Stroke. Click and drag to draw your rectangles. Here is an example layout with two different rectangles: one at the top and one at the bottom.


Step 5
Next, let's use the Type Tool to add some text to our composition. Click on your design to start typing out some text. I'll begin with the title "Open House".


Step 6
Let's turn to the Character panel to customize our text. Here, we can adjust the font, size, color, and more. For this design, we'll use the Visia Pro Heavy font for our title.
Continue to add text with the Type Tool. For example, it would be a great idea to bring emphasis to contact information, like a phone number. It's best to give it a large place in the composition. Consider adding smaller, supplemental text too, like the house's address and some key information. Visia Pro Light and Regular are great matching choices for other parts of our design.
Here's an example of how you could choose to arrange and position your text. Feel free to use this example or experiment with your own ideas:


Step 7
We can also add some decorative components to our design too, to create some interest. Let's experiment with these fun, geometric textures.
Start by opening the texture by going to File > Open. This particular wavy texture is #70 in the collection (it comes with many to choose from!). We're going to repeat that same process from earlier again: open your image, copy it, and paste it into your document.


Step 8
Photoshop will paste this image on a new layer. Let's move this layer in our Layers panel right above our colored rectangles.
Since this is a seamless pattern, we can also duplicate this layer to easily extend its width. Right-click on PC or Control-click on Mac and choose Duplicate Layer. Then, use the Move Tool to move this copy to the opposite side. The result gives us a pattern that continues across the base of the entire design.
To merge these layers together, hold Control on PC or Command on Mac, and then click on the layers you'd like to select. Then, go to Layer > Merge Layers. Now, our pattern is continuous and on one contained layer.


Step 9
With our pattern layer selected, go to Image > Hue/Saturation, and turn the Lightness value all the way up, so our pattern looks white. Toggle Preview on if you'd like to see your adjustments here, before you commit to them. Click OK to continue.


Step 10
Now, reposition this layer on top of the base colored rectangle, so it looks like a series of wavy lines. With the Move Tool active, click and drag to move this content. This is a quick and easy way to create a fun and interesting shape in our layout.


Step 11
Finally, let's copy this layer with our white, wavy lines on it. Right-click on PC or Control-click on Mac on this layer. Then select Duplicate Layer.
With the Move Tool selected, click and drag to position this second copy of our pattern on top of the colored rectangle towards the top of the composition.
Turn the Opacity down to 30% on this layer. This still gives us the wavy effect, but with a different twist.


And There You Have It!
We've created our own door knob hanger template. While this demo is for an open house door hanger template, you could push this in any way you like. Use these techniques to create anything from a do not disturb wedding door hanger template to a door tag template for your business, or even a Cricut door hanger template for fun home projects.
Want to see your door hanger template in action before you print and cut it? Try a door hanger mockup template! Check out our design in this photorealistic template, below. This can be a fun way to try out different shapes and cuts too, like in this mockup.
Check Out These Door Hanger Ideas
Using a door hanger template, word spreads when your viewer reaches for the door handle. They can be a fun and affordable way to advertise your business. They can also make for fun home decor.
If you're looking for some design inspiration, check out these door hanger ideas. You can also download them now; they're all included with unlimited downloads on Envato Elements.
1. Do Not Disturb Wedding Door Hanger Template Cricut


Looking for a do not disturb door hanger template? This one is a fun choice for a Cricut door hanger template too. Print and cut it with your own DIY tools.
2. Carpet Cleaning Door Hanger Template


Advertise your cleaning service with a door hanger template like this one. It can be a great way to get the word out to local customers.
3. Printable Door Hanger Template Vector


Other businesses can benefit from using door hanger templates too. For example, you could advertise tax services, Internet services, restaurant/food services, and much more.
4. Party Event Template for Door Hanger Sign


Throwing a party or event for your community? A door knob hanger template can help get the word out. Share vital information like dates and contact info. You can even require an RSVP.
5. Florist Flower Door Hanger Template


This flower door hanger template is a great choice for florists, but could be adapted for a variety of businesses. Try including a discount code or other incentive to entice customers.
6. Gym Fitness Door Knob Hanger Template


Whether you're opening a new business, sharing a new promotion, or just looking to get the word out about your services, a door tag like this one could be a great solution.
7. Small Door Hanger Template Mockup


If you're looking to create a small door hanger template, try a Photoshop mockup like this one. Mockups are such a handy way to test out your design and see how it might look in a photorealistic setting.
8. Laundry or Carpet Cleaning Door Hanger Template


Door tags can be a great way to attract a local audience. Let the community know about your service, restaurant, products, and more.
9. Real Estate Door Hanger Template Vector


Real estate is another industry that can really benefit from trying out a door hanger design. Advertise local listings, offerings, and more.
10. Funny Do Not Disturb Door Hanger Template Mockup


But door hangers can be fun for other things too, like at-home crafts, celebrations, and more. Use this mockup to try out some fun, chalk-styled door tag designs.
Why Not Design a Door Hanger Template Today?
Now that we've explored how to design a door hanger template, what would you create? If you're really crafty with your DIY door hanger template, Cricut can be an awesome tool for cutting out your creation. Or take your custom door hanger template to a professional printer. Your door tag template could work in a variety of ways. Remember, you can keep and reuse your blank door hanger template too.
If you're looking for door hanger templates, stock photos, logo designs, graphics, fonts, and more, check out Envato Elements. One low price gets you unlimited access to a giant library of professional content.
Want to learn about creating more content, like newsletters, flyers, and other templates? Check out these free tutorials from Envato Tuts+.

 Newsletter Templates35 Best Company Newsletter Templates (New for 2021)
 InstagramHow to Create an Instagram Post Template in Photoshop
 RestaurantFlyer43 Best Restaurant Flyer Templates (Food Flyer Designs to Download)
 Newsletter Templates41 Best Newspaper Templates to Download (InDesign, PSD, PDF)
 Flyers25+ Best Customizable Marketing Flyer Template Design Ideas for 2021

No comments:
Post a Comment