Whether you are a beginner or an expert, mirroring an image in Adobe Photoshop is one of the most commonly used skills. However, with so many tools available to you, it might be quite daunting to learn for someone who is just getting started.
So for this tutorial we will learn how to mirror an image in Photoshop (both horizontally and vertically) using a few different techniques. You'll also learn all the necessary steps along the way, including:
- how to flip an image in Photoshop
- how to flip a layer in Photoshop
Follow along with us over on our Envato Tuts+ YouTube channel:
What You'll Need
You'll need the following resources in order to complete this project:
Find more resources on Envato Elements!
1. How to Open Your Image
Step 1
To open your image in Adobe Photoshop, you need to go to the top menu bar and select File > Open. Select the image file from your hard drive and click Open.

Step 2
This will create a new file where you can edit your image.

Step 3
As an additional step, you may want to create a Photoshop layer using the image. To do this, you need to double click on the 'Background' layer in the Layers panel, which opens the New Layer window. Rename the layer to a suitable name and click OK.

2. How to Flip an Image in Photoshop Horizontally
Step 1
Let's learn how to flip an image in Photoshop horizontally. Go to the top menu bar and select Image > Image Rotation > Flip Canvas Horizontal.

Step 2
This will flip the image horizontally without the use of layers.

3. How to Flip an Image in Photoshop Vertically
Step 1
Now let's learn how to flip an image in Photoshop vertically. Go to the top menu bar and select Image > Image Rotation > Flip Canvas Vertical.

Step 2
This will flip the image vertically without the use of layers.

4. How to Create an Action
Step 1
You can also create a Photoshop action for flipping your image. Creating an action in Photoshop will allow you to automate the steps quickly and easily.
Navigate to the Actions panel or go to Window > Actions. Click on the Create New Action button in the Actions panel.

Step 2
Once you've clicked on the Create New Action button, you'll be prompted to fill in a few options first. These settings can be useful when creating your new Photoshop action and can help you identify it more quickly.
- Name: Choose a suitable name for the action.
- Action Set: Choose default.
- Function Key: This allows you to map an action to a keyboard key so that when you press that button, it will perform the action (for example F3).
- Color: You can assign a color to the action to help you identify it more quickly.

Step 3
Once you are happy with the initial action settings, you can click on the Record button. When you click on this button, everything that you do in Photoshop will be recorded as part of the action. The small button on the Actions panel will also change to a red dot to let you know that you are recording.

Step 4
Now repeat the steps for either flip horizontal or flip vertical. Once you have finished recording, click on the Stop Playing/Recording button. The action is now saved and can be found in the list of actions in the Actions panel.

Step 5
Excellent! Now we have created an action to flip the image. You can test that the action works on another image by opening up a different image. Select the action from the Actions panel and then click on the small grey Play Button at the bottom.
This will repeat the flipping action effect on any photo! You can make actions for flipping both horizontally and vertically.

5. How to Create a Reflection
Step 1
Now that we are familiar with flipping images, we can use this technique to create a mirror image or a reflection. To do this, we must first create a duplicate layer from the original image and learn how to flip a layer in Photoshop.
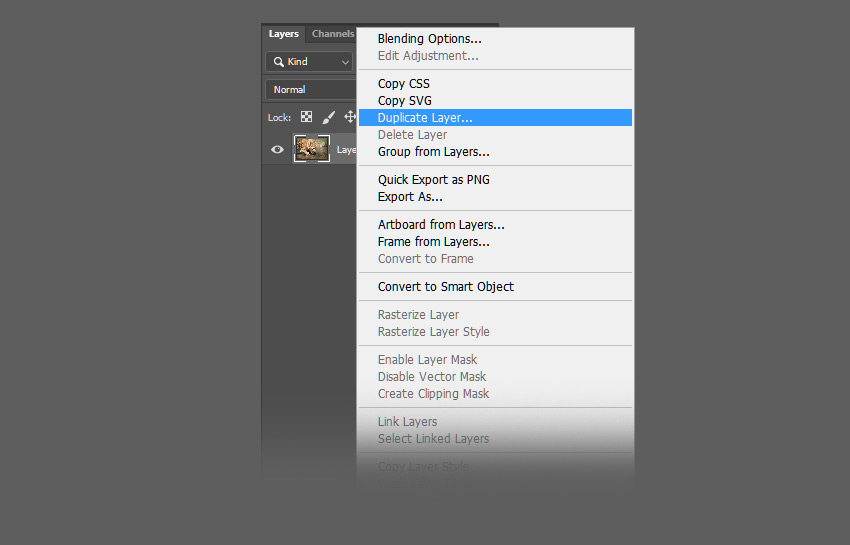
First make sure that the original photo is a layer by double-clicking and renaming it. Then, right-click on the layer and select Duplicate Layer.

Step 2
This will create a duplicate layer which is identical to the original. Rename the duplicate layer appropriately.

Step 3
Flipping a layer uses slightly different tools compared to flipping the canvas. For this image, we want to create a reflection in the water, which will require us to flip the duplicate layer vertically. To do this, go to the top menu bar and select Edit > Transform > Flip Vertical.

Step 4
On the newly flipped layer, use the Marquee Tool to select the area above the animal's paw and then press the Delete button on the keyboard to remove it.

Step 5
Hide the duplicate layer for now by clicking on the Eye Icon next to the layer. Select the Crop Tool (C) and extend the bottom of the image by clicking and dragging the left mouse button.

Step 6
You want to extend the canvas just enough so that there is room for the flipped image to act as a reflection for the lion cub.

Step 7
Make sure to reveal the duplicate layer again by clicking on the Eye Icon next to the layer, and then use the Move Tool (V) to move it directly below the original photo.
The duplicate layer must be above the original layer in the hierarchy in order for the flipped image to be displayed correctly.
Line up the duplicate layer so that any parts of the lion that make contact with the water (such as the paws) are touching each other.

6. How to Blur the Reflection
Step 1
We can also make some adjustments to the reflection to sell the image and to make it a bit more believable. First, we can add a bit of blur to the reflection layer. To do this, go to the top menu bar and select Filter > Blur > Gaussian Blur.

Step 2
In the Gaussian Blur window, select a Radius of up to 5 Pixels and click OK.

Step 3
This will help blur the reflection layer. Adjust the blur radius to your liking by repeating the steps above.

7. How to Add Wave Distortion to the Reflection
Step 1
Next, we will add a bit of distortion to the reflection to give it a slight "ripple" effect. To do this, go to the top menu bar and select Filter > Distort > Wave.

Step 2
Adjust the wave values to the following:
- Number of Generators: 50
- Min Wavelength: 10
- Max Wavelength: 250
- Min Amplitude: 1
- Max Amplitude: 10
- Scale Horiz: 100%
- Scale Vert: 1%
Feel free to play around with these values to find a look that suits your image.

Step 3
Drag and drop the water texture on top of your image to create a new layer. Then use the Free Transform Tool (Control-T) to resize the layer to fit on top of the reflection layer.

Step 4
Blur the water texture as well by going to the top menu bar and selecting Filter > Blur > Gaussian Blur. Select a suitable radius value of around 2 to 5 and click OK.

Step 5
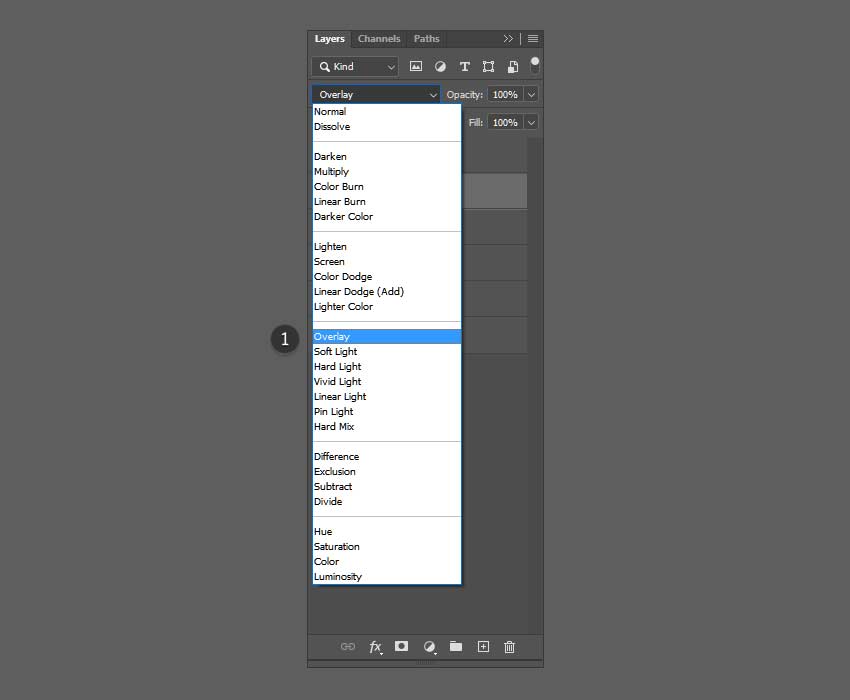
In the Layers panel, select Overlay from the dropdown menu to change the blend mode of the layer.

Step 6
The Overlay blend mode will allow us to see through the water texture layer into the image below.

Step 7
In the Layers panel, set the Opacity of the water texture layer to 50% to reduce the contrast.

Awesome! You're Finished!
Congratulations! You have successfully completed this tutorial on how to flip and mirror an image in Adobe Photoshop. I hope you found this tutorial helpful and that you've learned many new tips and tricks that you can use for your future designs. See you next time!

Learn More Photoshop Actions & Photo Manipulation!
If you liked this and are looking to learn some Photoshop actions or photo manipulation skills, check out the tutorials below! Expand your expertise by going through these in-depth guides. Happy designing!
 Adobe PhotoshopHow to Create an Ancient-Egypt-Inspired Cat Photo Manipulation in Photoshop
 Photo ManipulationHow to Create a Fun Giant Dog Photo Manipulation in Photoshop
 Photo ManipulationHow to Create an Autumn Queen Photo Manipulation With Adobe Photoshop
 Photo ManipulationHow to Create a Cerberus Photo Manipulation in Adobe Photoshop
 Photo ManipulationHow to Create a Vintage Portrait Photo Manipulation in Adobe Photoshop
 Adobe PhotoshopHow to Create an Abstract Diamond Lens Effect in Photoshop
No comments:
Post a Comment