
Welcome to How to Make a Gradient in Illustrator! In this tutorial, you will learn the step-by-step process of how to create basic gradients in Adobe Illustrator.
Follow along with us over on our Envato Tuts+ YouTube channel:
1. How to Make a Gradient in Illustrator
Step 1
To create a gradient, you must first have access to the Gradient panel. This should be located in the toolbar on the right. You can also access this by going to Window > Gradient.

Step 2
Clicking in the Gradient panel for the first time will select a white and black gradient by default (otherwise, the last used gradient will be applied by default). To apply a gradient to an object, first select the object to which you want to apply the gradient by clicking on it. Then simply click on the Gradient Box or the Gradient Bar inside the Gradient panel.
This will automatically apply the gradient to the object. By editing the look of the gradient in the Gradient panel, you will also change the gradient of the selected object.

Step 3
To define the gradient colors, double-click on one of the color stops under the gradient bar. This will open up some options to choose a color. When you choose a color, it will automatically be applied to the gradient.

Step 4
Define an ending color by clicking on the color stop on the right of the bar.

Step 5
Once the colors have been defined, you can choose to adjust the location of the starting point and/or the end point. This will change the look and smoothness of the gradient. To do this, click and drag the color stop left or right until you are happy with the result.

Step 6
To edit the look of the gradient further, you can adjust the location of the midpoint (represented by the diamond icon). This is where the gradient displays an even mix of both the starting and ending colors. To do this, simply drag the diamond left or right.

Step 7
You can also add extra colors to your gradient. To do this, click below the gradient bar to create another color stop. Choose a color as you did previously and use the mouse to click and drag a location for the color stop. Repeat this technique to create more color stops.

Step 8
To delete a color stop, simply select it with the mouse and click on the Delete Stop button or click and drag the color stop downwards.

Step 9
You can also adjust the angle of the gradient by choosing a value in the Angle Dropbox or by entering a value.
The angle will be automatically applied if you have an object selected.

Step 10
To adjust the opacity of a color stop, click on the color stop and use the Opacity Dropbox underneath the Gradient Bar. You can either type a value into the box or move the Opacity slider in the control panel.
The opacity of a color is represented by a checkered pattern when the value is below 100%.

Step 11
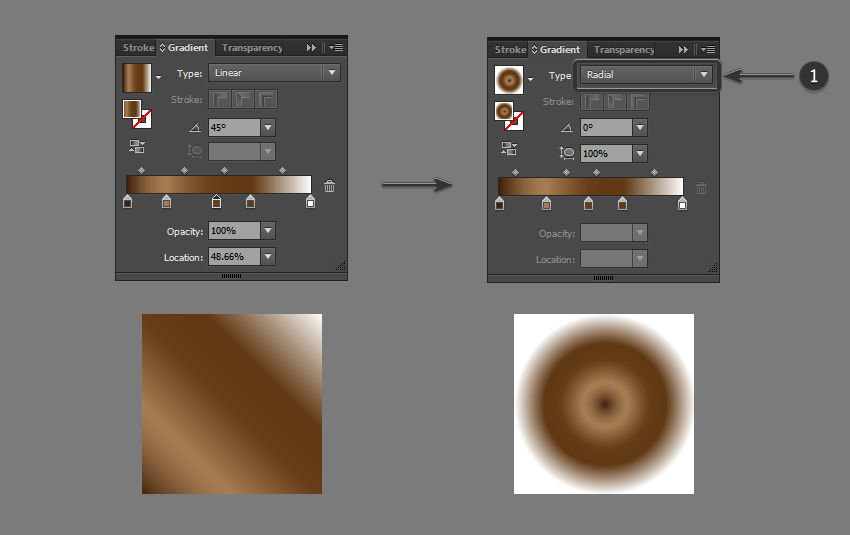
You can also choose the Gradient Type by clicking on one of the options at the top of the Gradient panel.
2. How to Save a Gradient in Illustrator
Step 1
To save a new gradient that you have created, you must add it to the Swatches. To do this, open up the Swatches panel (Window > Swatches).

Step 2
With the gradient still selected, click on the New Swatch button.

Step 3
Name the swatch in the popup window and click OK. This will create a new swatch with the gradient that you have created. You can also click and drag the gradient fill box from the Gradient panel into the Swatches panel.
For example, we have named the new gradient 'Dark Bronze'. Every new swatch you create will appear at the end of the list.

Step 4
To save the swatch library, click on the library button on the bottom left and select Save Swatches. Enter a file name and click Save. This will save your current swatches library in the default location for Illustrator, although you can specify a new location if you wish.

3. How to Load a Gradient in Illustrator
Step 1
Illustrator provides a preset range of gradients that you can use in the Gradient panel or the Swatches panel. All the gradients you create will also be found in the Swatches panel.
Open the Swatches panel by going to Window > Swatches.
Step 2
Click on the library button on the bottom left. This will open up all the swatch options for you to choose from. To choose one of the preset gradients, navigate to Gradients and choose from a wide range of options such as metals, seasons, sky, water, and earth tones.

Step 3
To load the swatch library that you have created and saved previously, navigate to User Defined, and select the saved file name from the list.

Awesome! You're Finished!
Congratulations! You have successfully completed this tutorial. I hope you found this tutorial helpful and that you've learned many new tips and tricks that you can use for your future illustrations and designs. See you next time!

Learn More Gradient Skills!
Now that you have learnt the basics of creating, saving and loading gradients, check out the tutorials below! Expand your expertise by going through these in-depth guides. Happy designing!
-

How to Create 5 Awesome Gradient Effects in Adobe InDesign
-

How to Create Transparent Water Droplets With Gradient Mesh in Adobe Illustrator
-

How to Create a Cartoon Gradient Text Effect in Adobe Photoshop
-

How to Draw an Abstract Gold Background in Adobe Illustrator Using Gradient Mesh

No comments:
Post a Comment