
In this tutorial, you will learn to create three different glitch techniques using Adobe Illustrator. We will work with vectors, allowing us to resize the elements as much or as little as we want without losing the quality.
What You Will Learn in This Adobe Illustrator Tutorial
- How to draw a glitch in Illustrator using basic shapes
- How to create a glitch effect in Illustrator using Pathfinder techniques
- How to create a glitch effect in Illustrator using a photo
If you don't have the time to learn how to create a glitch effect in Illustrator, you can always try this Glitch Graphic Style from Envato Elements. With just a few clicks, you can create your own glitch pattern, glitch logo design, or VHS effect in Illustrator.

For more inspiration on how to adjust or improve your vector glitch, you can find plenty of resources at Envato Elements.
What You Will Need
You will need the following resources in order to create a glitch in Illustrator:
- The Hustle Font
- Mountains and Boat Night Landscape
Follow along with us over on our Envato Tuts+ YouTube channel:
1. How to Create a Glitch Pattern
For this tutorial, we will start with one Illustrator file. We will create separate artboards as we work through the tutorial.
Step 1
In Illustrator, go to File > New. Name the document Vector Glitches. Set the Unit to Pixels and the Width to 600 px and Height to 600 px. Set the Color Mode to RGB and the Resolution to 72 Pixels/Inch. Click OK. Now that you're set, let's learn how to draw a glitch from scratch.

Step 2
For the first glitch effect in Illustrator, we will create smaller patterns that we will combine later to create the bigger glitch pattern.
On the toolbar, select the Rectangle Tool (M). Click on the artboard to bring up the Rectangle Options Window. Activate Constrain Width and Height Proportions, and set the Width and Height to 15 px. Click OK.
Create a checkered pattern by multiplying the square. Press Option-Shift and drag the square diagonally. Select both shapes and multiply them by pressing Option-Shift and dragging them vertically. Select all the shapes, press Option-Shift, and drag horizontally.
By pressing Option, we are multiplying the shape. By combining Option-Shift, we are multiplying and maintaining the vertical/horizontal alignment.
Group the pattern by selecting all the shapes and pressing Command-G.

Step 3
Multiply the pattern by pressing Command-Shift and dragging. Resize the vector by stretching the pattern horizontally and shortening it.
For the patterns on the right side, duplicate the pattern by pressing Command-Shift and dragging. Double-click on the multiplied pattern to enter Isolated Mode. Using the Selection Tool (V), select some of the elements and delete them.
Feel free to create your own pattern within these parameters.

Step 4
Let’s create the vertical and horizontal lines. On the toolbar, select the Rectangle Tool (M). Click on the artboard for the Rectangle Options Window. Deactivate Constrain Width and Height Proportions, and set the Width to 7 px and the Height to 35 px. Click OK.
Duplicate the element by pressing Command-Shift and dragging horizontally once. You can decide on the distance between these two elements. Once you’ve duplicated the shape, press Command-D to repeat the action multiple times. With this trick, you can duplicate the shape as many times as you wish.
Group the pattern by selecting all the shapes and pressing Command-G.

Step 5
Now that the pattern is grouped, duplicate it by pressing Command-Shift and dragging. Edit the patterns by stretching the elements in different directions. See the image below for an example:

Step 6
For the last pattern, create rectangles of different sizes and stack them. On the toolbar, select the Rectangle Tool (M). Click and drag to draw on the artboard. I created a set of four patterns of different shapes by only using rectangles. Feel free to add more rectangles to the stack.
Group the shapes by selecting the elements and pressing Command-G.

Step 7
Now that we have all the shapes, let’s create the final composition. Duplicate the board with the patterns by pressing Shift-O and dragging the board. Remember, you can hold Shift to maintain the vertical/horizontal alignment.
Let's work on this like putting together a puzzle. There is no right or wrong. Feel free to resize and stretch the grouped elements as you need. The key is to cover the board with the elements to create a non-repetitive glitch pattern.

Step 8
Now that we have the final composition done, let’s add a few more details for contrast.
Select the elements on the current active board by pressing Option-Command-A, followed by Command-2 to lock the elements.
On the toolbar, select the Rectangle Tool (M). Create three rectangles of any size. Select one rectangle and double-click on the Fill color. In the Color Picker window option, set the color value to #FF0000. Click OK. Set the color of the other two rectangles to #00FF00 and #0000FF.
Duplicate the rectangles, and arrange them vertically and horizontally like the image below. This will allow us to use the elements together and separately.

Step 9
Select the new elements. Send the elements to the back of the main composition by pressing Shift-Command-[. Multiply the elements by pressing Option and dragging. Distribute the rectangles behind any of the previous patterns we created. Feel free to resize them.
Great job! Remember that you can create many iterations of this glitch pattern—there is no right or wrong as long you follow these simple parameters:
- Create simple pattern groups and arrange them by balancing black and white pockets.
- Work on the composition like a puzzle. The only difference is that here, there's no right or wrong!
- Use a limited number of colors.

2. How to Create an Illustrator Glitch Text Effect
Step 1
For the second glitch effect in Illustrator, you will new a new artboard. Create a new one by pressing Shift-O. Head over to the Control bar, activate the Create New Board button, and click in the window. If you don’t have the Control bar open, head over to Window > Control to activate it.

Step 2
On the toolbar, select the Rectangle Tool (M). Click on the artboard to bring up the Rectangle Options Window. Activate the Constrain Width and Height Proportions, and set the Width and Height to 600 px. Click OK.
Double-click on the Fill color and set the color to #000000. Lock the square shape by selecting it and pressing Command-2.

Step 3
On the toolbar, select the Text Tool (T) and click on the board to type GLITCH. Head over to the Control bar and set the font to The Hustle and the Size to 300 pt. Press Shift-Command-O to convert the text into outlines.
Head over to Window > Align to bring up the Align panel. Select the text frame. On the Align panel, click on the Align To: button and select Align to Board. Under Align Objects, select Horizontal Align Center and Vertical Align Center.

Step 4
On the toolbar, select the Rectangle Tool (M). Create rectangular lines over the text. Try to have a variety of thicknesses and spacing between the rectangles.

Step 5
We need to use the Pathfinder options. If you don’t have this panel, head over to Window > Pathfinder to bring it up.
Using the Selection Tool (V), select the rectangular lines and the word. Head over to the Pathfinder panel and click on the Divide button. Press Shift-Command-G to Ungroup the elements.

Step 6
Use the Direct Selection Tool (V) to delete the elements outside the letters. Follow the image below. Press Command-G to Group the elements again.

Step 7
To create an offset glitch, we need to duplicate the word and color it to create a 3D effect.
While selecting the word, press Shift-Option and click and drag the element to multiply. Drag the first duplicate slightly to the right. Double click on the fill color and use the following color code: #FF0000. Send the element back by pressing Command-[.
Duplicate the word again, press Shift-Option, and click and drag, but this time to the left side. Double click on the fill color and use the following color code: #00FFFF. Send the element to the back by pressing Command-[.

Step 8
Select all of the elements and press Shift-Command-G to Ungroup. Let’s change to Outline View by pressing Command-Y. This way it will be easier to see where the slices are placed.
Using the Selection Tool (V), select the first rectangular division across the word. Hold down Shift, and move the slices by using the Left/Right arrow on your keyboard. Remember you can switch out of Outline View at any moment by pressing Command-Y. Continue to do this for the rest of the partitions.

Awesome! You've successfully created an Illustrator glitch text effect. This simple effect can create a big impact on any text. Make sure you remember to:
- Use limited amounts of color, but feel free to customise!
- Vary the size of rectangles to create a random glitch. Remember, glitches are beautiful imperfections!

3. How to Apply a Glitch Effect on an Illustration
Step 1
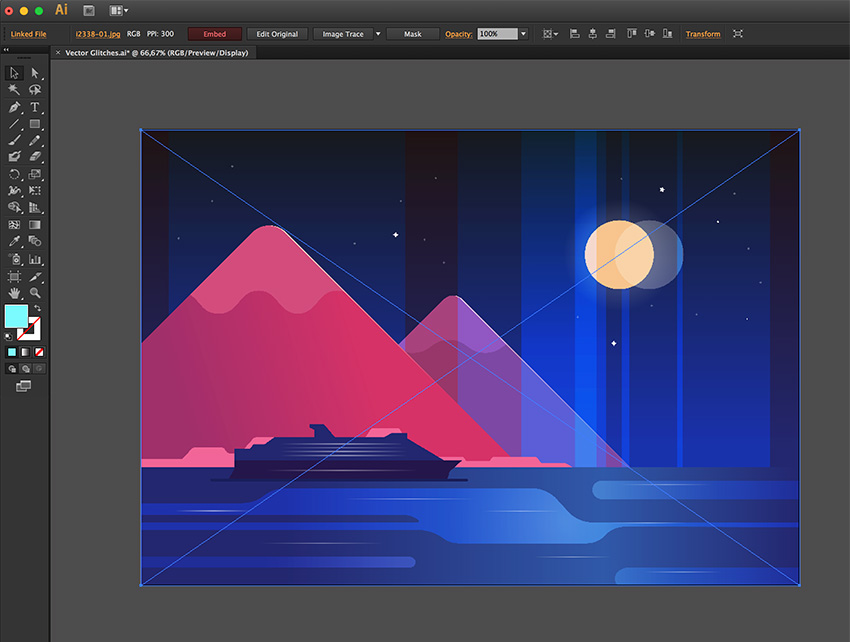
For the third glitch effect in Illustrator, you will need this JPEG file of Mountains and boat night landscape from Envato Elements into the Adobe Illustrator window.
Press Command-O and click on the image to create an artboard that is the same size as the image. While selecting the illustration, head over to the Control bar and click on the Embed button.
Step 2
On the toolbar, select the Rectangle Tool (M). Click and drag to draw a rectangle outside the perimeter of the JPEG image.

Step 3
Head over to Object > Create Gradient Mesh. On the Gradient Mesh window option, set the Rows to 25, Columns to 1, and Appearance to Flat. Click OK.

Step 4
Select both elements, the mesh and the illustration. Head over to Object > Envelope Distort > With Top Object.
On the toolbar, select the Direct Selection Tool (A). You will notice that the mesh has nodes on the left and right sides. With the Direct Selection Tool (A), select a node on the left and the respective node on the right. Hold Shift and drag both points to the right. This is how we will create the glitch.
Continue shifting the other nodes to the left and right. It is not necessary to do all of them, but a few will go a long way.

Step 5
Resize the image to fit over the artboard. Remember that you can do this only if the image is a vector or if the JPEG image is not at 100% of its size.
On the toolbar, select the Rectangle Tool (M). Create a rectangle the size of the artboard. Select both, the new rectangle and the meshed image. To create a Clipping Mask, press Command-7. If you need to adjust it, double-click on the composition to isolate the elements and resize the image.

Great job! You've successfully created a glitched JPEG image. This is a very easy technique that can be applied to any image or vector. Keep in mind that 'less is more' for this technique as you still want the image to be recognisable. Creating something more complicated can compromise the image.

4. Exporting a JPEG File
Step 1
To export the image, press Shift-O to check the artboard number. Head over to File > Export, and in the Export window option, insert the name of the file. Set the Format to JPEG, or PNG if you want to save a transparent file. Check the Use Artboards option, select the Range option, and insert the number of the artboard. Click Export.

Step 2
In the JPEG window option, select the Color Mode. RGB is for screen and CMYK for printing; I am selecting RGB for my file. Set the Resolution to the resolution you need. In this case, I am choosing 72 dpi as I am using this image for screen only. Click OK.

Congratulations! You’ve Finished This Tutorial
In this tutorial, we've covered three techniques for creating a vector glitch. This is very useful if you are looking to resize your artwork without losing the quality. This tutorial will provide different results for everyone. Be sure to post yours in the comments below!
Today, we've learned to:
- Use basic shapes to create complex patterns.
- Use essential Adobe Illustrator tools, such as the Pathfinder tool, the Gradient Mesh tool, and Clipping Masks.
- Use three different glitch techniques to yield different results.

I hope you've enjoyed this vector glitch tutorial and can apply these techniques in your future projects. Feel free to adjust the final vector glitch and make it your own. You can find some great sources of inspiration at Envato Elements, with interesting solutions to improve your glitch Illustrator design.
Popular Glitch Assets From Envato Elements
Envato Elements is an excellent resource for Photoshop and Illustrator glitch assets. Here's a short list of some of the most popular glitch assets that you can find.
Glitch Illustrator Graphic Styles (AI)
Don't have the time to learn how to draw a glitch effect? You can always use this glitch Illustrator graphic styles pack. With this 100% vector asset, you can easily create a VHS effect in Illustrator.
Glitch Effects - 10 PSD (PSD, ASL, PDF)
Cut the hassle of learning how to draw a glitch effect and use this massive pack to create it. Among other effects, this pack might help you learn how to create a VHS effect in Illustrator.

Glitch Effect With GIF Animation (PSD)
No need to learn how to draw a glitch effect if you're in a hurry. Check out this glitch effect Photoshop action and you'll be able to create a glitch effect in just a few seconds.

Glitch Logo Design (PSD, PDF)
Check out this cool glitch effect which can be used to create numerous variations for a glitch logo design. All you have to do to create your own glitch logo design is edit the text inside that smart object.

VHS Glitch Effect Photoshop Action (ATN)
Save the time that you would have spent learning how to draw a glitch and use this quick VHS effect Photoshop action instead.

Want to Learn More?
We have loads of tutorials on Envato Tuts+, from beginner to intermediate level. Take a look!
 Photoshop Actions20 Glitch & VHS Photo Effects With Digital Photoshop Art Styles
 GlitchHow to Create a Glitch Effect Poster in Adobe Illustrator and Photoshop
 GlitchHow to Create an Editable Animated RGB Glitch Effect in Adobe Photoshop
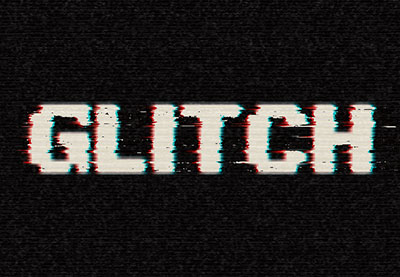 Text EffectsHow to Create an Easy Digital Glitch Text Effect in Adobe Photoshop
 GlitchHow to Create a Set of Glitches in Adobe Photoshop
 Adobe PhotoshopHow to Create a Cool Glitch Photo Effect in Adobe Photoshop
.jpg) Photoshop EffectsHow to Create VHS Glitch Art in Adobe Photoshop
Photoshop EffectsHow to Create VHS Glitch Art in Adobe Photoshop-
GlitchHow to Create an Editable Animated RGB Glitch Effect in Adobe Photoshop
 Text EffectsHow to Create a Quick Retro Video Glitch Text Effect in Adobe InDesign
 Digital PaintingHow to Create a 3D Anaglyph Effect in Photoshop

No comments:
Post a Comment