
Wondering what an outline stroke is in Illustrator and what it's used for?
Well, outline stroke is a simple way to convert a path with a thick stroke into an object and then use it as a building block in your designs. Adobe Illustrator turns your object's stroke value into the dimensions of a new shape.
In this tutorial, you'll learn more about outline stroke and how you can use it for various purposes in your designs like creating decorative borders, masking specific elements in your design, or creating shadows. You will also learn how to make new Illustrator brushes that we will then use to create a beautiful winter holiday text effect. Learning how to install brushes in Illustrator is an important step, and I will show you how to successfully do this for scatter and pattern brushes in order to obtain a great final result of the text design.
Expand your brush library by going to GraphicRiver, where you'll find a great selection of Illustrator brushes in various styles, shapes, and themes. Also, check out the text effects section, where you'll find plenty of inspiration and resources for your projects.
Follow along with us over on our Envato Tuts+ YouTube channel:
Tutorial Assets
To complete the tutorial, you will need the following assets:
1. How to Open a New Document
Launch Illustrator and go to File > New to open a blank document. Type a name for your file, set the dimensions, and then select Pixels as the Units and RGB as the Color Mode.
Next, go to Edit > Preferences > General and set the Keyboard Increment to 1 px and, while there, go to Units to make sure they are set as in the following image. I usually work with these settings, and they will help you throughout the drawing process.

2. How to Create the Text
Step 1
Let's obtain the letters that we need to create this text effect. Grab the Type Tool (T) and write “NOEL” on your artboard using the Comfortaa Font, Bold, Size of 190 pt. Under Tracking, choose a value of 75 or 100 in order to get more space between the letters (1).
While the text stays selected, apply a 12 pt Stroke using any color (2); then drag the bounding box upwards a little to make the text taller (3).

Step 2
Keep the text selected and go to Object > Path > Outline Stroke to convert the stroke into a shape and to get the letter shapes (1). Now, select only the two shapes that make up the first letter, and press Unite in the Pathfinder panel to merge them into a new shape. Continue to do the same thing for the other letters (2).
This is a good example of how to use outline stroke to obtain thicker and bolder text when this version is not available for your preferred font or when you need a bigger surface to apply textures and details to your Illustrator effects.

Step 3
Fill the newly obtained letters with the color indicated; then grab the Ellipse Tool (L) and draw two 35 x 37 px ellipses above the letter "E" as the umlaut. At this point, we are ready to create the text design.

3. How to Create the Colored Stripes Design on the Text
Step 1
Grab the Line Segment Tool (\) and use it to draw a 400 px line at a 135-degree Angle. Give it a 16 px red Stroke and place it on the bottom left side of the first letter. Make a copy of it and move it to the upper right side of the last letter of the text (1). We are focusing on the letters for now and will take care of the umlaut later.
With both paths still selected, go to Object > Blend > Blend Options and choose 13 Specified Steps. Hit OK and then go back to Object > Blend > Make (Alt-Control-B). As a result, your text will be covered with red stripes at an equal distance (2).

Step 2
We will use the same technique to create the green lines in our text design. Use the Line Segment Tool (\) to draw another 400 px line at a 135-degree Angle. Give it a 2 pt green Stroke and then place it in front of the first red line. Make a copy of it and move it after the last red line (1).
Blend these two lines using 14 Specified Steps, and you will get the rest of the green stripes between the reds (2).
Note: Increase the number of steps used to blend the red and green stripes if your word is longer and you have more letters to work with.

Step 3
Select the four letters and then Copy and Paste in Place (Shift-Control-V) to make copies of them in front of everything. Set the copies to stroke-none and fill-none; then go to Object > Compound Path > Make (Control-8) to obtain the “Noel compound path” (1).
Now, select the two blend groups along with the "Noel compound path" and go to Object > Clipping Mask > Make (Control-7) (2).

Step 4
Select the "Noel compound path" again, and Copy and Paste in Place (Shift-Control-V) to make a copy of it. Give it a 5 pt Stroke in green, and press the Align Stroke to Outside option in the Stroke panel. This will create a green border around the text.

Step 5
Copy and Paste in Front (Control-F) the "Noel compound path" again, and color it with white. Go to Effect > Stylize > Inner Glow and apply the settings shown to create a shadow inside the edges of the letters. Set the Blending Mode to Multiply to make the white fill transparent while the shadow remains visible.

4. How to Create the Stripes Border Around the Text
Step 1
Let's learn how to make a brush in Illustrator that will help us add more stripes to the design, but more quickly and easily. Grab the Line Segment Tool (\) and draw a 40 px line on your artboard at a 45-degree Angle. Give it an 8 pt black Stroke and then drag it into the Brushes panel to save it as a New Pattern Brush.
In the Pattern Brush Options window, type “Stripes Border Pattern Brush” as the name, and choose Auto-Between for the Outer Corner Tile (1) and Inner Corner Tile (2) in order to define the way the brush will act in the corners. Also, choose Tints as the Colorization Method so the brush will change color each time we change the stroke color. Hit OK.

Step 2
Select the “Noel compound path” and then Copy and Paste in Place (Shift-Control-V) to make a copy of it in front of everything. Stroke it with the Stripes Border Pattern Brush, change the stroke color to red so the stripes become red, and then reduce the Stroke Weight to 0.5 pt. You now have short stripes all around the letters.

Step 3
Select the green border made earlier in the tutorial, and then Copy and Paste in Place (Shift-Control-V) to make a copy of it in front of everything. Go to Object > Path > Outline Stroke to covert it to a border shape (1).
We are going to use this border shape to mask the short red stripes around the letters, and this is another good example of how you can use an outline stroke to mask edges or specific elements in your design, especially when it comes to Illustrator effects.
Keep the border shape selected along with the stroked path, and go to Object > Clipping Mask > Make (Control-7). Now, the short red stripes are only visible on the outer green border as an extra detail in our text effect (2).

Step 4
Copy and Paste in Place (Shift-Control-V) the “Noel compound path” again and give it a 1 pt white Stroke. Next, go to Object > Path > Offset Path and apply an Offset of 2.5 pt to move the white stroke to the middle of the green border (1). Set the Blending Mode to Overlay, and this will highlight the striped border (2).

5. How to Create and Apply a Holly Leaf Pattern Brush
Step 1
Let's learn how to make a brush in Illustrator. The first one is a holly leaf turned into a simple pattern brush.
First, use the Pen Tool (P) to draw the shape of the leaf, as shown in the image below, and color it with dark green (1). Continue to draw a similar but smaller shape inside, and color it with light green (2). Keep these two shapes selected, and go to Object > Blend > Blend Options. Choose Smooth Color and hit OK; then go back to Object > Blend > Make (Alt-Control-B) (3).
Now, grab a copy of the first leaf shape; move it a little to the right, and change the fill color to a darker shade of green. This will create a small shadow on the right side (4).
Finally, draw the shape of the main vein going through the middle of the leaf, followed by three thinner veins on each side. Use the color indicated to fill them (5).

Step 2
Learning how to save a brush in Illustrator is the next important thing.
Group (Control-G) all the shapes that make up the holly leaf and Rotate -25 degrees in the Transform panel. Now, drag it into the Brushes panel to save it as a New Pattern Brush.
In the Pattern Brush Options window, type “Holly Leaf Pattern Brush” as the name and choose Auto-Between for the Outer Corner Tile (1) and Inner Corner Tile (2) from the drop-down menu. Hit OK.

Step 3
You have learned how to install a brush in Illustrator successfully, so now let's incorporate it into our text design.
Select the letter “N” and then Copy and Paste in Back (Control-B) to make a copy of it. Stroke it with the newly saved Holly Leaf Pattern Brush; then go to the Appearance panel and open the Stroke Options window. Scale the brush 40%, and also set the Spacing to 20%. Hit OK.
At this point, the holly leaves are not entirely visible, so we need to fix this. With the letter still selected, go to Object > Path > Offset Path and apply an Offset of 7 px to move the stroke more towards the outside.

Step 4
Repeat the same process and apply the Illustrator brush to the other letters. If you get an empty space in a corner, just grab a copy of the holly leaf that you drew earlier and arrange it in that place. Send it to the back.

6. How to Create and Apply a Holly Berry Scatter Brush
Step 1
Grab a copy of the holly leaf that you drew earlier and rotate it as shown in the image below. Select the veins and change the fill color to light green (1). With the leaf still selected, go to Object > Transform > Reflect, check Vertical, and hit Copy to get a copy. Move the second leaf to the right; then select only the shadow shape from inside the group and change the fill color to light green (2).
Now, let's create the berry. Use the Ellipse Tool (L) to draw a circle filled with dark red followed by a smaller circle filled with lighter red on top. Keeping both circles selected, go to Object > Blend > Blend Options, and choose 6 Specified Steps. Hit OK and then go back to Object > Blend > Make (Alt-Control-B) (3). Finalize the berry by drawing another small circle on top, filled with burgundy (4).
Draw two more berries in the same way, or just make copies of the one we just finished, and arrange them as shown below (5).

Step 2
Group (Control-G) all the shapes that make up the holly berry and drag it into the Brushes panel to save it as a New Scatter Brush. In the Scatter Brush Options window, just type “Holly Berry Scatter Brush” as the name and leave the other settings as they are for the moment. Hit OK.

Step 3
You have saved the brush in Illustrator, and it's ready to be used. Select the letter “N” and then Copy and Paste in Place (Shift-Control-V) to make a copy of it in front of everything. Stroke it with the Holly Berry Scatter Brush; then go to the Appearance panel and open the Stroke Options window. Change the settings as shown below, and set the Rotation relative to Path. Hit OK.
We need to move these leaves towards the outside a little to make them more visible. We did this earlier for the other brush. With the stroked path still selected, go to Object > Path > Offset Path and apply an Offset of 10 px.

Step 4
Repeat the same process and apply the Holly Berry Scatter Brush to the other letters to complete the Illustrator effect.

7. How to Create Highlights on the Text Effect
Step 1
Use the Pen Tool (P) or the Line Segment Tool (\) to draw a straight path on the letter “N”, as shown in the image below. Give it a 10 pt Stroke and select Width Profile 4 in the Stroke panel, with the tip going downwards. Use a transparent white to white linear gradient at a 90-degree Angle for the stroke; then go to Effect > Blur > Gaussian Blur and apply a Radius of 3 px to make it smoother.

Step 2
Use the technique explained above to create more highlights on the letters. This will make them shinier.

8. How to Create a Shadow Under the Text Effect
Step 1
In the next steps, we are going to use an outline stroke to obtain a shadow. Simply applying the Drop Shadow effect to the letters will not work well in this case because of our complex edges.
Select the copy of the letter “N” that was stroked with the Holly Leaf Pattern Brush, and then Copy and Paste in Place (Shift-Control-V) to make a copy of it. Go to Object > Path > Outline Stroke to get the individual leaves (1).
With the group of leaves still selected, press Unite in the Pathfinder panel, followed by Object > Compound Path > Make (Control-8). As a result, you will get the orange compound path shown in the image below (2).

Step 2
Now, select the copy of the letter “N” that was stroked with the Holly Berry Scatter Brush, and then Copy and Paste in Place (Shift-Control-V) to make a copy of it. Go to Object > Path > Outline Stroke to get the individual holly berry groups. In each of these groups, there is a rectangle with no stroke and no fill at the bottom. You need to remove all of them before you continue (1).
With the group of holly berry leaves still selected, press Unite in the Pathfinder panel, followed by Object > Compound Path > Make (Control-8). You will get the blue compound path from the image below (2).

Step 3
Keep the orange and blue compound paths that you obtained in the previous step selected, and press Unite in the Pathfinder panel followed by Object > Compound Path > Make (Control-8) (1).
The newly obtained shape is exactly what we need to create the shadow for this text effect. Send it to the back by going to Object > Arrange > Send to Back (Shift-Control-[); then go to Effect > Stylize > Drop Shadow and apply this effect twice (2).

These are the settings for the Drop Shadow effects:

Step 4
Use the technique explained above to obtain the shadow compound path for the other letters and, once done, apply the Drop Shadow effect with the same settings.

Step 5
Let's get back to the umlaut so we can finalize the text effect. Apply all the techniques that you've learned so far to the two ellipses, and you will get the same look.

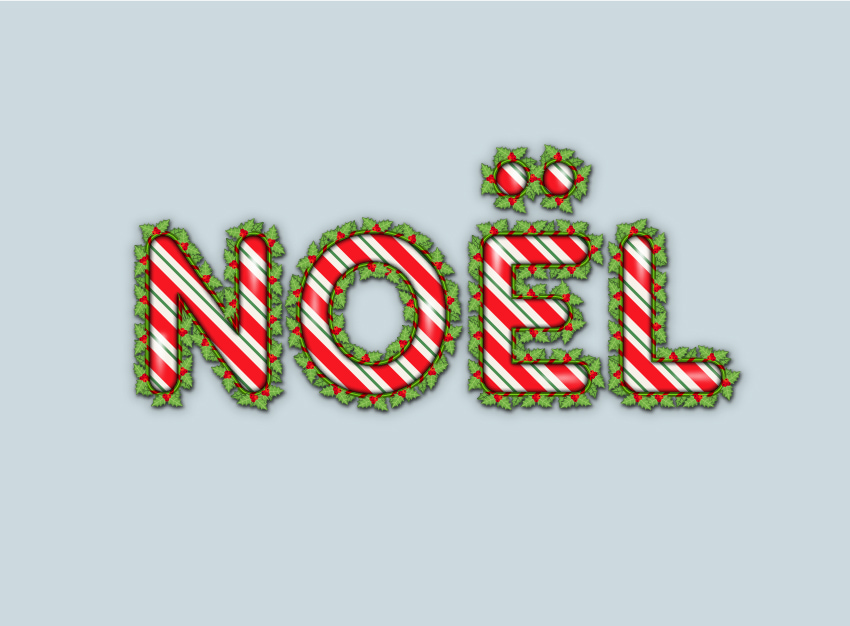
Congratulations! You're Done
Here is the final image of the winter holiday text effect. I hope this tutorial was fun for you and that you learned some new things today. Now you know how to use outline stroke for various purposes in your designs and how to create and install brushes in Adobe Illustrator.
Expand Your Text-Effect Designing Skills!
Keep drawing and learning with these recommended tutorials:
-

How to Make a Brush in Illustrator
-

Quick Tip: How to Create a Pencil Pattern Brush in Adobe Illustrator
-

How to Make a Texture Brush in Illustrator
-

How to Create a Flag Bunting Pattern Brush in Adobe Illustrator
-

How to Make a Pickle Pattern Brush in Illustrator
-

How to Create a Coconut Text Effect in Adobe Illustrator
-

Use a Pattern Rope Brush to Create a Rope Text Effect in Illustrator
-

How to Create a Multi-Layered Text Effect in Adobe Illustrator

No comments:
Post a Comment