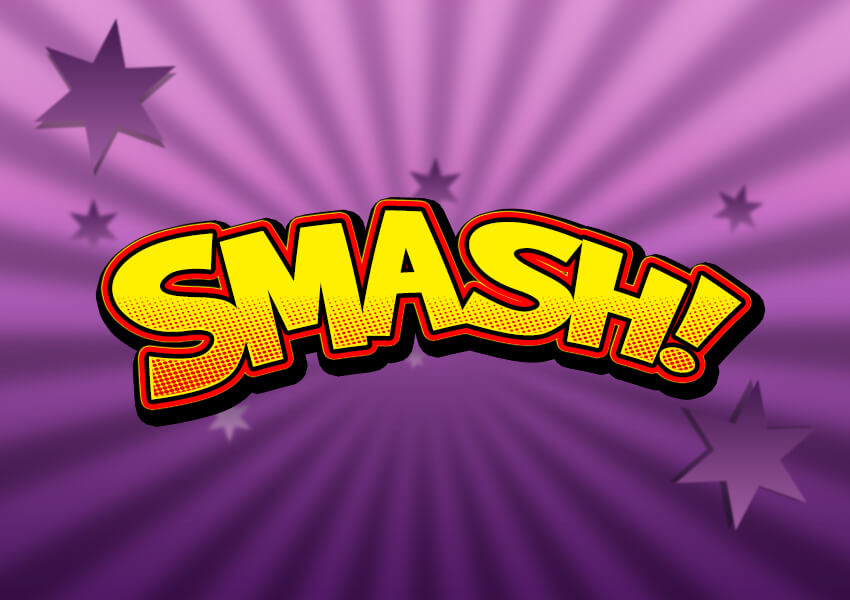
In this tutorial, I will show you how to create an easy cartoon text effect, using a pattern and a layer style.
This cartoon text effect we will be creating is a part of Cartoon and Comic Book Styles from my Cartoon and Comic Book Collection.

Follow along with us over on our Envato Tuts+ YouTube channel:
Looking for more cartoon and comic book resources? Check our selection of tutorials and recommended assets in the following articles:
 Photo Manipulation50+ Insane Comic-Book Style Photoshop Effects and Cartoon Filters
 Photoshop Actions30 Best Cartoon Photo Effects & Comic Text Photoshop Actions
Tutorial Assets
The following assets were used during this tutorial:
- Brady Bunch Remastered font
- Red Dots pattern
- Stars background
Before you start creating the cartoon text effect, download and install the font and the pattern into your Photoshop, and also download the background.
1. How to Load a Document Background
We will use the Stars background from the Tutorial Assets as our document background. It is an 850 x 600 px JPG file. Go to File > Open and open star-background.jpg.

2. How to Create and Warp Text
This text effect is made of one layer, so you can save it as a new style in your Styles palette when you are done.
Step 1
Pick the Type Tool and select the Brady Bunch Remastered font. Set the Font Size around 212 pt. Write "SMASH!" with capital letters and with any color.

Step 2
Now we need to stretch the letter spaces. Select the text layer, and then go to the Character panel and change the Tracking to -20. If you can't see the character panel icon, go to Type > Panels > Character Panel.
Step 3
The last step before we start applying the layer style is to warp our text. Right-click with your mouse on the text layer and select Warp Text from the menu. Set the Style to Arc, select Horizontal, and set the Bend to 30% and Horizontal Distortion to -30%. Now hit OK to apply the changes.

3. How to Create a Cartoon Text Effect
Step 1
Select the layer SMASH! and Double-click the layer to apply the following layer style:
Add a Stroke with these settings:
- Size: 10 px
- Position: Outside
- Blend Mode: Normal
- Opacity: 100%
- Fill Type: Gradient
- Style: Shape Burst
- Angle: 0°
- Check the Dither box
- Set the Gradient with these 2 color stops:
- First gradient stop Color
#f80000and Location at 45% - Second gradient stop Color
#000000and Location at 59%

Step 2
Add an Inner Shadow with these settings:
- Blend Mode: Normal with the Color
#fff000 - Opacity: 100%
- Uncheck the Use Global Light before setting Angle: 180°
- Distance: 3 px
- Choke: 100%
- Size: 0 px
- Check the Anti-aliased box

Step 3
Add a Satin effect with these settings:
- Blend Mode: Normal with the Color
#fff000 - Opacity: 100%
- Angle: 90°
- Distance: 2 px
- Size: 0 px
- Check the Anti-aliased box
- Uncheck the Invert box, if checked

Step 4
Add a Color Overlay with these settings:
- Blend Mode: Multiply
- Click on the Color box and choose the color
#fff000 - Opacity: 100%

Step 5
Add a Pattern Overlay with these settings:
- Click on the Pattern box and choose the Red Dots pattern
- Opacity: 100%
- Scale: 100%
Now you can change the pattern position: just Left-click and Drag your mouse over the text in the document to move the pattern up or down.

Step 6
Add an Outer Glow with these settings:
- Blend Mode: Normal
- Opacity: 100%
- Set Color of glow
#fff000 - Technique: Softer
- Spread: 94%
- Size: 11 px
- Check the Anti-aliased box

Step 7
As a final step, add a Drop Shadow with these settings:
- Blend Mode: Multiply and pick the Color
#000000 - Opacity: 100%
- Uncheck the Use Global Light before setting Angle: 120°
- Distance: 8 px
- Spread: 100%
- Size: 20 px
- Check the Anti-aliased box
Hit OK to apply the layer style.

Congratulations! You're Done!
In this tutorial, you learned how to create a cartoon text effect in Adobe Photoshop.
We started out by creating and warping our text, and then we added multiple different effects in order to create our final text effect.

I hope you've enjoyed this tutorial, and if you like the final effect, don't forget to save this style to your Layer Styles palette for future projects.
This text effect we just created is a part of Cartoon and Comic Book Styles.
Want more? Check out the following cartoon and comic book style tutorials here on Envato Tuts+:
 Text EffectsQuick Tip: Create a Gold Cartoon Text Effect in Photoshop Using Layer Styles
 Pixel ArtHow to Create a Pixel Art Portrait in Adobe Photoshop
 Text EffectsHow to Create a Quick Sketch Text Effect in Adobe Photoshop
 Photoshop ActionsHow to Create a Sketch Effect Action in Adobe Photoshop
 Photo EffectsPhotoshop in 60 Seconds: How to Create an Easy Sketch Effect With Actions
 CartoonHow to Draw, Ink and Colour a Cartoon Car in Adobe Photoshop
 Digital PaintingHow to Create a Pastel Painted Landscape in Adobe Photoshop
 Fan ArtHow to Create a Dark Batman Photo Manipulation in Adobe Photoshop
 Fan ArtHow to Create an Apocalypse-Inspired Photo Manipulation in Adobe Photoshop
 Photo EffectsHow to Turn a Photo Into Comic Book Art in Adobe Photoshop
 Text EffectsHow to Create a Comic-Book Ink Text Effect in Adobe Photoshop
 ComicsCreate a Comic Character: Making a Character Sheet in Adobe Illustrator
 CartoonHow to Create Speech Bubbles and Comic Effects in Adobe Illustrator
 ComicsCreate a Comic: How to Plan and Lay Out Your Comic

No comments:
Post a Comment