
Ever wanted to know how to make a trifold brochure? Trifold brochures can be an excellent tool for getting information to people in an easy-to-use, eye-catching way. In this tutorial, I will show you how to make a brochure template in Adobe InDesign CC. This versatile pamphlet template will allow you to change the information as you need.
Looking for a Trifold Pamphlet Template?
Sometimes, we could also use a little extra help. Try out a trifold layout template if you're looking for a head start on your design project.

You can download this template, and thousands of others, on Envato Elements. One low fee gets you unlimited access to the entire library of creative assets. This includes fonts, stock photos, graphics, and much more. Sign up today to take advantage of unlimited downloads.
Follow along with us over on our Envato Tuts+ YouTube channel:
Trifold Brochure Layout Basics
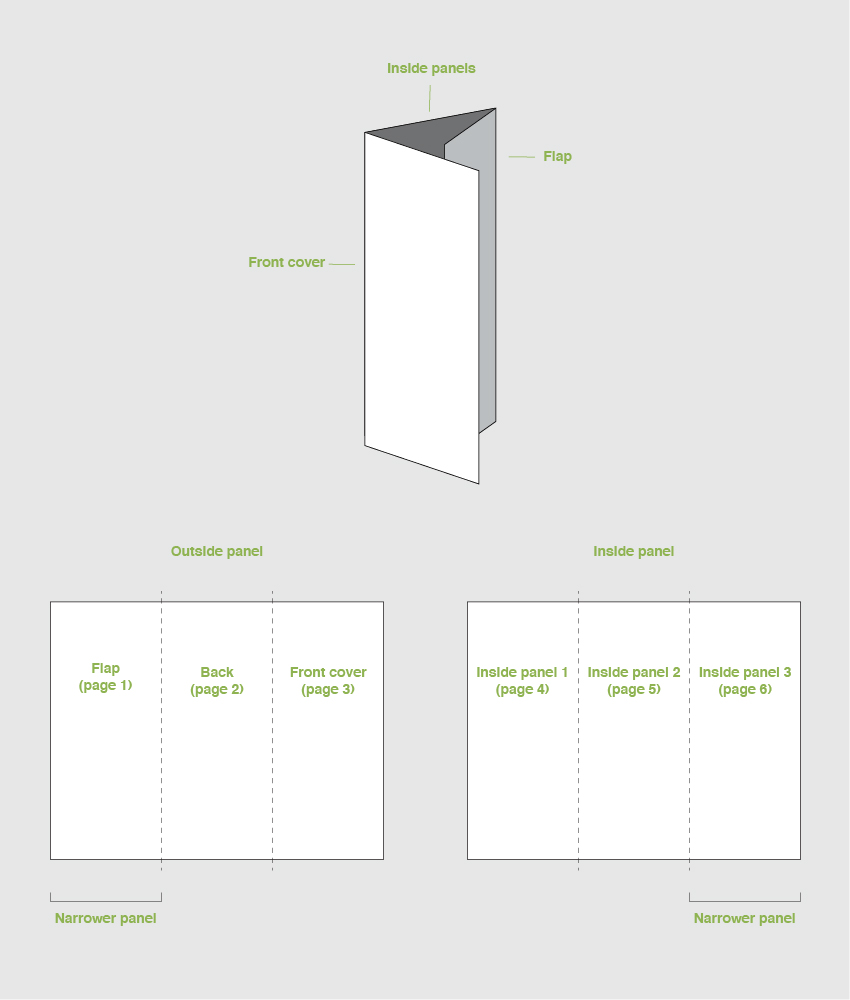
A trifold brochure is a page containing three panels per side for a total of six panels inside and outside of a brochure (it's important to understand how to fold a pamphlet!). Two of the panels are the same width, while one panel is slightly narrower to accommodate the roll fold.
We will be creating a file with six pages and altering the Master Pages later on. This approach will allow us to easily move panels on a template when necessary. We will also be able to make a PDF with crop marks, which will indicate the position of the folds. Do make sure to indicate this to the printer to avoid any mistakes.
Looking for InDesign trifold template inspiration? Check out our recommended brochures in these articles:
 InDesign Templates23 Best Trifold Brochure Templates & Examples (Word, InDesign, & PSD)
 Brochure25 Best Pamphlet Templates (Tri-Fold Brochures, Bi-Fold, and More!)
What You Will Need
You'll need access to Adobe InDesign and Adobe Illustrator; if you don't have the software, you can download a trial from the Adobe website. You'll also need the following assets:
- Two creative owners
- Business people
- Modern architecture
- Young people brainstorming
- Businessman working
- Smartnet Logo
- 150 Line icons
- Sentral font
Download the assets and make sure the font is installed on your system before starting. When you are ready, we can dive in to how to create a trifold brochure together!
Looking for amazing trifold brochure templates? Head on over to Envato Elements or GraphicRiver.
1. Setting Up a Trifold Brochure File in Adobe InDesign
Let's begin our discussion of how to make a trifold brochure with setting up our document.
A common trifold dimension when open flat is Letter size or A4. We will be using a Letter size page for this tutorial, but feel free to use an A4 page if you prefer. As trifold brochure dimensions will vary depending on your needs, I’ve created an equation chart that you can follow below:

Step 1
The trifold brochure size for this tutorial is a Letter page. First, we need to divide the final width (279.4 mm) by 3 (93.13 mm). To this new width, we need to add a buffer for the fold (1 mm). The width of the two panels is 94.13 mm.
Later on, we will modify the size of the shorter panel. We need to subtract (2 mm) from the panel to accommodate the fold (91.13 mm).
In InDesign, go to File > New. Name the document trifold brochure. Set the trifold dimensions to the following:
- Width to 94.13 mm
- Height to 215.9 mm
- Units to Millimetres
- Orientation to Portrait
- Uncheck Facing Pages
- Pages to 6
- Margins to 10 mm
- Bleeds to 3 mm (although it's best to seek your professional printer’s preference)
Click Create.

Step 2
A trifold brochure has a flap that folds in; this is a shorter panel. We will create a second Master Page with this new size.
Head over to the Pages panel. If you don’t have it active, head over to Windows > Pages. The top portion of the panel contains the Master Pages.
Right-click on A-Master > New Master. In the New Master window, make sure Based on Master is set to [Master]. Set the Width to 91.13 mm (subtract 2 mm from the 93.13 mm). Click OK.

Step 3
On the Pages panel, right-click on the B-Master we just created and select Apply Master. In the Apply Master window, under To Pages enter 1, 6 (this is to specify that we are changing Pages 1 and 6). Click OK.
In the Master Page Size Conflict window, click Use Master Page Size.

Step 4
Now that we have the page sizes set up, we can move the pages to set up the spreads. Pages 1-3 will be the outside spread, and Pages 4-6 will be the inside spreads.
On the Main Menu of the Pages panel, make sure that Allow Document Pages to Shuffle is unchecked. Drag Page 2 towards Page 1 to combine. Combine Pages 1-3 as one spread and Pages 4-6. Make sure that you have the BAA and AAB Master Pages configuration.
To exit the Master Pages mode, double-click on the regular pages thumbnail.

Step 5
For this trifold brochure template tutorial, we will work with two layers. This will make it easier to update the template when you need to add new information.
Bring up the Layers panel by going to Window > Layers. Double-click on Layer 1 and rename it Images.
On the Layers panel main menu, select New Layer. Name it Copy, and click OK.

Step 6
We will be using Rulers for this tutorial, so press Command-R to bring them up.
Let’s add some Guides. Head over to Layout > Create Guides. In the Create Guides option window, set the Rows Number to 3 and the Gutter to 0. Under the Options, set the Fit Guides to: Page and click OK. Repeat this step on the second spread.
Show/Hide the guides and margins by pressing Command-;. Alternatively, use W to enter and exit Preview mode.

Step 7
Before we start with the design, let’s add some color swatches. Head over to Window > Color > Swatches to expand the Swatches panel. Choose New Color Swatch button from the main menu. Add the following two colors:
- Yellow: C=0 M=25 Y=100 K=0. Click Add and OK.
- Blue: C=95 M=95 Y=0 K=30
Click Add and OK after you input each of the color values.

2. How to Place Images in Adobe InDesign
Step 1
Let’s start by placing images into the document. On the Layers panel, make sure you have the Images layer selected. We will be working on Page 1-3.
On the Toolbar, select the Frame Tool (F). Using the guides we created, draw frames covering the following:
- Page 1: full page
- Page 2: lower 1/3 of the page
- Page 3: top 2/3 of the page
I’ve changed the color for easier guidance. Make sure all the frames extend to the bleed. This will ensure there are no white edges.

Step 2
Select the full page rectangle and press Command-D to Place an image. Select the Modern architecture image and click Open.
Select the image inside the frame. You can do this by clicking on the donut shape in the center of the frame or by selecting the Direct Selection Tool (A) from the toolbar. Head over to the Control bar, activate the Constrain Proportions for scaling button, and set the percentage to 45%.
This will be a background image. Place the image as you wish—there’s no right or wrong.

Step 3
Select the rectangle on Page 2 and press Command-D to Place an image. Select the Business people image and click Open.
Select the image and head over to the Control bar. Activate the Constrain Proportions for scaling button and set the percentage to 25%. Try to center the hands in the frame using the Direct Selection Tool (A).
Repeat this process for Page 3. Select the Two creative owners image and click Open.
Head over to the Control bar. Activate the Constrain Proportions for scaling button and set the percentage to 35%. Try to place the focused subject within the margins.

Step 4
You’ll notice that the images we placed have different tones. A great way to fix this is to add a colored effect over the top. This is also a great way to apply your brand to the brochure by choosing colors from your logo.
Using the Rectangle Tool (M), create rectangles over each image. Head over to the Swatches panel and select the purple color we added previously.

Step 5
To apply an effect, bring up the Effects panel. Go to Window > Effects.
Select the rectangle on Page 1. Since we will have text over this image, we need to select a Blending Mode that will allow the type to be legible. Select Multiply from the drop-down menu and set the Opacity to 90%.

Step 6
We need the images on Page 2 and 3 to come through more since they will be standalone images. Select both rectangles and set the Blending Mode to Color.

Step 7
Let’s add a contrasting color to some of the empty sections. This will help to reinforce the brand on the brochure template. Select the Rectangle Tool (M) and draw a rectangle covering the top portion of Page 2. Head over to the Swatches panel and select the yellow color we added.
Additionally, create a line under the main image on Page 3. Select the Line Tool (\) from the toolbar. Hold down Shift to draw a straight horizontal line across the panel. Head over to the Control bar, set the Stroke size to 7 pt, and set the Stroke color to yellow.

Step 8
Let’s add a logo to the pamphlet template. Ideally, the logo is placed on the first page and the back of the pamphlet. Press Command-D and select 01_smartnet.eps and 02_smartnet.eps. The 01 file is perfect for the front of the brochure template, and 02 is perfect to go over a colored background.
Resize both images by going to the Control bar and setting the Scaling to 10%.

Step 9
Let’s work on Pages 4-6. Select the Rectangle Tool (M) and draw a rectangle at the very top of the pages. Cover the width of the document, making sure it is extended to the bleeds. On the Control bar, set the Height to 20 mm.
Using the Add Anchor Point Tool (=), add an anchor on the first fold guide. Using the Direct Selection Tool (A), select the point and move it upwards as much as you’d like. We are adding some movement to the inside as the exterior is static.
Head over to the Swatches panel, and select the color yellow.

Step 10
Select the Rectangle Tool (M) from the toolbar. Draw a rectangle that fits Page 4-5 and a second rectangle that covers Page 6.
Select the first rectangle and set the Height to 100 mm on the Control bar. Select the second rectangle and set the Height to 120 mm.
Using the Direct Selection Tool (A), select the top inside points of the rectangles and move both downwards.

Step 11
Select the left object and press Command-D to Place an image. Select the Young people brainstorming and click Open. Select the image and head over to the Control bar. Set the Scale to 10%.
Place an image on the right-hand side object. Select the Businessman working file, and click Open. Select the image and head over to the Control bar. Set the Scale to 35%.
Let’s apply the same color effect here as the outside panel. Select both objects and press Command-C to Copy and Command-V to Paste. Using the Direct Selection Tool (A), select the image within the object and press Backspace to Delete.
Select both objects and head over to the Swatches panel. Set the color to purple. On the Effect panel, set the Blending Mode to Color.

Great job! We’ve finished working on the Images layer, and now it’s time to work on the Copy layer. Head over to the Layers panel, lock the Images layer, and select the Copy layer.
3. How to Format Type Using Paragraph Styles in Adobe InDesign
Paragraph styles allow us to add formatting attributes to be applied to large amounts of text. This is useful if you want to maintain the same type settings throughout your design. Therefore, the styles will keep your template flawless and cohesive. For this tutorial, we will create two styles: headline and body copy.
Step 1
Head over to Window > Paragraph Styles. On the Paragraph Styles panel, select the New Paragraph Style option from the main menu.
In the New Paragraph Style window option, select Basic Character Formats in the left menu. Set the Style Name to Headline. Use the following settings for Basic Paragraph Formats options:
- Font Family: Sentral
- Font Style: ExtraBold
- Size: 20 pt
- Tracking: -15
Click OK.

Let’s add a second Paragraph Style. This time, let’s name it Body Copy and use the following settings for the Basic Character Formats options:
- Font Family: Sentral
- Font Style: Regular
- Size: 10 pt
- Tracking: -5
Click OK.

Step 2
Let’s work on the first spread, Pages 1-3.
Let’s use our new Paragraph Styles. On the Toolbar, select the Text Tool (T). Create a text box on Page 1.
Add the copy you wish to add. To format the text box, select the headline using the Text Tool (T) and click on the Headline style from the Paragraph Styles panel. Select the rest of the body copy and select the Body Copy style from the Paragraph Styles panel.
Select the text box and head over to the Swatches panel. Select the [Paper] color, which will make the type legible against the background.

On Page 2, add a small tagline and contact information—this is great to have on the back of the template. Set the tagline to the Headline style. When applying a Paragraph Style to a text box, you can change the format through the Control bar. This will only change the format on the text box you are selecting and not on the style. Set the contact information to Body Copy and change the Size to 9 pt on the Control bar.
On the Swatches panel, select the color purple for both elements.

Page 3 is the front of the brochure, so add a headline here that describes the information inside. Set the format to Headline style from the Paragraph Style panel. Using the same method as before, select the first line and head over to the Control bar. Change the Family to Regular. This small detail can add something special that will set this headline apart from the rest of the content.
On the Swatches panel, select the color purple.

Step 3
Let’s work on the inside panels. On the Layers panel, select Pages 4-6.
Using the Text Tool (T), create a text box on all three pages. With the help of the Paragraph Styles, format the contents.

Let’s add some vectors on Page 5. Open the 150 Line icons 1.ai file on Adobe Illustrator. Press Command-G to Ungroup the icons. Select the first three icons from the first row. Press Command-C to Copy.

Head back into Adobe InDesign and press Command-V to Paste the icons. Press Command-G to Ungroup the objects. On the Swatches panel, set the color to yellow.
Head over to the Control bar and activate the Constrain Proportions button. Set the Width to 13 mm. Move the icons to the left side within the margins of Page 5.
To make space for each icon, we can use the Text Wrap option. Go to Window > Text Wrap to open the panel. Select all three icons and select the Wrap around bounding box button. Set the Bottom Offset to 6 mm and the Right Offset to 3 mm.
Using the Swatches panel, set the sub-heading color to yellow. This will make it easier for the reader to distinguish this section from the regular copy.

Let’s work on Page 6. Use the Paragraph Styles to format the text.
A great tip when working with bullet points is to use hanging punctuations. This means that the lines after the first line are indented and aligned to the first line (vertically). Avoiding having any text under the bullet point makes for a sharper design.
To do this, we can add an Indent to Here special character by pressing Command-\ after the bullet point. To see if this is activated, head over to Type > Show Hidden Characters. The Indent to Here should be shown as a dagger.

4. How to Export a PDF File for Printing
Before exporting a file for printing, it's useful to take a look around all the edges of the brochure. This is to make sure all the images and vectors bleeding out are touching the bleeds. Press W to go between Preview mode and Normal mode.
Remember that each fold will be represented by a crop mark. Let your professional printer know to avoid confusion. It is also helpful to ask for a printer's proof to make sure the project is printed correctly.
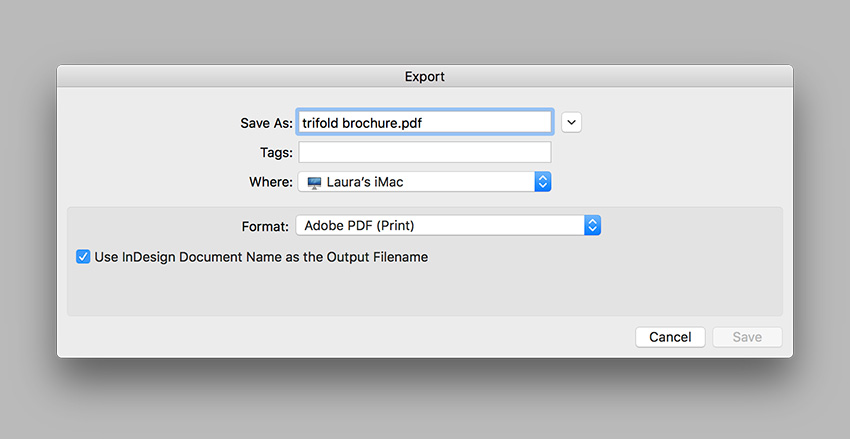
Step 1
To export the file, go to File > Export. Name the file trifold brochure and choose Adobe PDF (Print) from the Format drop-down menu. Click Save.
Step 2
In the Export Adobe PDF window, set the Adobe PDF Preset to Press Quality. Under Pages, select Export As Spreads.

On the left side of the panel, select Marks and Bleeds. Check All Printer’s Marks and Use Document Bleed Settings. Click Export. You will have a ready-to-print PDF file.

Check Out These Tri-Fold Pamphlet Layout Designs
Now that we've covered how to create a trifold brochure, take a look at these stylish templates. You can use all those insights into how to make a tri-fold pamphlet and use it to easily customize these designs.
Consider downloading one today, or check out the design inspiration. It might help inspire your next tri fold layout design.
1. Trending Style Trifold Brochure Pamphlet (AI, EPS, INDD, PSD)

If you think you might prefer a different pamphlet format, try out this trifold pamphlet template. Replace the images, change the colors and make this tri-fold brochure layout any way you prefer.
2. Developer Tri-Fold Brochure Template InDesign (INDD)

Download this tri-fold brochure template InDesign file, and customize it using the pamphlet layout techniques from this tutorial. It has plenty of potential.
3. Gardening Services Templates Brochure Booklet Pack (INDD)

This trifold pamphlet template has so many options. Choose a tri-fold layout or one of the many alternatives included in this brochure pamphlet design.
4. Technobus Multi Format Tri-Fold Brochure Layout (AI, EPS, INDD, PSD)

Create a trifold brochure that's perfect for your project using this brochure booklet template. Not sure what pamphlet format you prefer? This download includes multiple file types.
5. Business Tri-Fold Layout - Trifold Pamphlet Template (INDD)

Using a trifold pamphlet template, it's easy to create a trifold brochure that suits your needs. Prefer different colors? Swap them out. You can customize this as little or as much as you want.
Looking for Even More Tri-Fold Layout Inspiration?
Finding the perfect tri-fold brochure layout for your project can be tough. Check out these inspiring design collections to help spark ideas, or download some new trifold pamphlet template designs today.
 Brochure20 Best Free Bifold & Tri-Fold Brochure Template Designs (Download 2021)
 Templates30+ New Tasty Restaurant & Cafe Menu Templates for 2021
 InDesign Templates50+ InDesign Templates Every Designer Should Own
 Brochure20+ Best Modern Corporate Brochure Templates With Clean Designs for 2021
 Brochure27+ Best New Brochure Templates for 2021 (Design Inspiration & Ideas)
Great Job! You’ve Finished This Tutorial!
In this tutorial, we learned how to make a trifold brochure template that's ready to print. This pamphlet is easy to use and edit to any branding guidelines. Today, we’ve learned to:
- Set up a ready-to-print pamphlet template in Adobe InDesign.
- Design and properly set up a Letter size brochure.
- Create Master Pages and Layers.
- Place images and use blending modes.
- Use the Paragraph Styles panel to format typography.
- Use vectors and format shapes.
- Export a ready-to-print brochure template PDF file.
If you would like to explore more brochure ideas, you can find many customizable pamphlet templates over at Envato Elements and Graphic River. Check it out!


If you liked this tutorial, you might like these:


No comments:
Post a Comment