
In the following steps, you will learn how to create a layered floral typography text effect in Adobe Photoshop.
Floral typography is a design trend that combines nice floral elements with bold typography to create some elegant designs. Learn how to create a piece of flower text art in Photoshop. This floral Photoshop tutorial will show you how to use a flower stock image, with some simple text and a couple of layer styles, filters, textures, and adjustments, to create your own flower typography design. Let's get started!
If you don't have the time to create your flower typography, you can always try Envato Elements, the place where you can find a massive collection of flower text effects, Photoshop effects for flowers, Photoshop flower text, or even floral overlays for Photoshop.

What You'll Learn in This Floral Photoshop Tutorial
- How to create a Photoshop effect for flowers
- How to create a flower text Effect
- How to stylize your flower typography
- How to apply text to the floral typography
Follow along with us over on our Envato Tuts+ YouTube channel:
What You Will Need
You will need the following resources in order to complete this piece of flower word art:
- Flower Bouquet photo
- Big John Regular font
- 21 Paper Textures
The cool thing about the technique used in this Photoshop effect for flowers is that it can work for almost any image you use. High-quality images with slightly large details, however, will help you create a better and neater piece of flower text art.
It's also important to choose an image that can be isolated from the background pretty easily, so that you can add your own background.
1. How to Create a New Document and Set Up the Background
Step 1
Hit Control-N to create a new document. Select Pixels from the Units drop-down menu and enter 3000 in the width and height boxes. Select RGB for the Color Mode, set the Resolution to 72 Pixel/Inch, and then click the Create button. Now that you're set, let's start the work on the Photoshop effect for flowers.

Step 2
Focus on the Layers panel (Window > Layers) to unlock your starting layer, and then click the Create a New Layer button to add a second layer.
Pick the Paint Bucket Tool (G) from your toolbar, make sure that the foreground color is set to black (R=0 G=0 B=0), and simply click on your canvas to fill your new layer with black.

2. How to Set Up the Flower Photo
Step 1
Keep focusing on the Layers panel and drag your white layer on top of the black layer.
Download this flower bouquet photo from Envato Elements and simply drag it inside your document.
Return to the Layers panel, select your photo along with the white layer, right-click on one of these two elements, and go to Merge Layers.
Double-click the name of your black layer and rename it 'Background', and then select the other layer and rename it 'Flowers'.

Step 2
Make sure that your 'Flowers' layer is still selected and select the Magic Wand (W) tool from your toolbar.
Focus on the control panel, set the Tolerance to 10 and uncheck the Contiguous box, and then simply click somewhere on the background from your 'Flowers' layer. This will add a selection around all the white content from your selected layer.
Return to the Layers panel, hold down the Alt key, and press the Add layer mask button to mask the content that you have selected.

Step 3
Make sure that the layer mask applied to your 'Flowers' layer stays selected, and focus on your design. If you take a closer look at the flowers, you'll notice that some sections from the white flowers are masked.
Let's fix this using the Brush Tool (B). Set the foreground color to white (R=255 G=255 B=255) and right-click on your canvas to select a hard round brush tip, adjusting the size or the hardness of the brush as needed.
Simply paint over the areas that should be visible, and keep in mind that you can also use the [ and ] keys to easily increase or decrease the brush size.
If there are any parts that you want to unpaint, you just need to set the foreground color to black and unpaint those areas. Use the X key to easily swap the foreground and background colors.

Once you're done, your masked flowers should look somewhat like this.

3. How to Set Up the Flower Text Effect
Step 1
Pick the Type Tool (T) from your toolbar and focus on the Character panel (Window > Character).
Select the Big John font, set the size to 500, the leading to 400, and the tracking to 150, change the color to white, and simply click on your canvas. Type in 'FLORAL' on three separate rows and switch to the Move Tool (V).
Press Control-A to create a selection around your entire canvas, and click the Align horizontal center and Align vertical center buttons from the control panel to easily move your text to the center of the canvas. Once you're done, press Control-D to get rid of the selection around the canvas.

Step 2
Focus on the Layers panel, make sure that the text is still selected, and lower its Opacity to 50%. This will make it easier to paint the floral parts on top of the text in the following steps.

4. How to Paint and Mask the Flower Text Effect
Step 1
Select your 'Flowers' layer and press Control-J to duplicate it. Drag this new layer to the top of the Layers panel and select the applied layer mask.
Pick the Paint Bucket Tool (G) and set the foreground color to black, and then click inside your canvas to basically mask your entire selected layer.

Step 2
Switch to the Brush Tool (B) and set the foreground color to white. Make sure that the mask applied to the 'Flowers copy' layer is still selected, and then start painting over the parts you want to have in front of the text. Take your time to paint these parts as precisely as possible, and don't forget that you can use the [ and ] keys to easily increase or decrease the brush size.

Step 3
Hold down Control and click the layer mask applied on the 'Flowers copy' layer to load a selection around the mask.
Move to the Layers panel to add a new layer, name it 'Shadow' and select it. Grab the Paint Bucket Tool (G), set the foreground color to black, and simply click inside your selection to fill it with black.
Press Control-D to get rid of that selection, and then press the down arrow key five times to move your selected layer 5 px down.

Step 4
Focus on the Layers panel and drag your 'Shadow' layer below the 'Flowers copy' layer.
Right-click on your 'Shadow' layer and go to Convert to Smart Object, and then go to Filter > Blur > Gaussian Blur. Set the Radius to 7 px and click OK.

Step 5
Focus on the Layers panel, hold Control, and click your text to load a selection around it.
With this selection active, select the 'Shadow' layer and just click the Add layer mask button.

Step 6
Having a closer look between the 'L' and the 'R' from the text, you'll notice a small overlap from the 'Shadow' layer.
To fix this small issue, make sure that the layer mask applied on the 'Shadow' layer is still selected, grab the Brush Tool (B) and set the foreground color to black, and then simply paint over that overlapping area to mask it.

Step 7
Make sure that your 'Shadow' layer is still selected, lower its Opacity to 30%, and change the Blending Mode to Multiply.

5. How to Stylize the Flower Text Effect
Step 1
Focus on the Layers panel, select your text and increase its Opacity to 100%, and then double-click to open the Layer Style window.

Enable the Inner Shadow effect and enter the settings shown in the following image.

Also enable the Drop Shadow effect, enter the attributes shown below, and click OK.

Step 2
Focus on the Layers panel and double-click your 'Background' layer to open the Layer Style window.

Enable the Gradient Overlay, enter all the settings shown in the following image, and click OK.

6. How to Add Shading to the Floral Typography
Step 1
Focus on the Layers panel, hold down the Control key, and click the layer mask applied for the 'Flowers' layer to load a selection around it.
Add a new layer inside the Layers panel, rename it 'FlowerShadow', and select it. Grab the Paint Bucket Tool (G) and set the foreground color to R=85 G=85 B=85, and then click inside your selection. When you're done, press Control-D to disable the selection.

Step 2
Convert your 'FlowerShadow' layer into a smart object, drag it right above the 'Background' layer, and then go to Filter > Blur > Gaussian Blur. Set the Radius to 30 px and click OK.

Step 3
With your 'FlowerShadow' layer still selected, go to Edit > Transform > Warp. Select Fisheye from the Warp menu, set the Bend to 10, and press Enter.

Step 4
Make sure that your 'FlowerShadow' layer is still selected, lower its Opacity to 10%, and change the Blending Mode to Linear Burn.

Step 5
Press Control-J to duplicate your 'FlowerShadow' layer.
Make sure that this new layer is selected and go again to Edit > Transform > Warp. Just increase the Bend to 30 and press Enter.

Step 6
Lower the Opacity of your 'FlowersShadow copy' layer to 5%.

7. How to Apply the Paper Texture for the Flower Typography
Download this pack of 21 Paper Textures, select 'Paper_21' and drag it inside your document.
Make sure that it covers your entire canvas, lower its Opacity to 70%, and change the Blending Mode to Multiply. With this final touch, your floral Photoshop tutorial is complete.

Congratulations! You're Done!
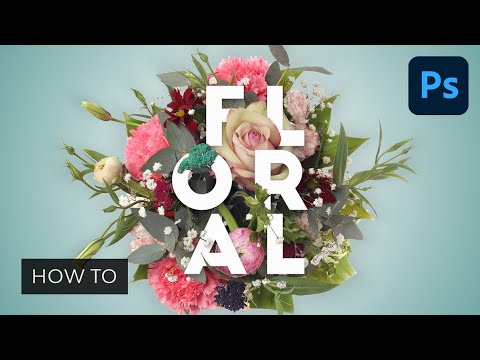
Here is how your floral typography should look. I hope you've enjoyed this floral Photoshop tutorial and can apply these techniques in your future projects. Don't hesitate to share your final flower text art in the comments section.
Feel free to adjust the final Photoshop flower text and make it your own. You can find some great sources of inspiration at Envato Elements, with interesting solutions to improve your flower word art.

Popular Flower Assets From Envato Elements
Envato Elements is an excellent resource for flower text effects, Photoshop effects for flowers, or floral overlays for Photoshop. Here's a short list of some of the most popular floral assets that you can find.
Hand Drawn Summer Flower Typography (AI, EPS, SVG, PNG)
Cut the hassle of learning how to create flower text art and use this hand-drawn flower text effect to create mesmerizing flower word art.

Watercolor Flower DIY Pack (PNG)
Create your own floral overlays for Photoshop in a few minutes by overlaying different premade elements from this pack of floral assets.

Bouqet Flower & Watercolor
Don't have the time to learn how to make floral typography? You can always use this SVG font instead to create amazing Photoshop flower text with just a few clicks.

Elegant Flower Brushes for Photoshop (ABR)
Take your flower text to the next level with this set of detailed flower brushes. You can use one of these 15 brushes to make your Photoshop effect for flowers stand out.

Watercolor Flowers, Backgrounds and Floral Overlays for Photoshop (JPG, PNG)
Using these hand-painted watercolor flowers, you can create wonderful floral overlays for Photoshop. You have 37 hand-painted illustrations and nine seamless patterns to choose from.

Want to Learn More?
We have loads of tutorials on Envato Tuts+, from beginner to intermediate level. Take a look!
 BrushesHow to Make a Flower Brush in Photoshop
 Vector50+ Best Rose Art Files (Vector & PSD)
 Poster DesignHow to Create a Poster Using Layer Masks in Adobe Photoshop
 Text EffectsCreate a Spectacular Grass Text Effect in Photoshop
 BrushesHow to Create a Leaf Brush in Photoshop
 Gradient Mesh ToolHow to Draw Heart-Shaped Daisies in Adobe Illustrator

No comments:
Post a Comment